Install Bold Booster on Magento 1
Bold Booster is an extension that makes it easy for merchants to access a diverse lineup of payment solutions, including Fastlane (US only), Venmo (US only), Pay Later, and other payment options customers prefer. Bold Booster seamlessly integrates with your existing checkout, so you can retain all your current customizations without any disruption or additional costs.
Setup
To set up Bold Booster on your Magento 1 store, complete the following steps.
Step 1: Install Bold Booster
Who's involved: Developer
- In your store's directory, navigate to the
app/code/communitylocation. - Create a new folder titled
Bold. - In the newly created Bold directory, create a new folder titled
CheckoutPaymentBooster. - Navigate to the Bold Checkout Payment Booster on Magento 1 repository. Download the repository contents (click the Code drop-down menu and select Download ZIP).
- Unzip the downloaded directory.
- Copy the contents of the unzipped directory to the
app/code/community/Bold/CheckoutPaymentBoosterlocation in your store's directory that you created in Step 2. - Navigate to the root directory (the parent directory of /app) and execute the following commands:
   cp app/code/community/Bold/CheckoutPaymentBooster/etc/modules/Bold_CheckoutPaymentBooster.xml app/etc/modules/
   cp -r app/code/community/Bold/CheckoutPaymentBooster/design/* app/design/
   cp -r ./app/code/community/Bold/CheckoutPaymentBooster/skin/* ./skin/
Step 2: Complete Bold Booster onboarding
Who's involved: Developer Merchant
- Clear your Magento Admin cache.
- Navigate to System > Cache Management.
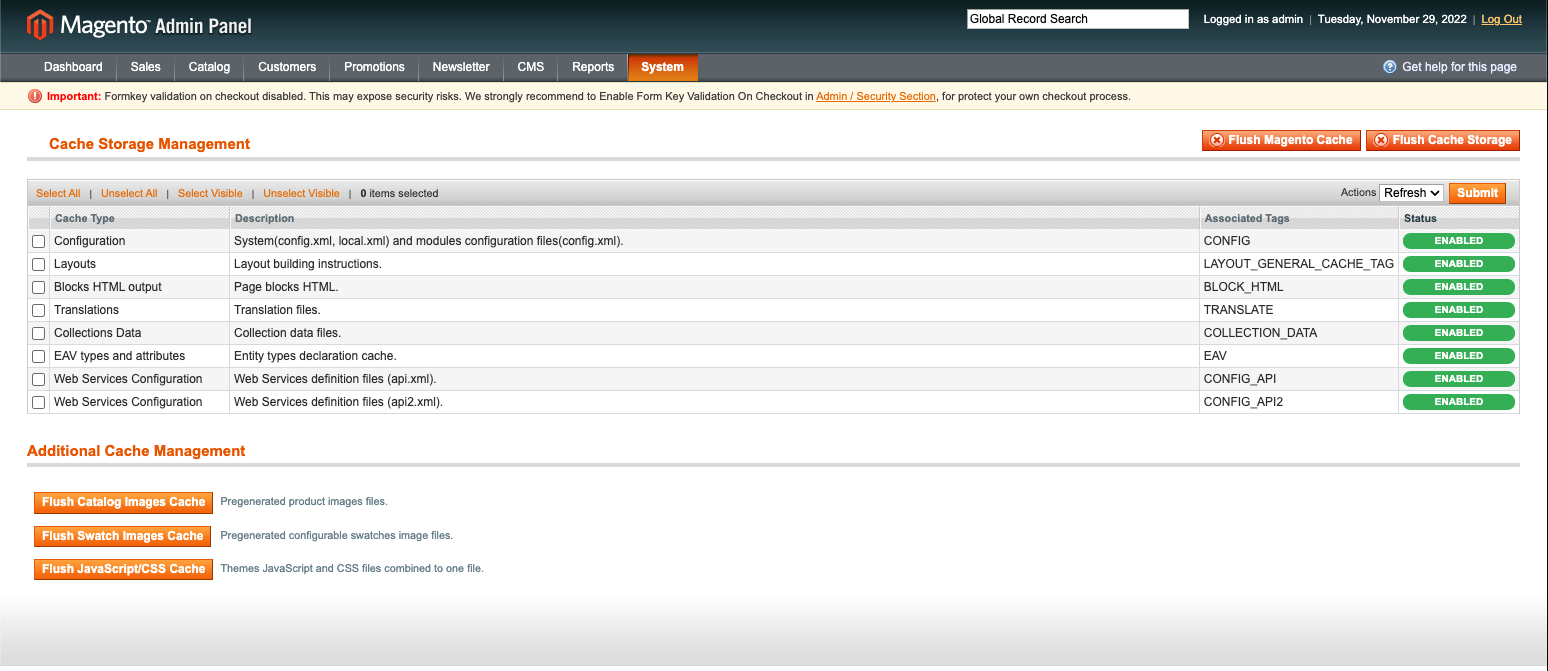
- Click the Flush Magento Cache button.
- Click the Flush Cache Storage button, then click OK on the confirmation pop-up message.
- Navigate to System > Cache Management.
- Navigate to System > Configuration.
- In the Sales section of the left-hand menu, click Checkout.
- In the Current Configuration Scope drop-down menu, select Main Website.
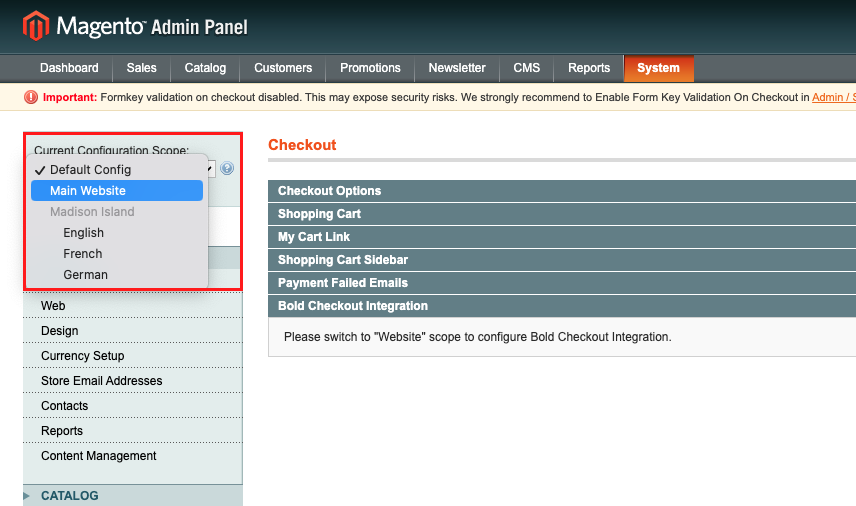
- A Bold Checkout onboarding banner appears on the page, prompting you to set up your store. Click the Connect with Bold button.
note
Ensure that your browser does not have any settings enabled that block cookies, such as "Incognito Mode" or similar "Do Not Track" (DNT) settings. These settings can cause an error when attempting to complete onboarding.
- A pop-up window appears. Follow the instructions in the window to create a Bold account if you haven't already.
- Connect your store. When entering your URL, remove the
http://orhttps://and any trailing slash (/). - Install Bold Checkout.
- On the Connect a payment gateway step, find the payment gateway you want to use and click Connect.
- Enter your payment gateway credentials. Refer to the following documentation for help setting up popular payment gateways with Bold Booster:
- Next to the payment gateway, click the ellipsis (...) and click Edit credentials to configure the gateway.
- (PayPal Complete Payments and Braintree) For Payment gateway name, specify a name for this gateway, or leave it as is. This name won't be visible to customers.
- For Currency, select the currency this gateway will use.
- (PayPal Complete Payments only) For PayPal account, confirm the email is the correct email associated with your PayPal business account.
- Under Payment Methods, select which payment method(s) you want this payment gateway to use. Refer to Connect payment gateways for details about which gateways support which payment methods.
- (Optional, PayPal Complete Payments only) Customize the appearance of the payment method buttons.
- Specify whether you want this gateway to use 3D Secure for card payments. Do not enable 3D Secure if you also enable Fastlane.
- Select whether you want to enable guest checkout using Fastlane by PayPal.
- Click Save.
- Copy the API access token.
caution
Ensure that you save the API access token in a safe place. You will need it for the next step.
- Click Close.
Step 3: Configure in the Magento 1 admin
Who's involved: Merchant
- If you are not already there, navigate to the System > Configuration page in the Magento admin.
- In the left-hand menu of the Configuration page, navigate to Sales > Checkout.
- In the Current Configuration Scope drop-down menu at the top of the page, select Main Website.
- Expand the Bold Checkout Payment Booster Extension section.
- For the Enabled Payment Booster drop-down, select Yes.
- For the Enable Digital Wallets in Express Checkout drop-down, if you want payment options to appear above the shipping step, select Yes. Otherwise, select No.
note
If your checkout has mandatory checkboxes after the payment step, such as terms and conditions or a GDPR confirmation, you must select No.
- (Optional, PayPal Complete Payments only) To further streamline checkout, enable digital wallets (such as PayPal, Apple Pay, or Google Pay) on the cart or product pages.
- Enable Digital Wallets in Cart: If you select Yes, additional payment buttons will appear on the cart page, separate from your existing checkout button.
- Enable Digital Wallets in Mini Cart: If you select Yes, payment buttons will appear in the mini cart pop-up.
- Enable Digital Wallets on Product Page: If you select Yes, payment buttons will display directly on all product detail pages.
- Empty Cart Before Adding Digital Wallets Product: If you select Yes, the store will clear existing items from a customer's cart when they check out from a product detail page.
- Populate the API Token field using the API access token you copied during onboarding.
- (Optional) To customize styling, expand Bold Checkout Payment Booster Advanced Settings.
- (Optional) If you want to edit the Payment Method title, open etc/config.xml. Find the
<title>tag on lines 145, 150, or both, and replaceBold PaymentsorCredit Cardwith your preferred title. - Click the Save Config button in the top right.
Step 4: Enable Fastlane (optional)
Who's involved: Merchant
Fastlane by PayPal offers a streamlined checkout experience to existing Fastlane customers and allows new customers to quickly and easily save their payment and shipping information for a seamless checkout experience in the future. Customers can use Fastlane wherever it's available on the internet, allowing you to leverage a network of millions of PayPal customers.
Install and configure Fastlane with Bold Booster to reduce steps in checkout, boosting conversions and increasing lifetime customer value.
Fastlane requirements
- A store located in the United States, selling in USD, on one of the following platforms:
- Adobe Commerce
- Magento Open Source
- Magento 1
- OpenCart
- Gravity Forms
- A PayPal Complete Payments or Braintree Credit Card payment gateway.
- Fastlane does not currently support 3D Secure.
- Fastlane enabled in your PayPal account. Refer to PayPal's documentation for enabling Fastlane with PayPal Complete Payments or Braintree.
- Log in to Bold Account Center and open Bold Checkout.
- Navigate to Payment options > Payment gateways.
- Next to PayPal Complete Payments or Braintree, click on the ellipsis to edit the settings.
- Check the box to enable Fastlane by PayPal.
- (Optional) Click Style Fastlane to edit additional style settings.
- Click Save.
- In the Magento admin, navigate to System > Configuration.
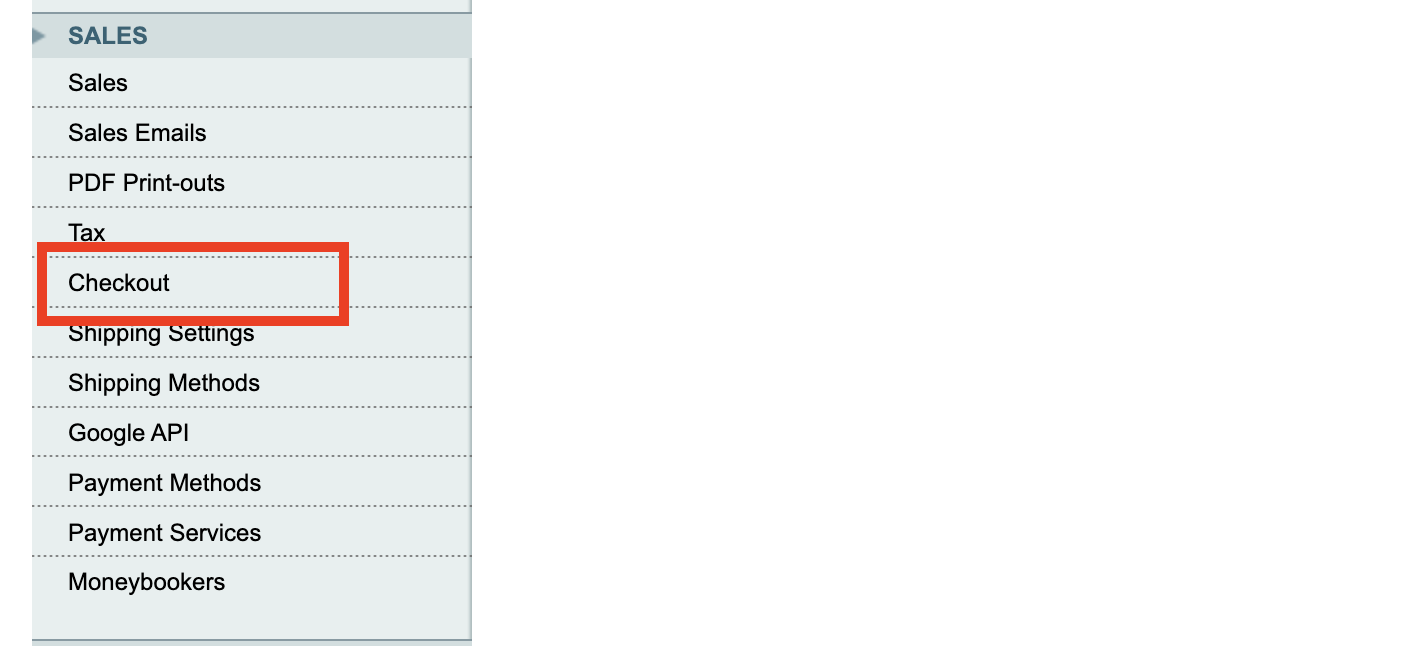
- In the left-hand menu of the Configuration page, navigate to Sales > Checkout.
- In the Current Configuration Scope drop-down menu, select Main Website.
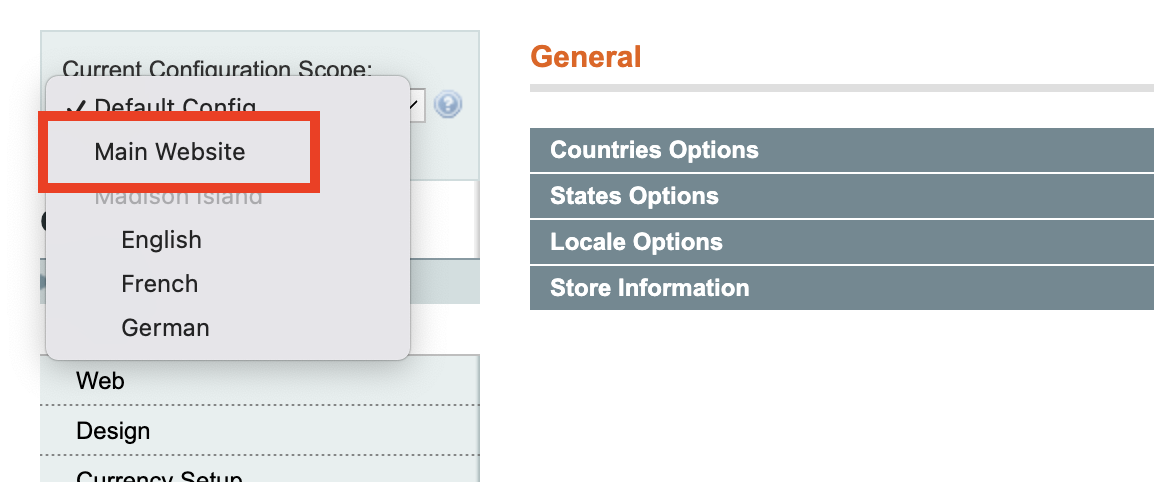
- Under Bold Checkout Payment Booster Extension, for Enabled Payment Booster, select Yes if you haven't already. A Fastlane field appears.
- For Enabled PayPal Fastlane, select Yes.
- For Enable Express Pay, ensure you have selected Yes. This is required for Fastlane to work correctly.
- Click Save Config.
- Navigate to System > Cache Management and click Flush Magento Cache.
Customer experience: Existing PayPal customer with a Fastlane profile
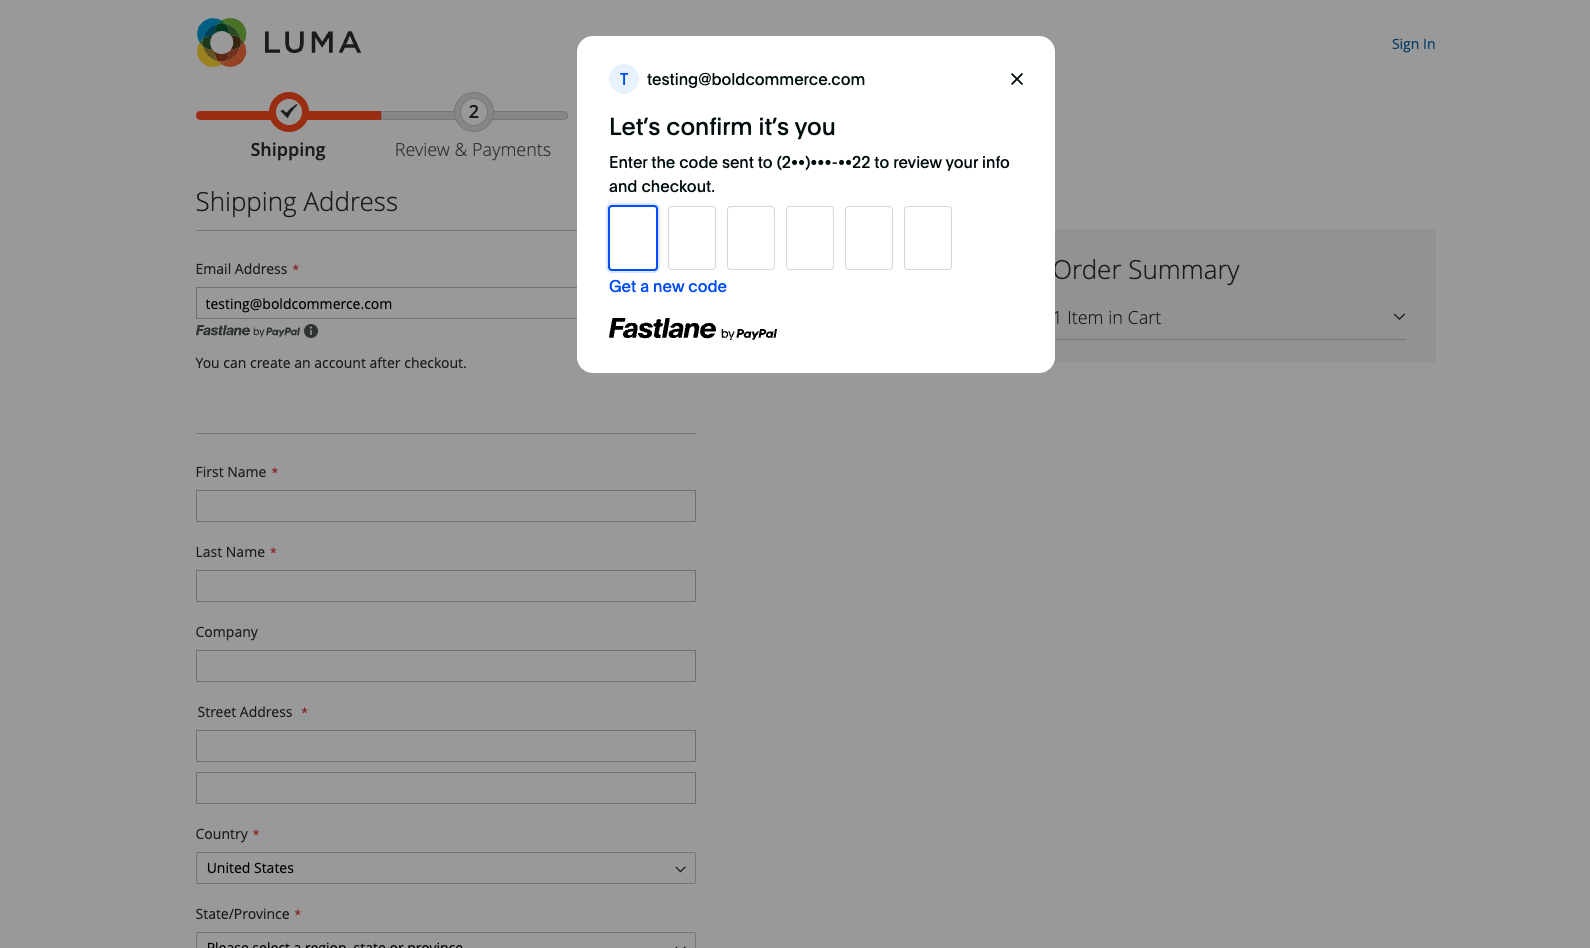
When the customer enters a PayPal associated email in the checkout, they receive a verification code by text which they can then enter into the checkout. Once validated, the checkout is automatically populated with their saved shipping, billing, and payment information. From here, they can either complete the order, or they can adjust their checkout information.
Customer experience: Customer without a Fastlane profile or PayPal-associated email address
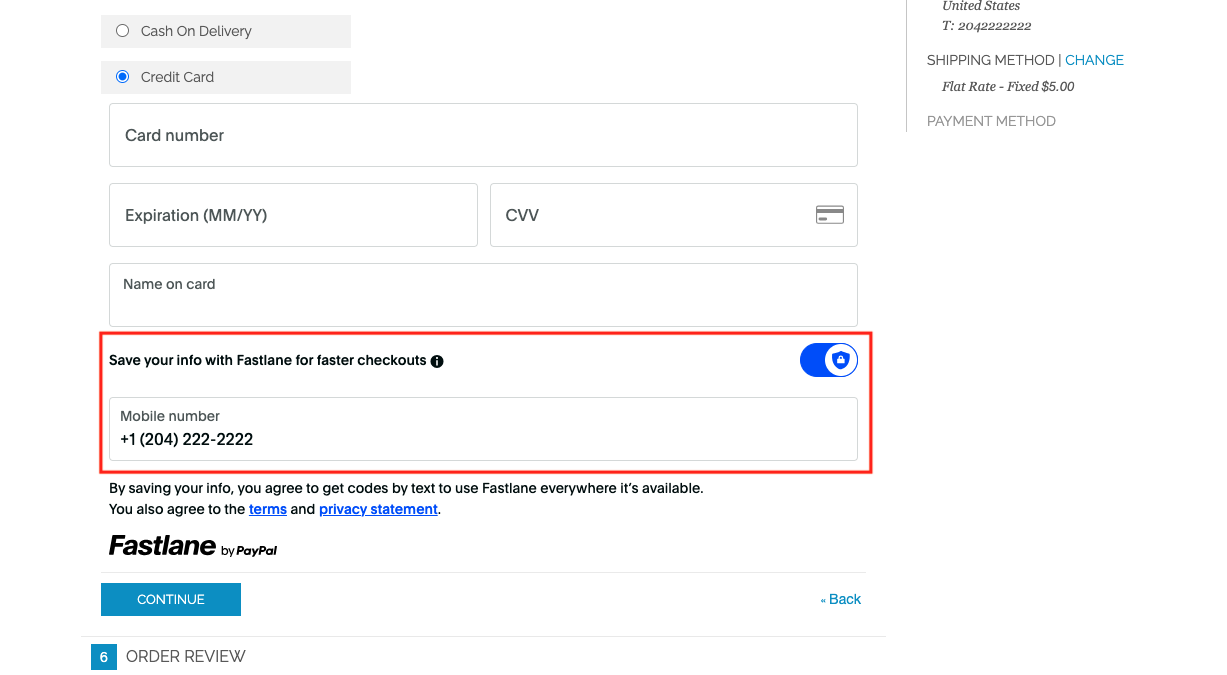
When the customer proceeds to the checkout, they enter their email address, shipping information, and payment information as usual. If the customer consents to save their payment profile with Fastlane (enabled by default) on the payment information page, a Fastlane profile is automatically created once they complete their order. Customers can also manually disable Fastlane account consent if they do not wish to save a Fastlane profile.
Fastlane opt-in is only displayed to customers located in the United States.
Step 5: Configure security settings
Who's involved: Developer DevOps/Security
Configure your security settings so Bold can communicate with your store.
Your store setup might have firewalls in place that restrict incoming and outgoing network traffic, allowing only a predefined set of IP addresses. For Bold's integrations to function, Bold domains must be able to make requests to your application. This means you must add specific domains or IP addresses to your allowlist.
- Add the following domains to your allowlist:
https://api.boldcommerce.comhttps://checkout.boldcommerce.com
- Add the following IP addresses to your allowlist:
34.118.185.13034.152.35.11735.234.253.9535.234.240.21434.152.62.19535.203.83.16934.95.4.13435.203.123.9535.203.41.1535.203.111.21835.203.12.9434.152.48.935.203.70.9034.152.57.7934.152.40.16935.203.98.4935.234.243.14734.118.146.18834.152.1.13434.152.7.13635.234.248.10735.234.247.24635.203.50.15634.95.47.12435.203.8.16235.203.89.9935.203.5.16434.95.58.19635.203.82.9135.234.246.935.203.57.13935.203.27.12334.152.60.21135.203.79.153
- If your security system filters traffic based on headers, add the
User-Agentheader with a value ofBold-APIto your allowlist.
For more information about allowlisting and Bold's security configuration requirements, refer to the security concepts overview.
Next steps
After installing Bold Booster on your store, you can:
- Update your payment gateway settings at any time
- Learn more about how Bold handles payment information
- Troubleshoot issues
If you need help onboarding, please submit a support ticket. Or, if you have a Bold representative working with you, add them as a support user on your store and contact them for further help.