Install Bold Booster on Gravity Forms
Bold Booster is an extension that makes it easy for merchants to access a diverse lineup of payment solutions, including Fastlane (US only), Venmo (US only), Pay Later, and other payment options customers prefer. Bold Booster seamlessly integrates with your existing checkout, so you can retain all your current customizations without any disruption or additional costs.
Requirements
- WordPress 3.7 or later
- Gravity Forms 1.9.17 or later
- PHP 5.6 or later
Setup
To set up Bold Booster on Gravity Forms, complete the following steps.
Step 5: Configure security settings
Who's involved: Developer DevOps/Security
Configure your security settings so Bold can communicate with your store.
Your store setup might have firewalls in place that restrict incoming and outgoing network traffic, allowing only a predefined set of IP addresses. For Bold's integrations to function, Bold domains must be able to make requests to your application. This means you must add specific domains or IP addresses to your allowlist.
- Add the following domains to your allowlist:
https://api.boldcommerce.comhttps://checkout.boldcommerce.com
- Add the following IP addresses to your allowlist:
34.118.185.13034.152.35.11735.234.253.9535.234.240.21434.152.62.19535.203.83.16934.95.4.13435.203.123.9535.203.41.1535.203.111.21835.203.12.9434.152.48.935.203.70.9034.152.57.7934.152.40.16935.203.98.4935.234.243.14734.118.146.18834.152.1.13434.152.7.13635.234.248.10735.234.247.24635.203.50.15634.95.47.12435.203.8.16235.203.89.9935.203.5.16434.95.58.19635.203.82.9135.234.246.935.203.57.13935.203.27.12334.152.60.21135.203.79.153
- If your security system filters traffic based on headers, add the
User-Agentheader with a value ofBold-APIto your allowlist.
For more information about allowlisting and Bold's security configuration requirements, refer to the security concepts overview.
Step 2: Install Bold Booster
Who's involved: Developer
Install Bold Booster to your WordPress store to start the setup process.
- Contact Bold to access the Bold Booster on Gravity Forms code package.
- Log in to your WordPress admin account and navigate to Plugins > Add New.
- Click Upload.
- Select the code files you received from Bold and click Install Now.
- Navigate to Installed Plugins on the left.
- Find Bold Checkout for Gravity Forms and click Activate.
Gravity Forms offers additional ways to install add-ons. Refer to Gravity Forms documentation for details.
Step 3: Complete Bold Booster onboarding
Who's involved: Developer Merchant
- In WordPress, navigate to Forms > Settings > Bold Commerce.
- Click Connect with Bold.
note
Ensure that your browser does not have any settings enabled that block cookies, such as "Incognito Mode" or similar "Do Not Track" (DNT) settings. These settings can cause an error when attempting to complete this step.
- A pop-up window appears. Follow the instructions in the window to create a Bold account if you haven't already.
- Connect your store. When entering your URL, remove the
http://orhttps://and any trailing slash (/). - Install Bold Checkout.
- On the Connect a payment gateway step, find the payment gateway you want to use and click Connect.
- Enter your payment gateway credentials. Refer to the following documentation for help setting up popular payment gateways with Bold Booster:
- Next to the payment gateway, click the ellipsis (...) and click Edit credentials to configure the gateway.
- (PayPal Complete Payments and Braintree) For Payment gateway name, specify a name for this gateway, or leave it as is. This name won't be visible to customers.
- For Currency, select the currency this gateway will use.
- (PayPal Complete Payments only) For PayPal account, confirm the email is the correct email associated with your PayPal business account.
- Under Payment Methods, select which payment method(s) you want this payment gateway to use. Refer to Connect payment gateways for details about which gateways support which payment methods.
- (Optional, PayPal Complete Payments only) Customize the appearance of the payment method buttons.
- Specify whether you want this gateway to use 3D Secure for card payments. Do not enable 3D Secure if you also enable Fastlane.
- Select whether you want to enable guest checkout using Fastlane by PayPal.
- Click Save.
- Copy the API access token.
caution
Ensure that you save the API access token in a safe place. You will need it for the next step.
- Click Close.
Step 4: Enter the API token
Who's involved: Developer Merchant
- If you are not already there, navigate to Forms > Settings > Bold Commerce.
- In the API Token field, paste the API token you copied during onboarding.
- Save the settings.
Step 5: Create a form
Who's involved: Developer Merchant
Add and configure a new form type to make Gravity Forms work with Bold.
- In the left-hand menu, click Forms > New Form and create a blank form.
- Specify a form title and optional description.
- In the field selector panel on the right, navigate to the Pricing Fields section.
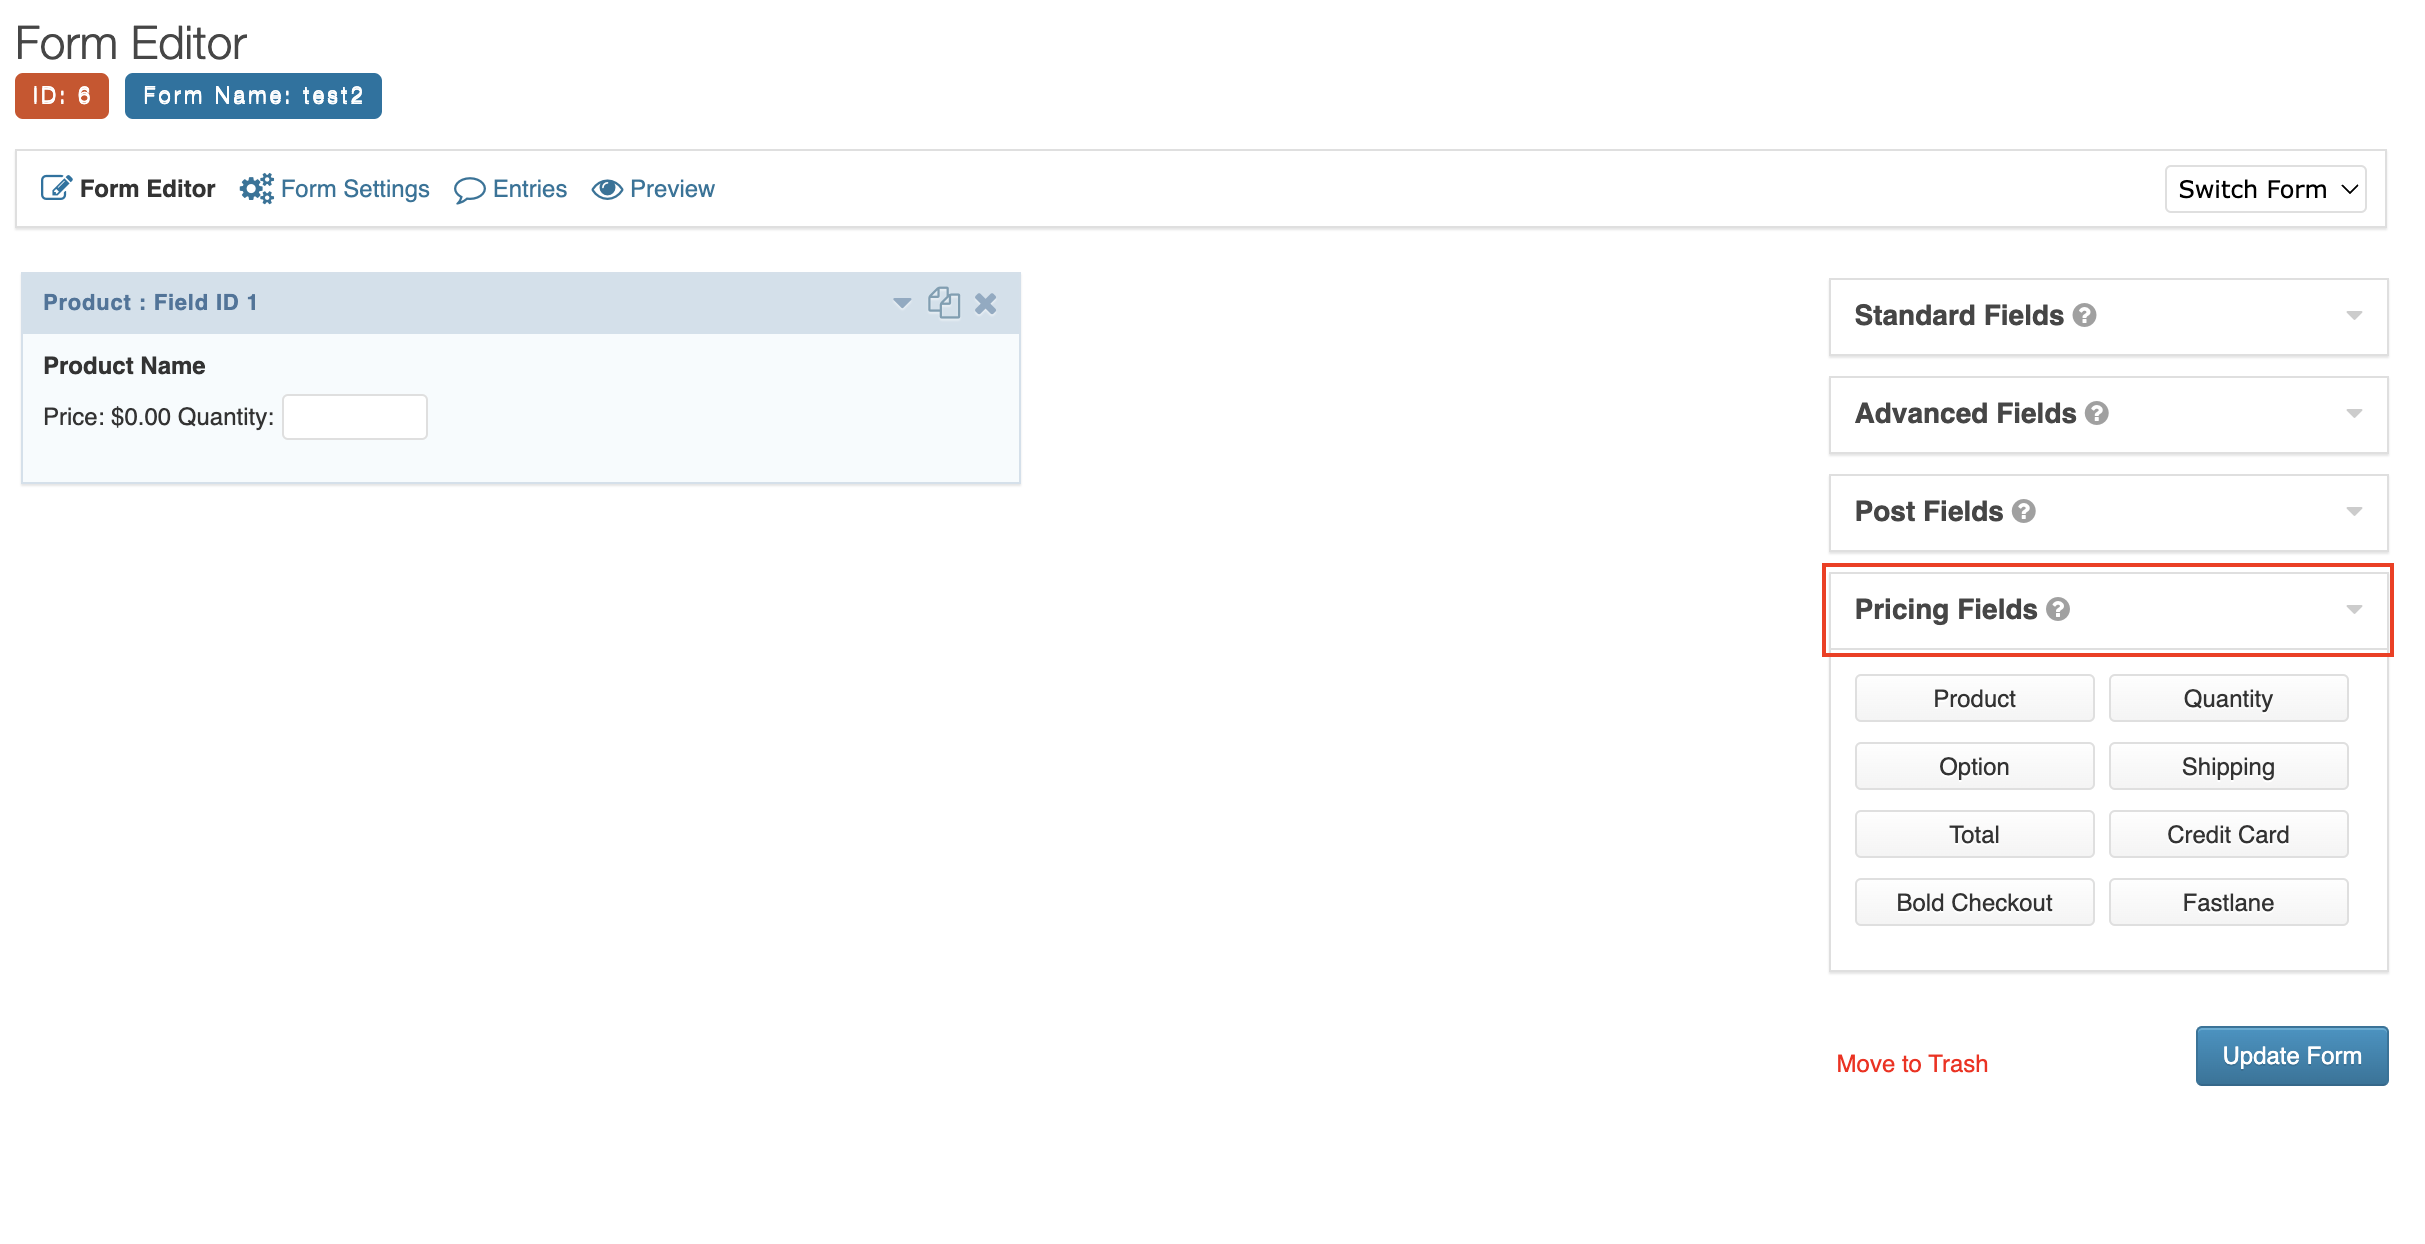
- Select Product to add and configure the product you want to offer in this form.
- Select the Product field you just created to configure its options. This opens the field settings.
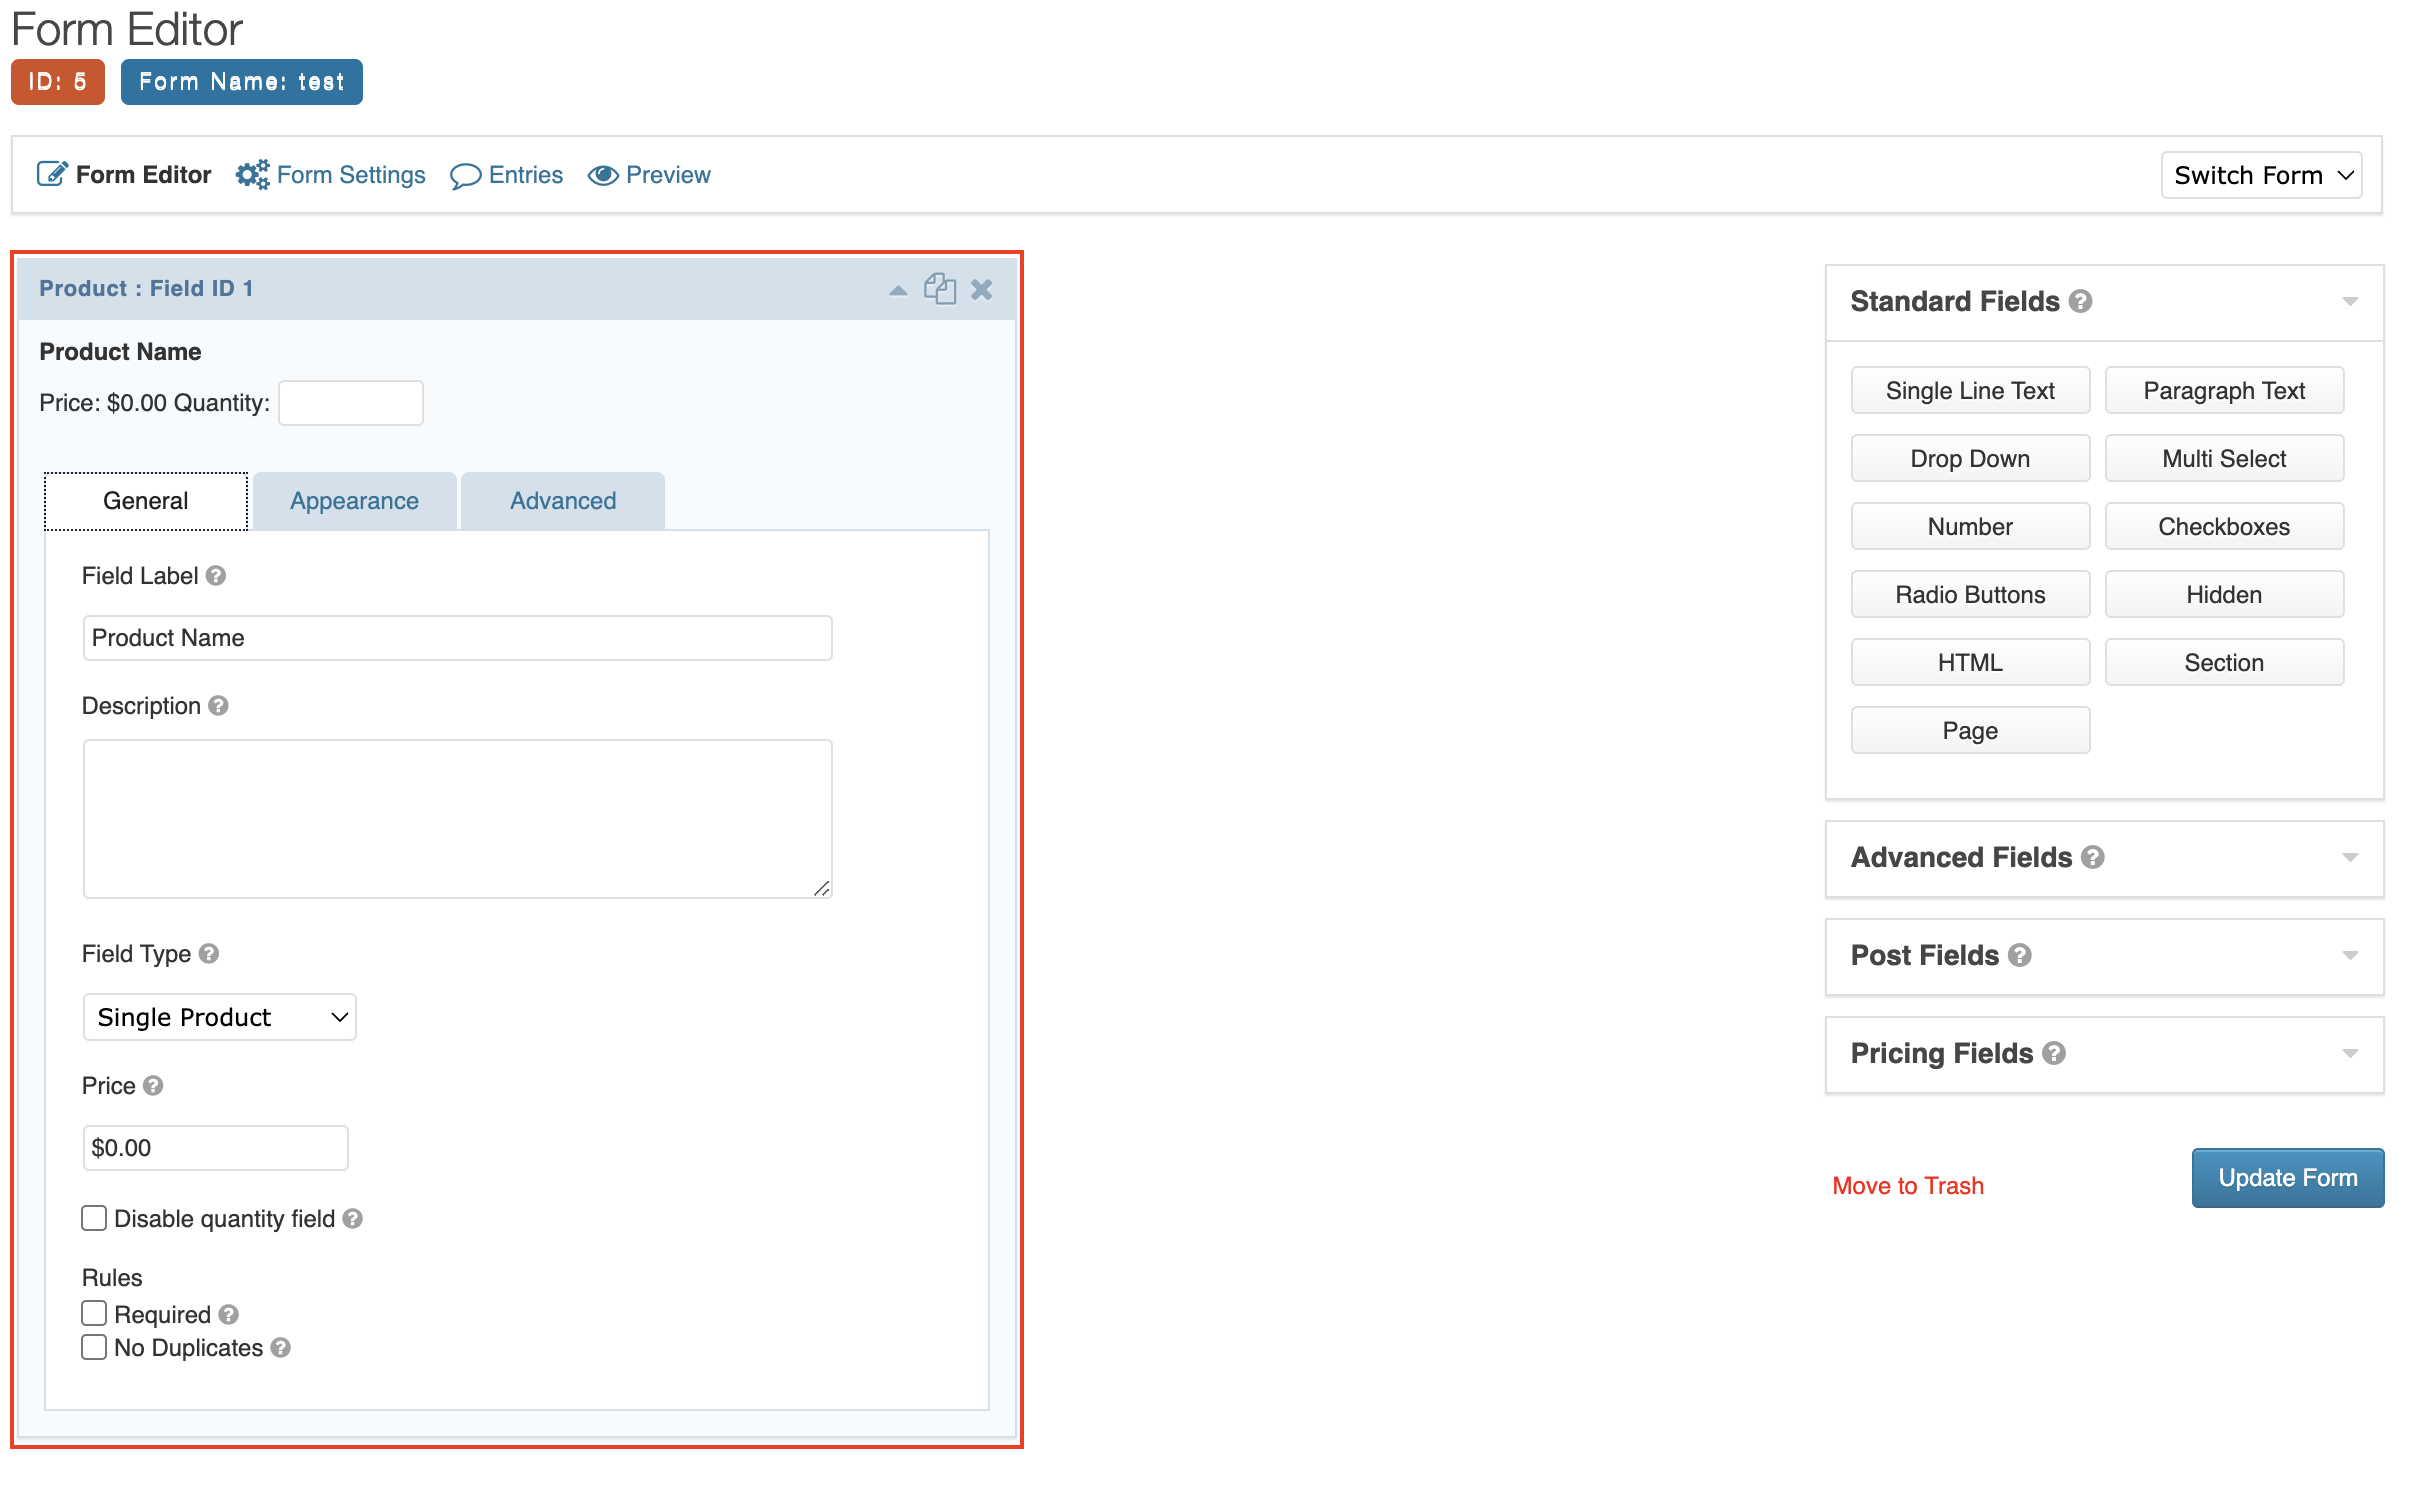
- In the General section of the field settings, specify a name and price for the product. All other fields are optional.
- Under Field Type, select whether this field represents a single product or a list of multiple products customers can choose from. If you choose to include multiple products, include a name and price for each.
- (Optional) Fill out any other fields with more information.
- Add more Product fields or options as needed for every product you want to include in the form.
note
For Gravity Forms to work seamlessly with Bold, keep product fields at the beginning of the form. Moving the fields to a different location can result in errors.
- (Optional) In the field selector panel, in the Pricing Fields section, add the Option pricing field and specify any extra fees, other than shipping, to add to orders at checkout.
- In the field selector panel, under Advanced Fields, add each of the following fields:
- Name
- Address field for billing address
- Address field for shipping address (if selling physical products)
note
If you do not add these fields, Bold will not work with Gravity Forms.
- Under Pricing Fields, add a Shipping field and configure its options.
- Choose between offering a single shipping method or add drop-down or radio buttons for multiple shipping options.
- In the Label for each shipping method, specify a name and price.
- Set the shipping options to Required.
- Under Pricing Fields, add the Total field.
- If you want to use Fastlane in your checkout, follow these steps to enable Fastlane in the Bold Account Center and on the form you're creating.
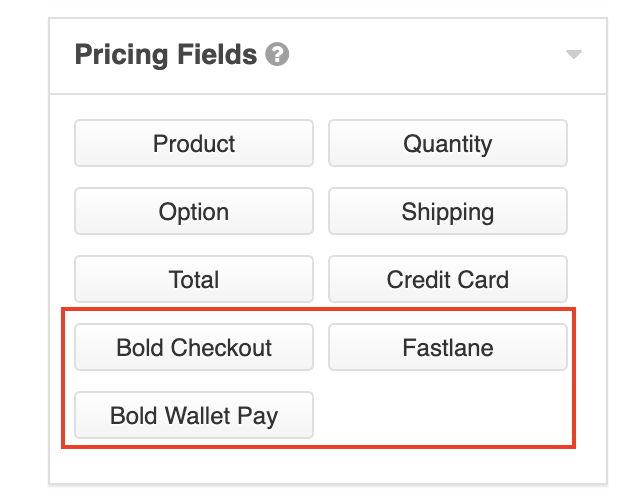
- Add a Bold Checkout, Bold Wallet Pay, or Fastlane field. This is where the payment step will load. To ensure the best customer experience, Bold recommends this field be the final step of the checkout process.
note
Do not use the Bold Checkout field and the Fastlane field in the same form.
- Save the form.
Step 6: Create a feed for the form
Who's involved: Developer Merchant
Set up a Bold feed to define how your store processes information from the form.
- In the left-hand menu, click Forms and find the form you just created.
- Click Settings > Bold Commerce > Add new.
- Specify a name for your feed.
- Under Transaction Type, select Products and Services.
note
Bold Booster on Gravity Forms does not support subscriptions.
- For Payment Amount, select Form Total.
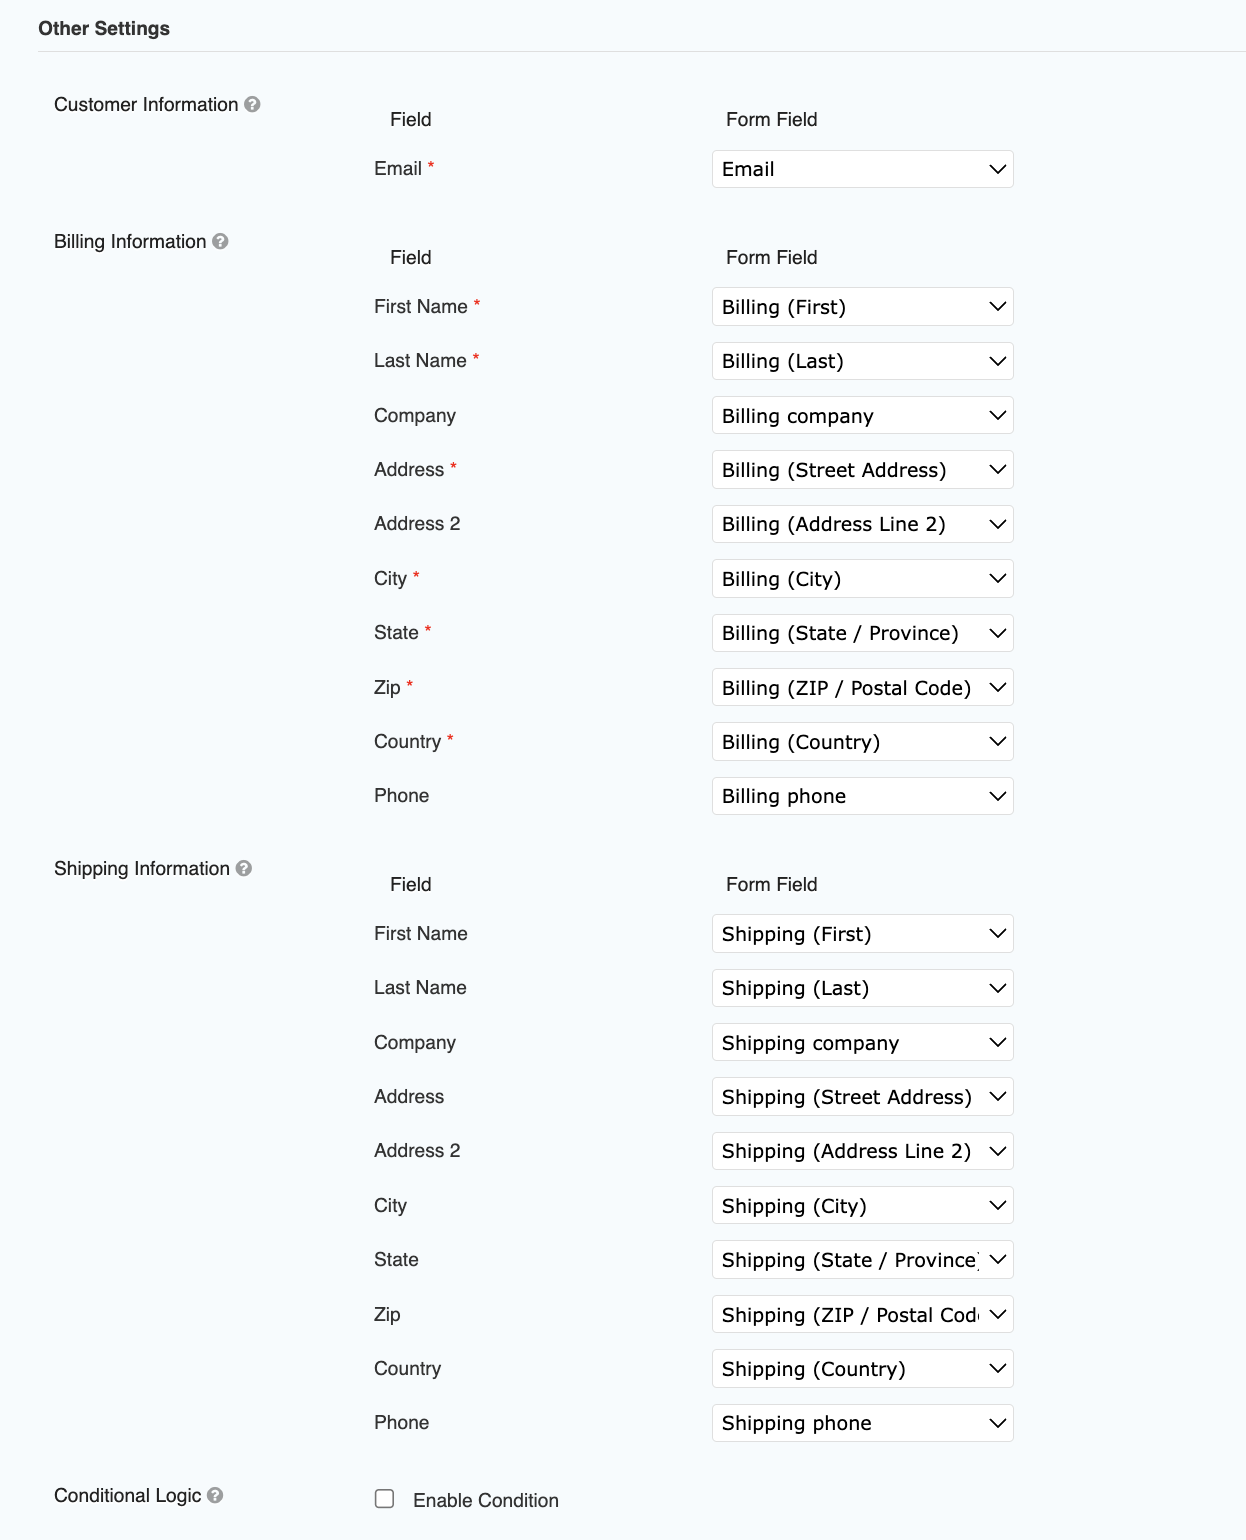
- Under Other Settings, map your required fields in the billing address to the form fields you had previously created.
- (Optional) Map your required fields in the shipping address to the form fields you created in the previous steps. If you choose to not map the shipping forms, Bold will use the same mapping you set for billing addresses.
- Save the feed.
The following image shows an example of a successfully mapped feed for a form using Bold.
 For more information about using feeds in Gravity Forms, refer to Gravity Forms documentation.
Step 7: Create the form page
Who's involved: Developer Merchant
Create a page to display your form so customers can use it for checkout.
- In the left-hand menu, go to Pages > Add New.
- Specify a Page title.
- Add the form to the page.
- Gravity Forms version 1.9:
- Click the Add form button under the page title field.
- Select the form and click Insert form.
- Gravity Forms version 2.0 or later:
- Click + in top left corner and search
form. - In the drop-down menu that appears, select the form you created.
- Click + in top left corner and search
- Gravity Forms version 1.9:
- Click Publish.
Step 8: Create the confirmation page
Who's involved: Developer Merchant
Create the page customers will see after submitting an order.
- In the left-hand menu, go to Forms > Forms.
- In the list of forms, locate the form you want to create a confirmation page for.
- Hover over the title of the form and click Settings > Confirmations.
- Click to edit the Default Confirmation.
- Next to Confirmation Type, ensure Text is selected.
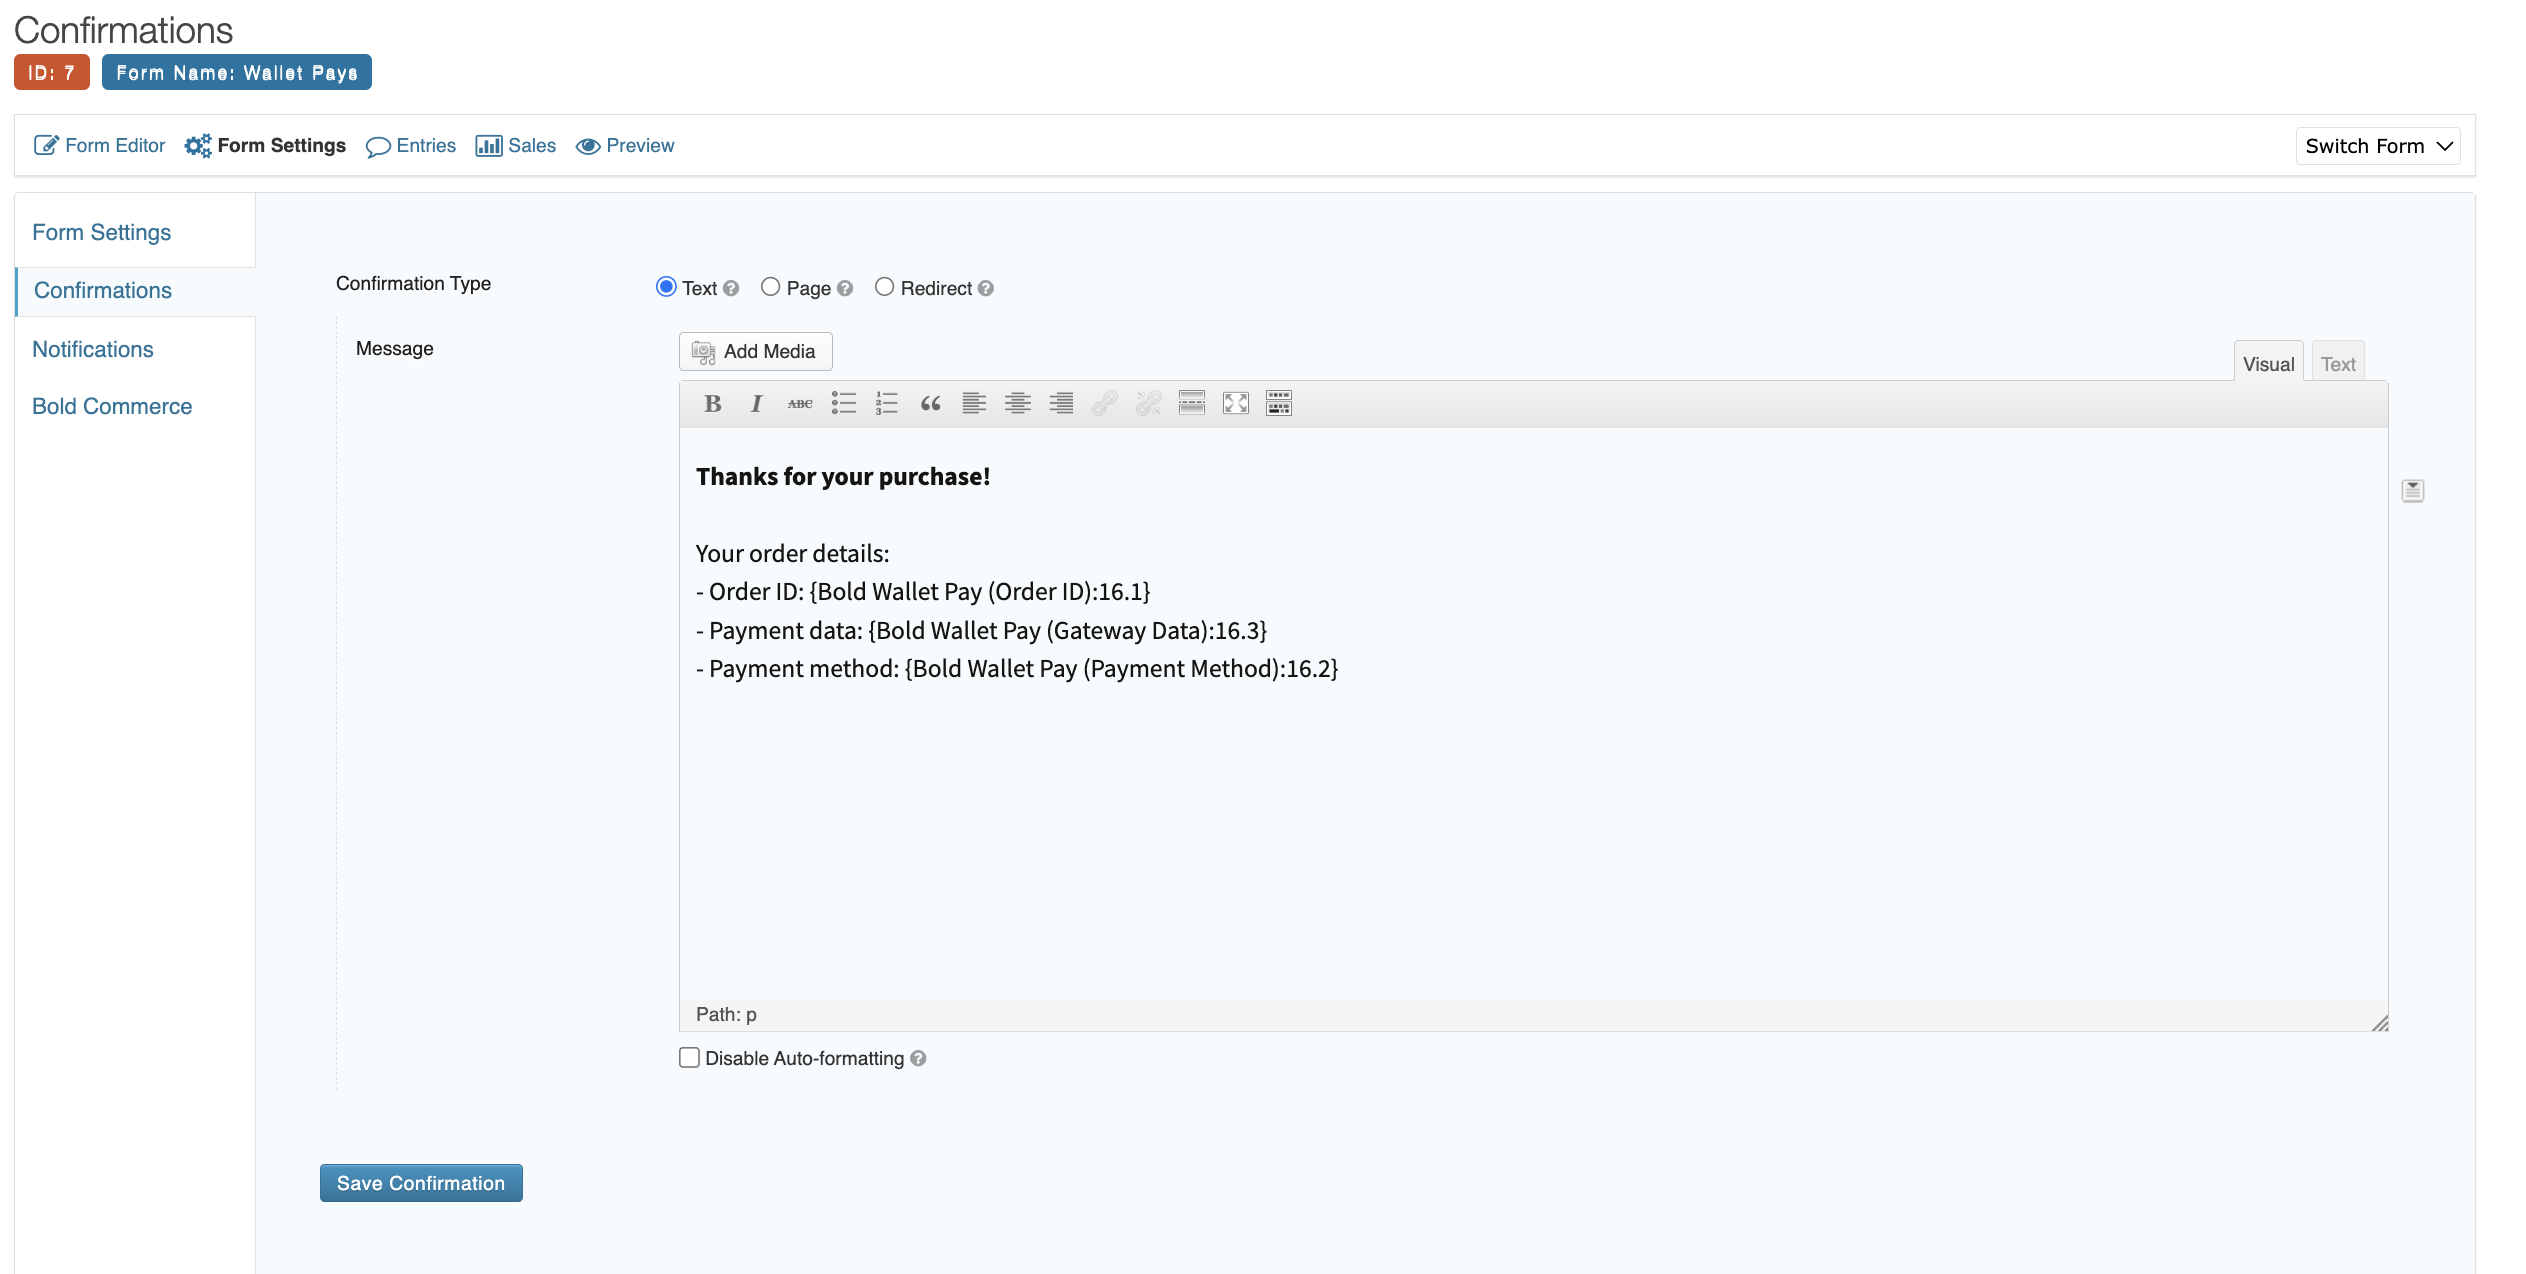
- Write the confirmation text you want customers to see. Example:
Thanks for your purchase!
Your order details:
Order ID:
Payment info:
Payment method:
- Add tags to the confirmation text so that it pulls in the customer's order information:
- On the right, click the Merge tags icon and scroll down to the tags that start with
Bold.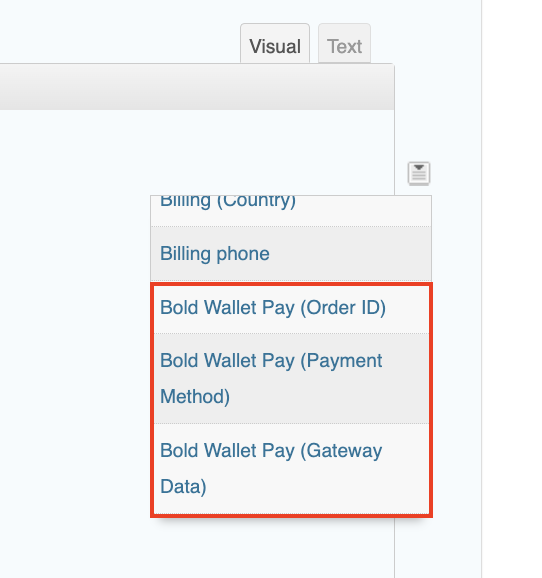
- Add each tag to the corresponding place in your confirmation message. Example:
- On the right, click the Merge tags icon and scroll down to the tags that start with
- Leave the Disable Auto-formatting box unchecked.
- Click Save Confirmation.
Step 9: Enable Fastlane (optional)
Who's involved: Merchant
Fastlane by PayPal offers a streamlined checkout experience to existing Fastlane customers and allows new customers to quickly and easily save their payment and shipping information for a seamless checkout experience in the future.
Install and configure Fastlane with Bold Booster to reduce steps in checkout, boosting conversions and increasing lifetime customer value.
Customers can use Fastlane wherever it's available on the internet, allowing you to leverage a network of millions of PayPal customers.
Fastlane requirements
- A store located in the United States, selling in USD.
- A PayPal Complete Payments or Braintree Credit Card payment gateway.
- Fastlane does not currently support 3D Secure.
- Fastlane enabled in your PayPal account. Refer to PayPal's documentation for enabling Fastlane with PayPal Complete Payments or Braintree.
- Log in to Bold Account Center and open Bold Checkout.
- Navigate to Checkout > Payment Settings.
- Next to PayPal Complete Payments or Braintree Credit Card, click on the ellipsis to edit the settings.
- Check the box to enable Fastlane by PayPal.
- Click Save.
- In Gravity Forms, when creating a form, place the Fastlane field at the end of the form to use Fastlane in your checkout experience.
- Continue with creating a feed for the form.
Customer experience: Existing PayPal customer with a Fastlane profile
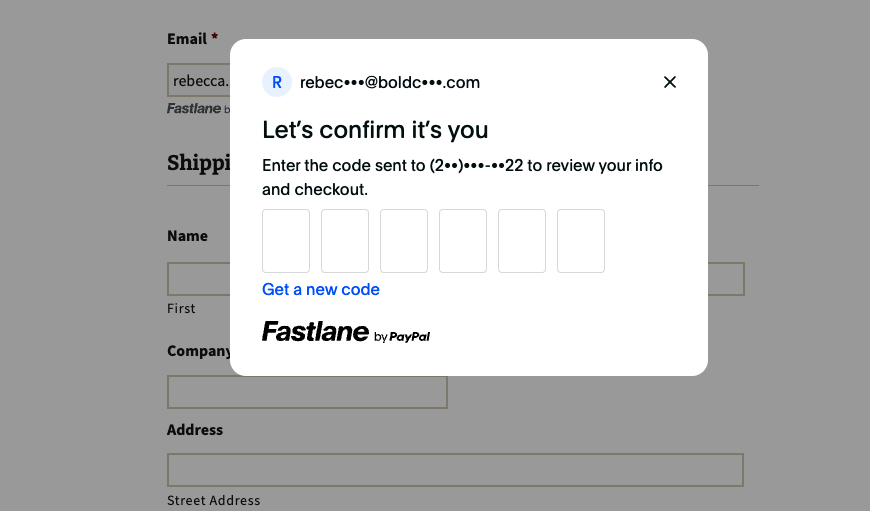
When the customer enters a PayPal associated email in the checkout, they receive a verification code by text which they can then enter into the checkout. Once validated, the checkout is automatically populated with their saved shipping, billing, and payment information. From here, they can either complete the order, or they can adjust their checkout information.
Customer experience: Customer without a Fastlane profile or PayPal-associated email address
When the customer proceeds to the checkout, they enter their email address, shipping information, and payment information as usual. If the customer consents to save their payment profile with Fastlane (enabled by default) on the payment information page, a Fastlane profile is automatically created once they complete their order. Customers can also manually disable Fastlane account consent if they do not wish to save a Fastlane profile.
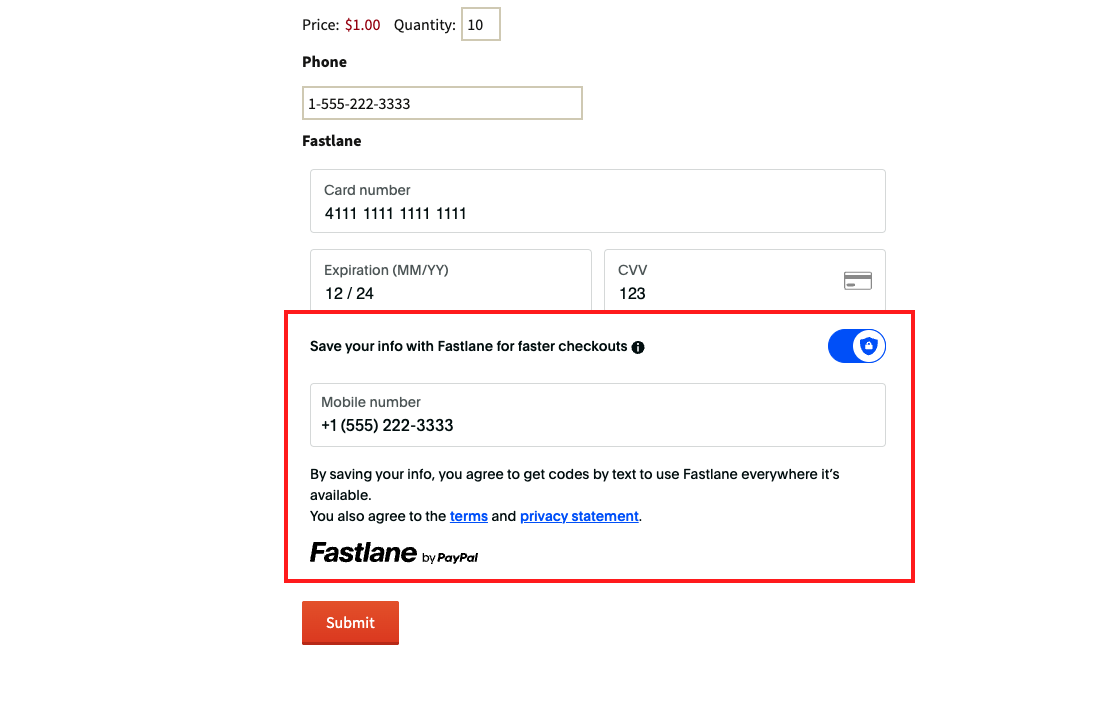
Fastlane opt-in is only displayed to customers located in the United States.
Next steps
After installing Bold Booster on your store, you can:
- Update your payment gateway settings at any time
- Learn more about how Bold handles payment information
- Troubleshoot issues
If you need help onboarding, please submit a support ticket. Or, if you have a Bold representative working with you, add them as a support user on your store and contact them for further help.