Install Bold Booster for Quickbooks Payments on Adobe Commerce (Magento 2)
Step 1: Install Bold Booster
Who's involved: Developer
- Install using Composer (recommended)
- Install manually
- Open your terminal and navigate to your Adobe Commerce/Magento project directory.
- Run the following Composer command to install Bold Booster:
composer require bold-commerce/module-checkout-payment-booster
- Enable the extension using the following commands:
php bin/magento setup:di:compile
php bin/magento setup:upgrade
- If you're using a 2.3.x version of Adobe Commerce, apply the following patch so Bold's content security policy (CSP) works correctly with your store:
patch < vendor/bold-commerce/module-checkout-payment-booster/patches/CSP-PAYMENT-BOOSTER_2.3.x.patch
If you're not sure what Adobe Commerce version you have, follow Adobe Commerce's documentation to find out.
- In the command line, log in to the Magento server.
- Navigate to the root directory of your website (the parent directory of the
./appdirectory). - In the root directory, open the
./app/codedirectory.
cd ./app/code
- Create a directory named
Boldand navigate into it.
mkdir Bold
cd Bold
- Access the ZIP file in one of the following ways:
- Use the command line to download the file from Packagist using the GitHub link for the latest release.
- Example using
wget:
wget https://github.com/bold-commerce/adobe-commerce-bold-checkout-payment-booster/archive/refs/tags/v2.4.2.zip
- Example using
curl:
curl -LO https://github.com/bold-commerce/adobe-commerce-bold-checkout-payment-booster/archive/refs/tags/v2.4.2.zip
- If you use CPanel, Plesk, or FileManager, download the Source code ZIP file from the GitHub release page and upload it to your server.
- Unzip the file you downloaded.
unzip <name of the file>
- Rename the unzipped file to
CheckoutPaymentBooster. For example:
mv adobe-commerce-bold-checkout-payment-booster-2.2.7 CheckoutPaymentBooster
- Navigate back to the root directory (the parent directory of the
./appdirectory). - Enable the extension using the following commands:
php bin/magento setup:di:compile
php bin/magento setup:upgrade
- If you're using a 2.3.x version of Adobe Commerce, apply the following patch to add rules to your store's Content Security Policy (CSP). These rules ensure Bold assets load correctly on your store.
patch < app/code/Bold/CheckoutPaymentBooster/patches/CSP-PAYMENT-BOOSTER_2.3.x.patch
If you're not sure what Adobe Commerce version you have, follow Adobe Commerce's documentation to find out.
- (Optional) Run the following command to ensure your website's CSS, admin menu, and other elements function correctly.
php bin/magento setup:static-content:deploy
- Check the status of the Bold module. Some stores will disable the module by default.
php bin/magento module:status
- If the module is disabled, enable it.
php bin/magento module:enable Bold_CheckoutPaymentBooster
Step 2: Complete Bold Booster onboarding
Who's involved: Developer Merchant
-
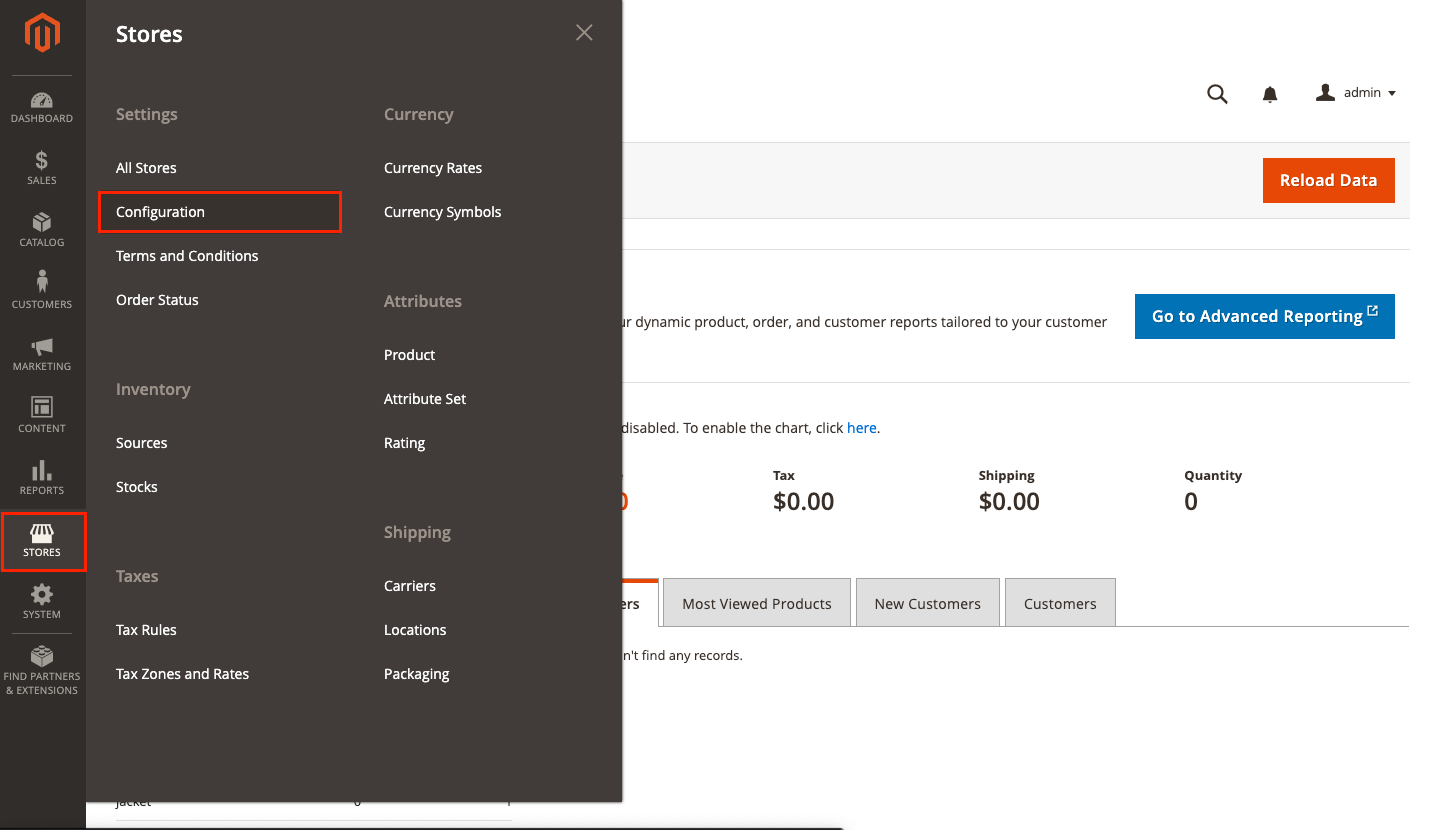
In the Adobe Commerce admin, navigate to Stores > Configuration.
-
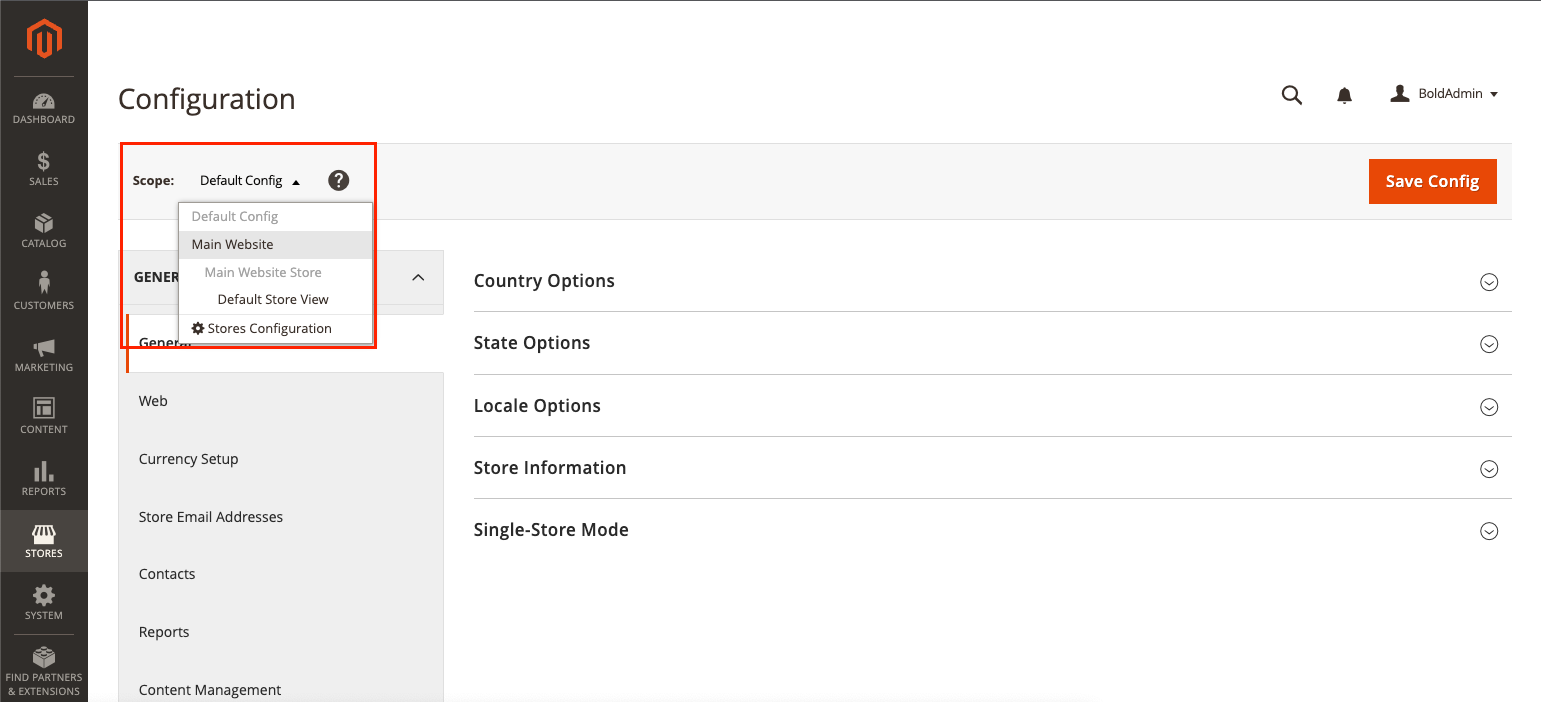
In the Scope drop-down menu at the top of the page, select the website where you're setting up Bold. This option is often called Main Website, but you might have renamed it to match your website name. In the dropdown, it's usually directly below the Default Config option.
noteIn Adobe Commerce versions earlier than 2.4, this drop-down is titled Store View.
-
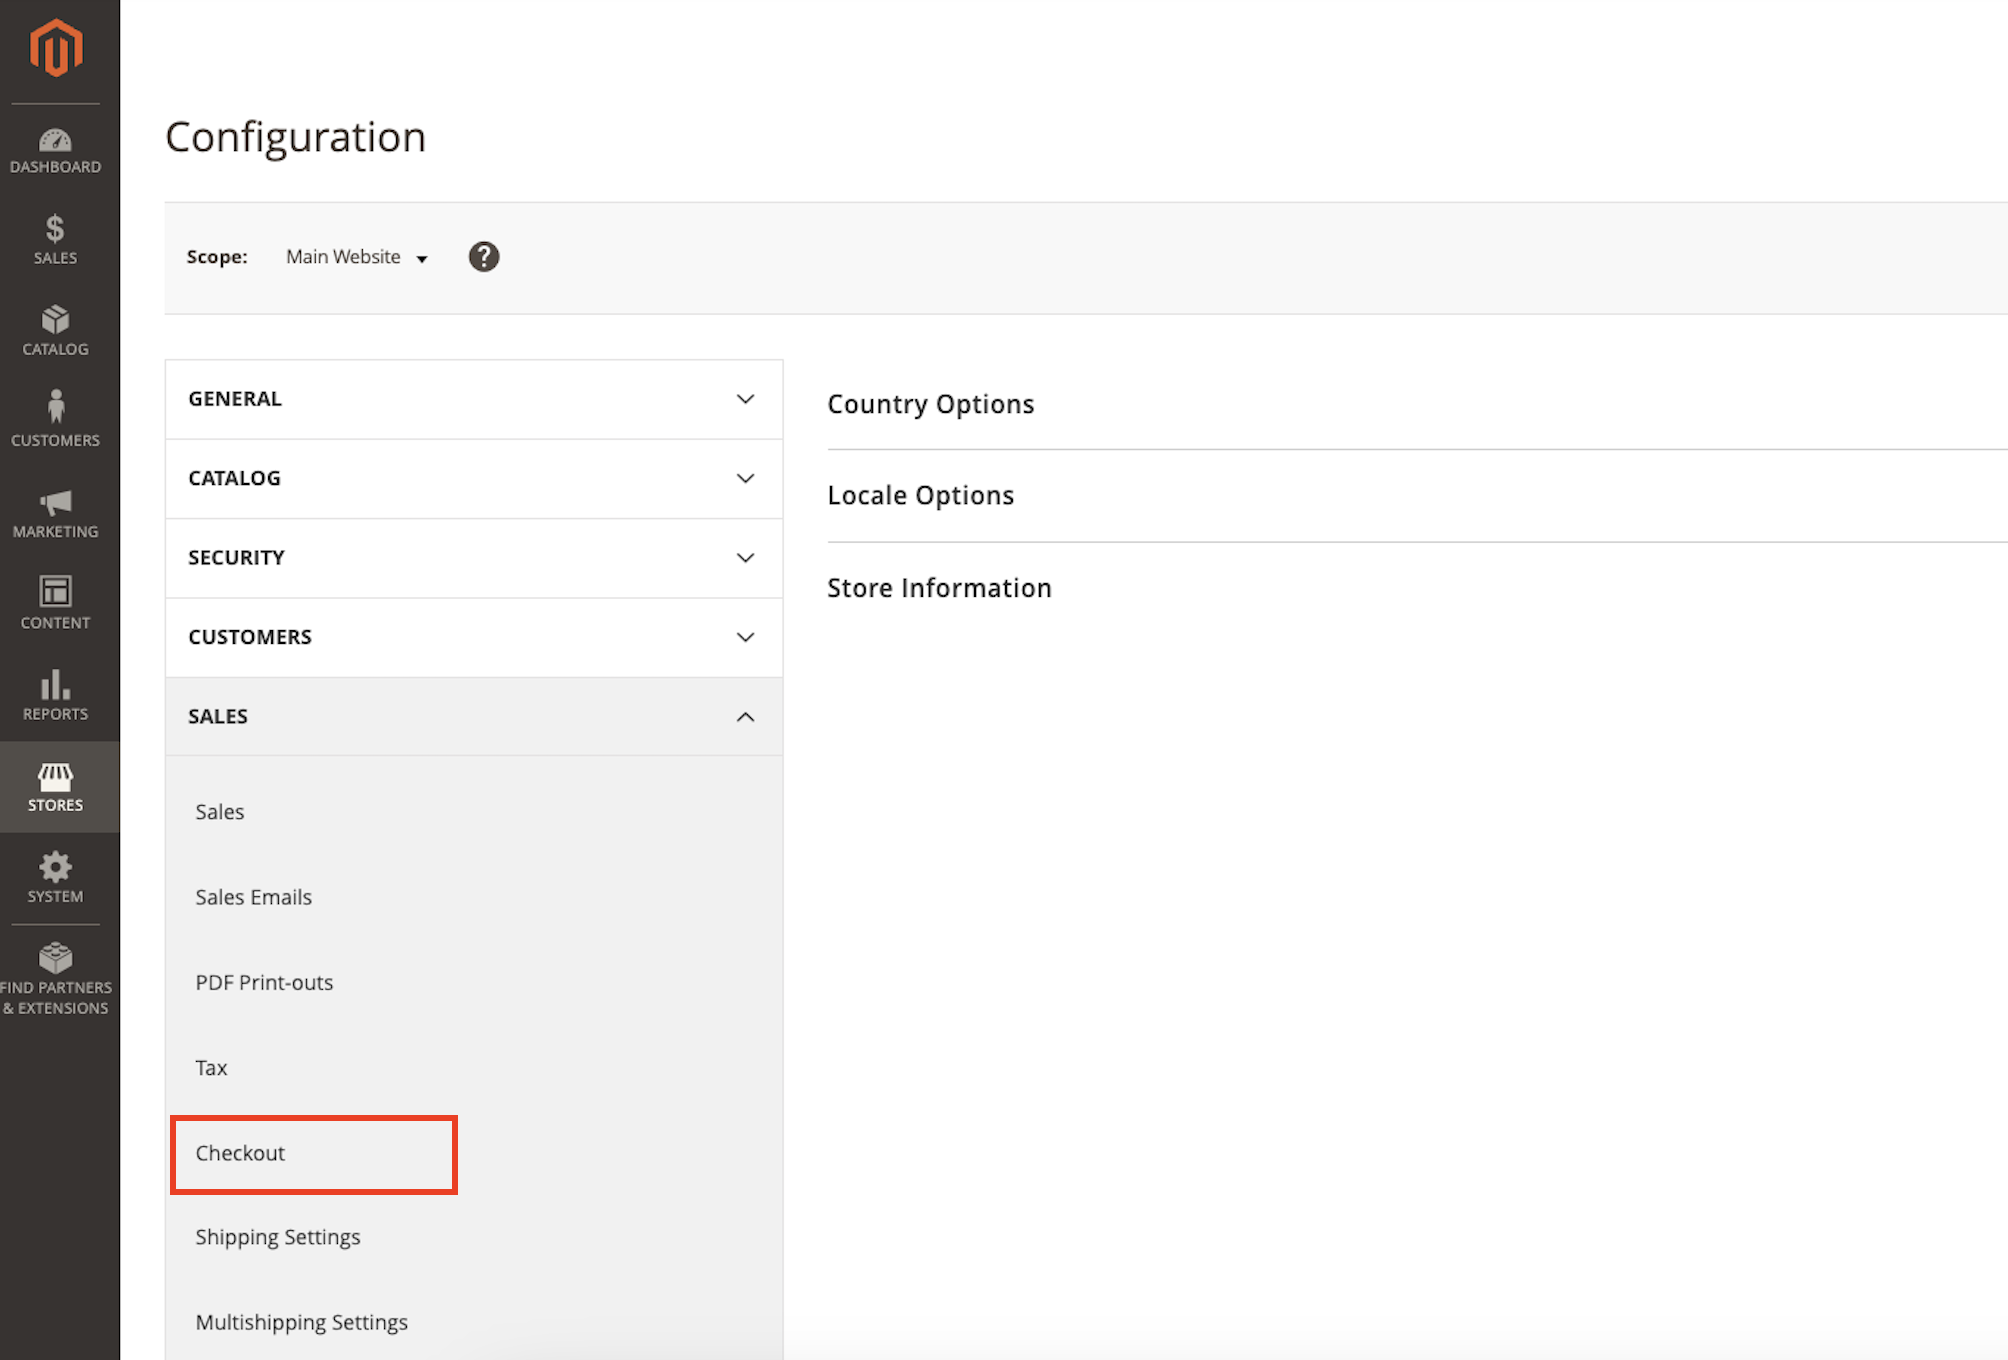
In the left-hand menu of the Configuration page, navigate to Sales > Checkout.
-
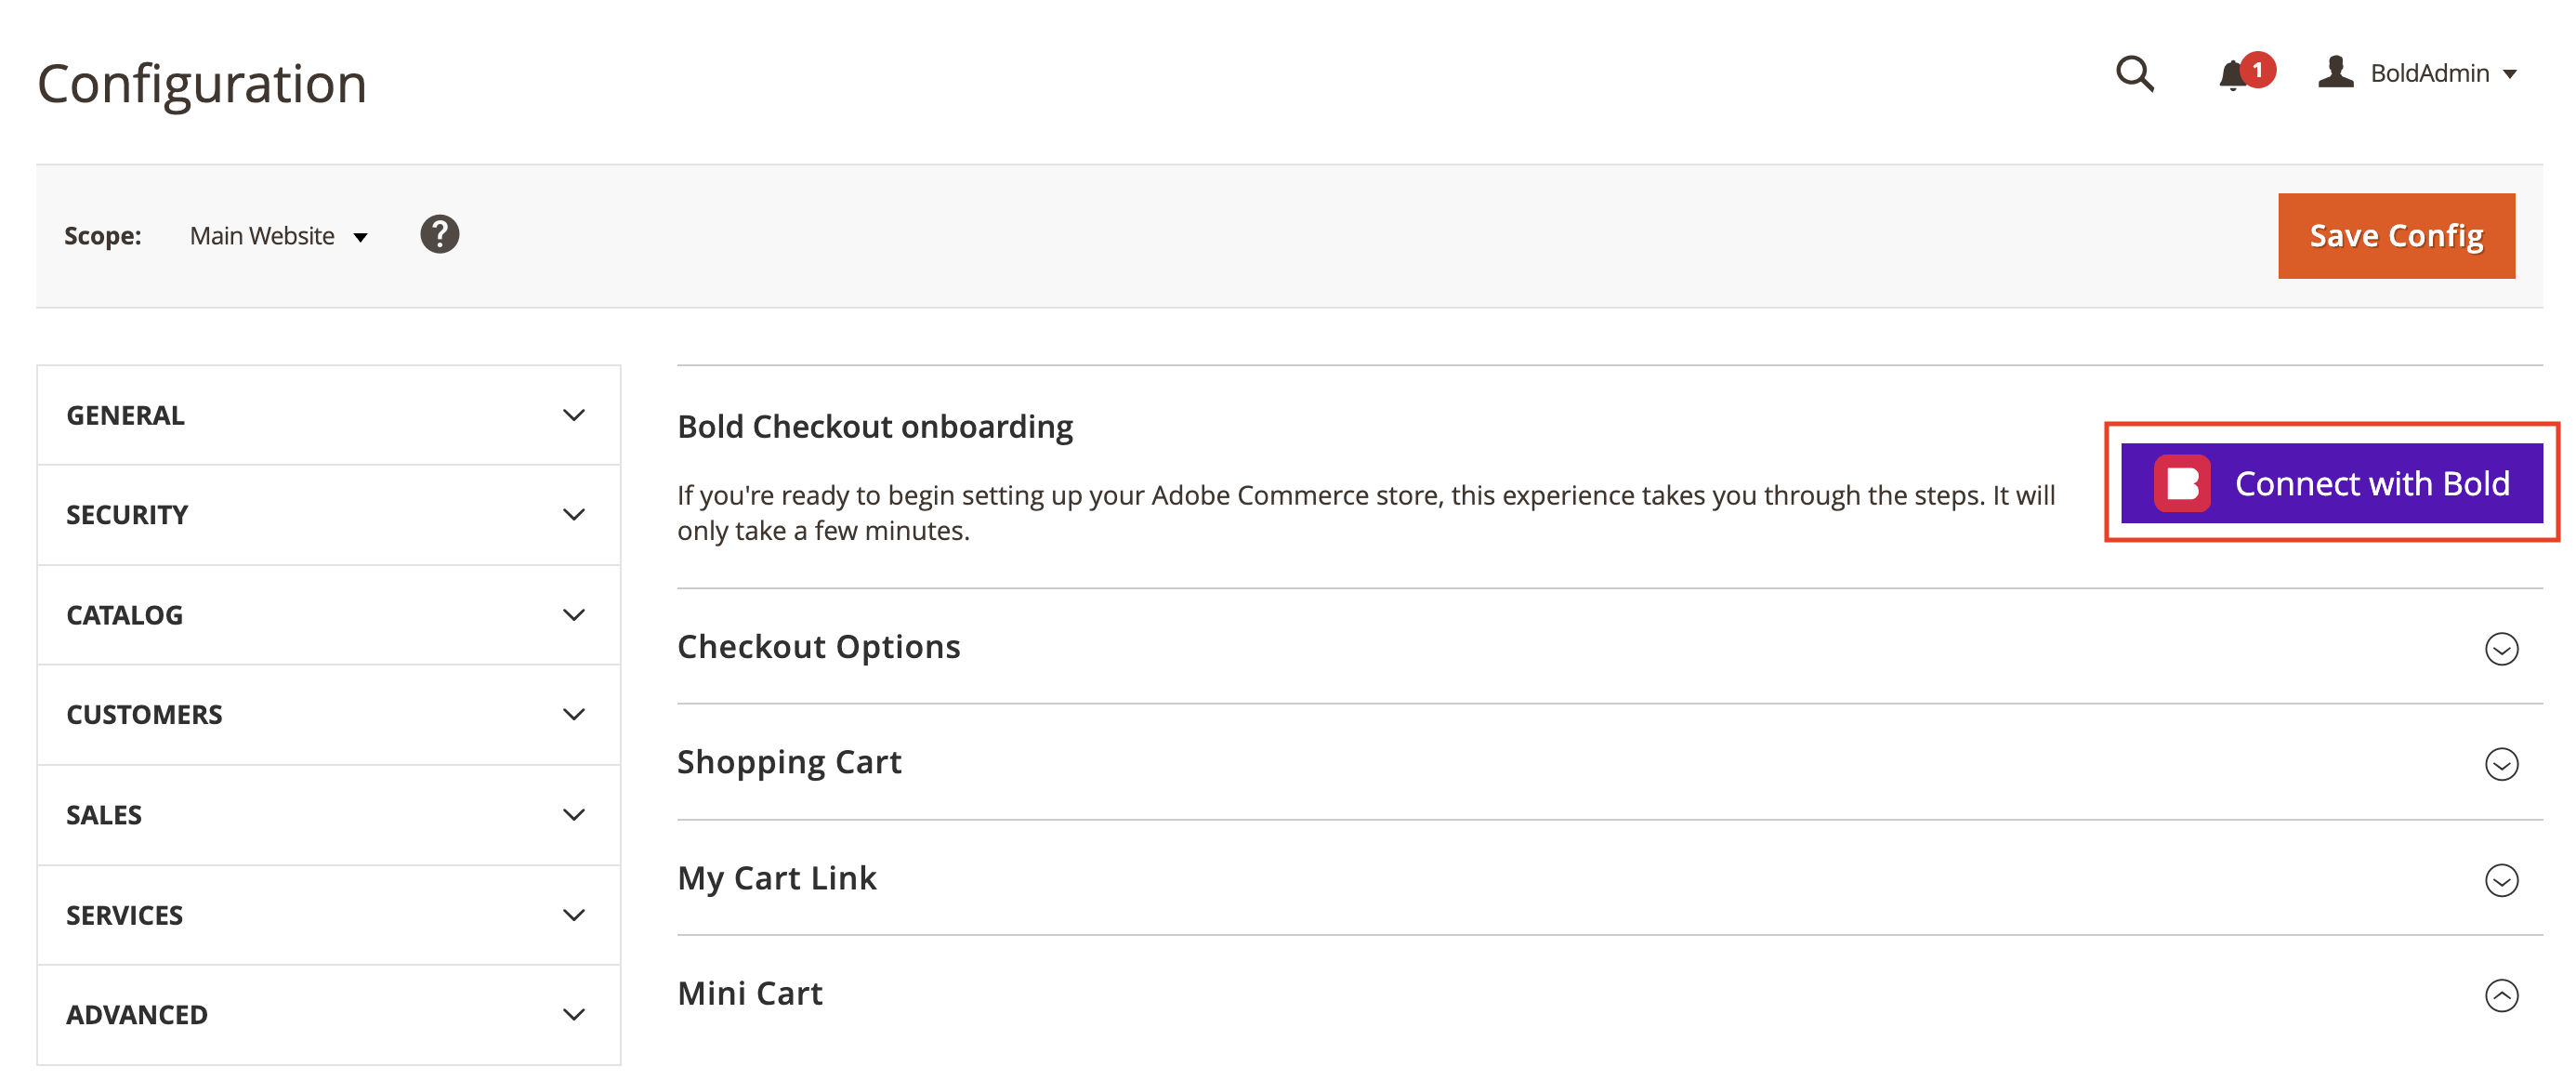
A Bold Checkout onboarding banner appears on the page, prompting you to set up your store. Click the Connect with Bold button.
-
A pop-up window appears. Follow the instructions in the window to create a Bold account if you haven't already.
noteEnsure that your browser does not have any settings enabled that block cookies, such as "Incognito Mode" or similar "Do Not Track" (DNT) settings. These settings can cause an error when attempting to complete this step.
-
Connect your store. When entering your URL, remove the
http://orhttps://and any trailing slash (/). -
Install Bold Checkout.
-
On the Connect a payment gateway step, find a payment gateway you want to use and click Connect.
-
Enter your payment gateway credentials. Refer to the following documentation for help setting up popular payment gateways with Bold Booster:
-
Next to the payment gateway, click the ellipsis (...) and click Edit credentials to configure the gateway.
-
If you want to include credit and debit card payment fields processed through Intuit QuickBooks Payments, check the Credit Card box.
-
If you want to offer direct bank transfers processed through Intuit QuickBooks Payments, check the ACH box
-
Under the Intuit Account Settings section you must link your accounts that will be used for sales and refund receipt creation.
-
Click Save.
-
Repeat for each payment gateway you want to connect.
-
Copy the API access token.
cautionEnsure that you save the API access token in a safe place. You will need it for the next step.
-
Click Close.
Step 3: Configure in the Adobe Commerce admin
Who's involved: Merchant
- If you are not already there, navigate to the Stores > Configuration page in the Adobe Commerce admin.
- In the left-hand menu of the Configuration page, navigate to Sales > Checkout.
- In the Scope drop-down menu at the top of the page, select the website where you're setting up Bold. This option is often called Main Website, but you might have renamed it to match your website name.
note
In Adobe Commerce versions earlier than 2.4, this drop-down is titled Store View.
- Expand the Bold Checkout Payment Booster Extension section.
- In the API Token field, enter the API access token you copied.
- For Configuration Group Label, use this table to determine which action to take.
Configuration What to do Your store domain in Bold Account Center is the same as your Magento base URL. Leave Configuration Group Label as is. It's OK if this field is blank. Your store domain in Bold Account Center is different from your Magento base URL. Edit Configuration Group Label to exactly match your Bold Account Center store domain. Ensure the domain does not include the protocol (such as https://). - For Is Payment Booster Enabled, uncheck Use Default and select Yes.
- (Optional) For Payment Title, specify a title for the section of your checkout that accepts credit card payments.
- Click the Save Config button at the top of the page.
- Navigate to System > Cache Management and click the Flush Magento Cache button.
Step 4: Install compatibility modules
Who's involved: Developer
Depending on your store setup, you might need to install an additional module so your configuration works seamlessly with Bold.
Follow these instructions to install compatibility modules if your store uses any of the following extensions:
- Swissuplabs Firecheckout
- OneStepCheckout
- Amasty Checkout
Step 5: Configure security settings
Who's involved: Developer DevOps/Security
Configure your security settings so Bold can communicate with your store.
Your store setup might have firewalls in place that restrict incoming and outgoing network traffic, allowing only a predefined set of IP addresses. For Bold's integrations to function, Bold domains must be able to make requests to your application. This means you must add specific domains or IP addresses to your allowlist.
- Add the following domains to your allowlist:
https://api.boldcommerce.comhttps://checkout.boldcommerce.com
- Add the following IP addresses to your allowlist:
34.118.185.13034.152.35.11735.234.253.9535.234.240.21434.152.62.19535.203.83.16934.95.4.13435.203.123.9535.203.41.1535.203.111.21835.203.12.9434.152.48.935.203.70.9034.152.57.7934.152.40.16935.203.98.4935.234.243.14734.118.146.18834.152.1.13434.152.7.13635.234.248.10735.234.247.24635.203.50.15634.95.47.12435.203.8.16235.203.89.9935.203.5.16434.95.58.19635.203.82.9135.234.246.935.203.57.13935.203.27.12334.152.60.21135.203.79.153
- If your security system filters traffic based on headers, add the
User-Agentheader with a value ofBold-APIto your allowlist.
For more information about allowlisting and Bold's security configuration requirements, refer to the security concepts overview.
Next steps
After installing Bold Booster on your store, you can:
- Add more payment gateways to offer customers more ways to pay
- Learn more about how Bold handles payment information
- Troubleshoot issues
If you need help onboarding, please submit a support ticket. Or, if you have a Bold representative working with you, add them as a support user on your store and contact them for further help.