Configure Entities
Subscription Builder requires Bold Checkout to be installed on your store. Therefore, it is not available to merchants using Shopify. For information on build-a-box subscriptions on Shopify, refer to the Help Center.
The Subscription Builder Admin UI enables you to set up your store's boxes, box products, time slots, and time slot options. Once these entities have been configured, they will be available for consumption using the Subscription Builder Admin API.
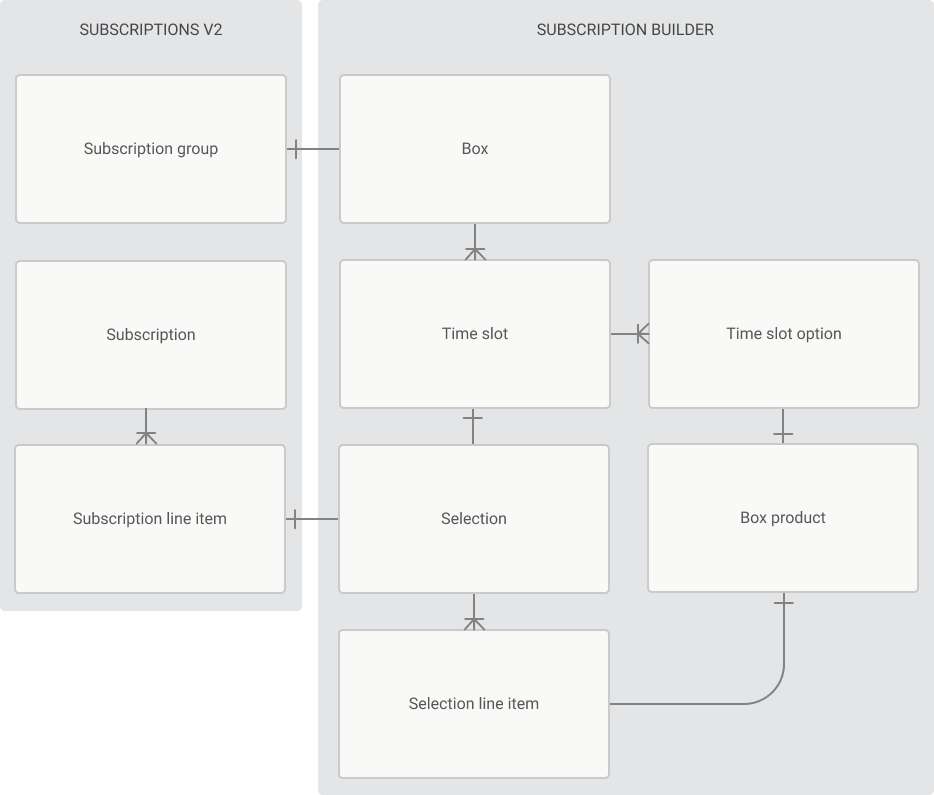
Subscription Builder Entities
When you use Subscription Builder, there are several Bold-specific definitions of terms that are helpful to understand:
| Term | Definition |
|---|---|
| Box | Connects Subscription Builder to a subscription group. Also sets guidelines for the number of products per box, and the type of pricing which is used. |
| Box product | The products/variants to be made available to a box's time slots. |
| Time slot | A collection of box products available in a time range for a box. These are typically used to denote the different options your customers can choose from for each of your delivery cycles. |
| Time slot option | A single box product available within a time slot. |
| Shell product | A product that is programmatically added to the cart along with the other product selections, which allows Subscription Builder to differentiate the order from a regular subscription. |
| Shell subscription group | A subscription group containing only the shell product. |
| Subscription line item | A single line item in a customer's subscription that is associated with a box. |
| Selection | A collection of box products that have been (or will be) added to a subscription order for a subscription line item on a specific date. |
| Selection line item | A single box product that has (or will be) added to a subscription within a selection. |
The following entity relationship diagram shows the key touch points between entities of Subscription Builder and Bold Subscriptions:
Use the following steps to define these entities within the Subscription Builder Admin UI.
Prerequisites
Before you get started, complete the following steps:
- Install the Bold Subscriptions and Bold Checkout applications on your store.
- Add the Subscription Builder integration to your store via Bold Account Center.
Create a shell product
Use your platform's UI to create a shell product. There are two ways to create a shell product:
- Dynamic — Create a product priced at $0 to serve as the shell product, and price all box products normally. In a dynamic Subscription Builder use case, the price of the box changes with the customer's selections, and customers may pay different prices depending on what is in their box.
- Fixed — Create a product with a price to serve as the shell product, and price all box products at $0. In a fixed Subscription Builder use case, the price of the box is always the same regardless of the customer's selections.
Based on your choice, create a shell product in your platform UI, price it appropriately, and name it so that you can find it easily later.
Create a subscription group
Use the Bold Subscriptions app to create a shell subscription group to hold the shell product.
- Open Bold Account Center and log in to your store. Open the Bold Subscriptions app.
- Click Subscription groups in the left sidebar and click Create subscription group.
- Use a name you can easily identify later (e.g. "SuBu Group"). Click Select products and select the shell product that you created in the platform UI. Do not add any other products at this time.
- Enter other details of your subscription group if necessary, and click Save changes.
Create and configure a new box
Create a new box. You'll define the products that can go in this box in a later step.
- Open Subscription Builder from the Integrations tab of the Bold Account Center.
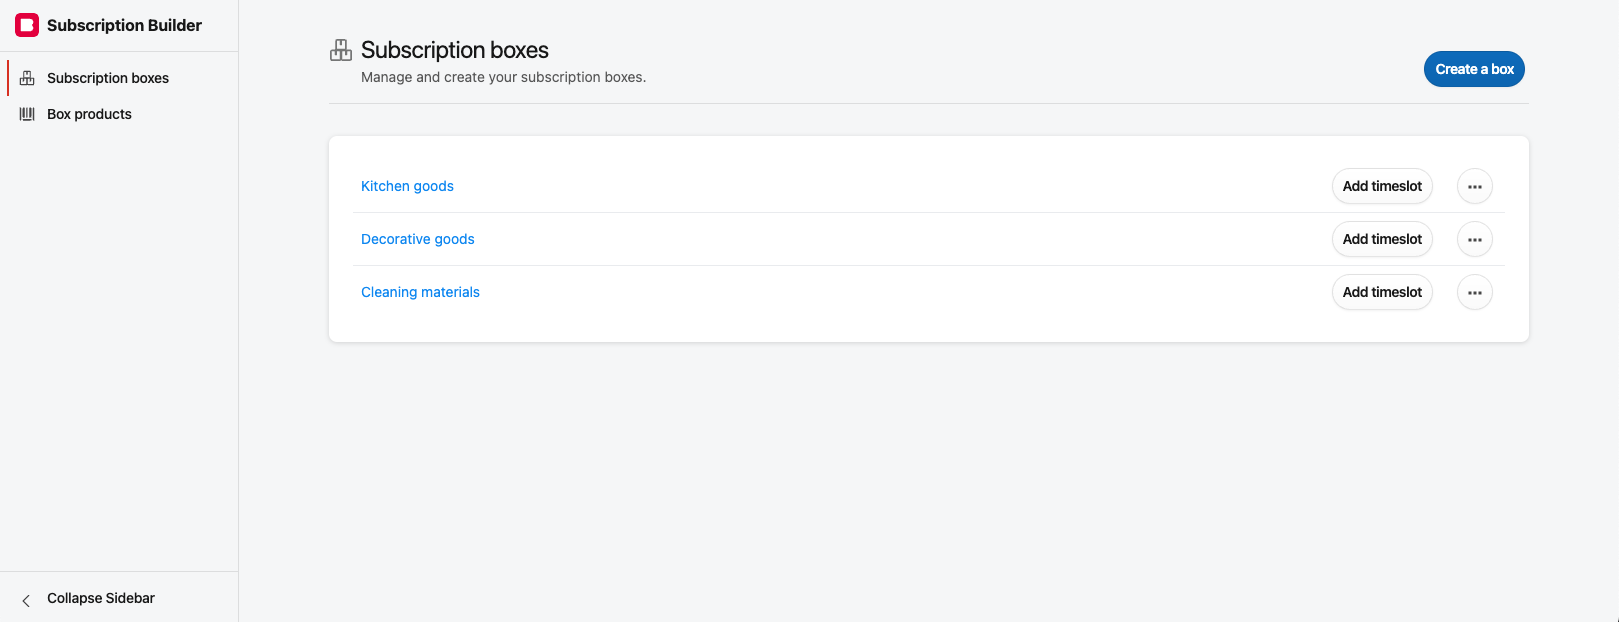
- In Subscription Builder, click Subscription boxes in the left sidebar, and click Create a box.
- Select the subscription group you created earlier from the drop-down menu.
- Configure the box size in the Set box restrictions section.
- (Optional) Click Add attribute to add metadata about the box to tag or categorize it, which can be referenced by the API endpoints.
- Click Save changes to finish configuring your box.
Add time slot to box
For each box, define a time slot and the products that will be available to choose from during that time slot.
-
On the Subscription boxes page, click the Add time slot button to the right of the box you created.
-
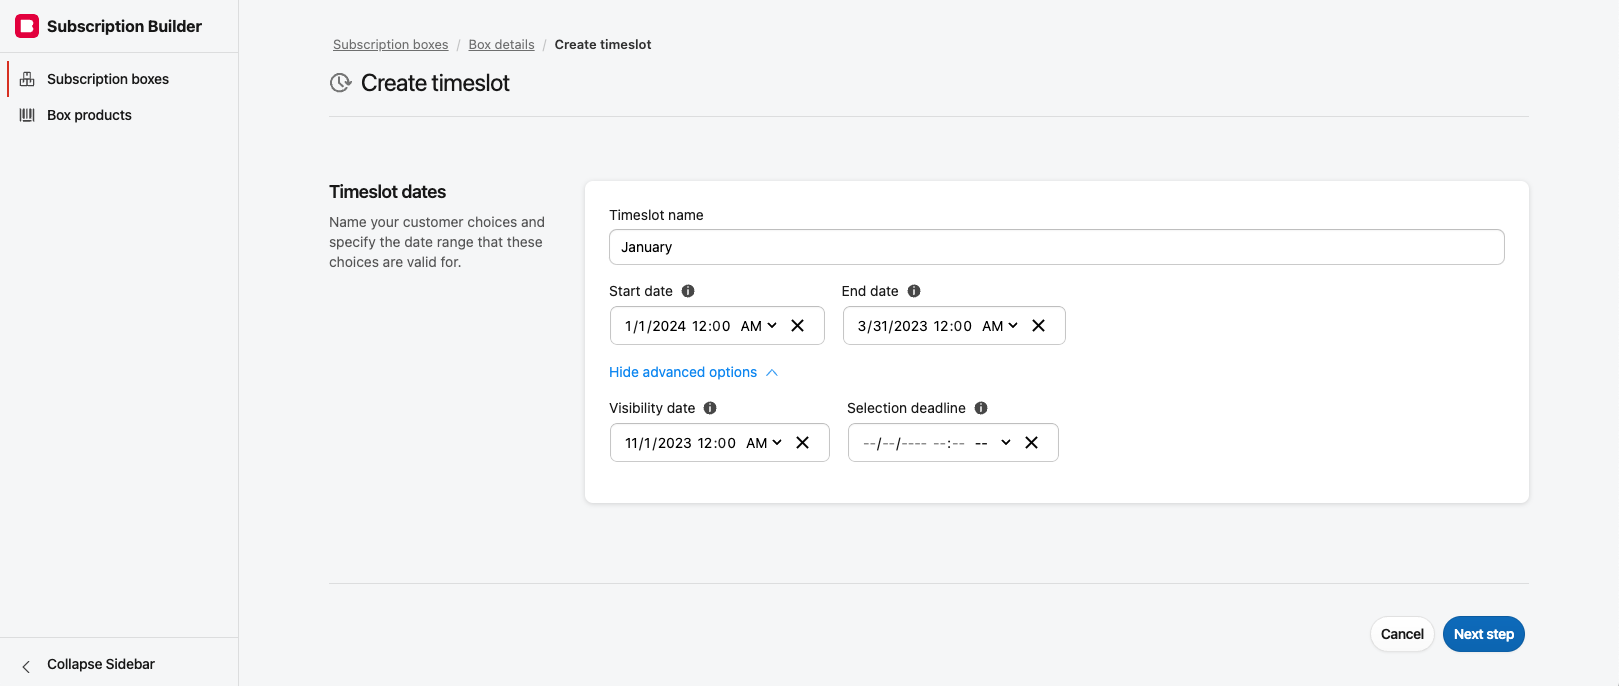
Enter a Timeslot name.
-
Select a Start date and End date using the drop-down menus.
-
(Optional) Click Show advanced options to display the Visibility date and Selection deadline fields.
-
(Optional) Set the Visibility date using the drop-down menu. The Visibility date determines when the subscription box becomes visible to the customer. If you leave the Visibility date empty, the subscription box is visible between the start and end date.
-
(Optional) Set the Selection deadline using the drop-down menu. The Selection deadline determines when the customer must select products to add to their subscription box. If you leave the Selection deadline empty, customers can add products to their box at any time between the start and end date.
noteClick on the i next to each field name for more information about each field.
-
(Optional) Click Add attribute to add metadata to the time slot that can be accessed by the API endpoints.
-
Click Next step to continue configuring the time slot.
-
Click Select products to select products from your store that should be available in this time slot.
-
(Optional) If you want default selections to be made if the customer doesn't make any selections before the deadline, you can edit the quantity included in each box with the Edit default quantities button.
Enable Subscription Builder
Before you can add Subscription Builder as a Bold Checkout or Bold Cashier integration, you must request that your store is added to a list of Subscription Builder-enabled stores. Contact the Customer Success team with your unique store URL to be added to the allow list.
After your store has been added, enable Subscription Builder via the Bold Checkout or Bold Cashier marketplace.
Next steps
At this point, the entity setup in the Subscription Builder Admin UI is complete. Now, your storefront must be customized to integrate the Subscription Builder Admin API.
There are two user interface flows that you must build in order to allow the customer to successfully place a Subscription Builder order and customize their box:
- An initial checkout flow, during which a customer indicates which box they want to subscribe to.
- A custom selection flow, during which a customer indicates the items they want in their box.
For a high-level overview of the process to integrate Subscription Builder, refer to the Subscription Builder page.