Connect a Magento 1 store
Set up Bold on your store by installing and configuring Bold and the Magento 1 extension.
For most use cases, Bold recommends installing Bold Booster instead. Refer to the product comparison below for details. If you think full Bold Checkout is right for you, contact Bold Support for installation guidance.
Bold Booster vs. full Bold Checkout
Bold Booster is a more lightweight alternative to Bold Checkout. Use this table to choose which option fits your use case.
| Bold Booster | Bold Checkout | |
|---|---|---|
| Use Bold Checkout functionality | Yes, payment functionality only. | Yes. |
| Replaces existing checkout | No. | Yes. |
| Frontend interface | Use your existing experience, with the addition of Bold's payment interface. | Bold's three page or one page checkout experience. |
| Development effort | Low or none — Bold cleanly adds the payment interface without changing the rest of the experience. | Low or none — using the pre-built solution keeps code requirements low. |
| Integration support | Retain all integrations. | Retain nonvisual integrations. |
| Customization options | Merchant retains full control of behavior of checkout interface. | Lightweight customization using Checkout LiFE and CSS. |
To install Bold Booster instead, refer to the Bold Booster help.
Prerequisites
Before you connect your Magento 1 store with Bold, ensure you have the following:
- A Magento account.
- A payment gateway associated with the store. Bold strongly recommends PayPal Complete Payments or Braintree.
- An SFTP client with a connection to your store's Magento 1 server.
Local development stores must use a port-forwarding service, such as ngrok, Cloudflare Tunnel, or OpenVPN, to communicate with Bold.
Configure firewall settings
Configure your firewall settings to allow Bold domains to make requests to your application.
To ensure proper operation, update your firewall settings to allow requests from the following domains or IP addresses:
- Domains
- IP Addresses
Calls from Bold to your platform connector come from one of the following domains:
https://api.boldcommerce.comhttps://checkout.boldcommerce.comhttps://magento-1-connector.boldapps.net
Bold's applications are hosted on Google Cloud Platform, in the northamerica-northeast1 scope. These IPs are included below:
34.19.128.0/1734.20.0.0/1734.47.0.0/1834.95.0.0/1834.104.76.0/2234.118.128.0/1834.124.12.0/2234.128.37.0/2434.128.42.0/2334.128.49.0/2434.128.58.0/2334.152.0.0/1835.203.0.0/1735.215.0.0/1835.220.43.0/2435.234.240.0/2035.242.43.0/242600:1900:40e0::/44
Install the Bold Checkout Magento 1 extension
The Bold Checkout Extension is a Magento 1 extension that must be installed on your store. Use the following steps to add the Bold Checkout Extension to your Magento 1 store.
- Navigate to the
app/code/communitylocation in your store's directory. Create a new folder titledBold. - Navigate to the Bold Checkout on Magento 1 repository. Download the repository contents (click the Code drop-down menu, and select Download ZIP).
- Unzip the downloaded directory.
- Copy the
CheckoutandCheckoutIntegrationdirectories to theapp/code/community/Boldlocation in your store's directory that you created in Step 1. - Navigate to the root directory (the parent directory of
/app) and execute the following commands:cp ./app/code/community/Bold/Checkout/etc/Bold_Checkout.xml ./app/etc/modules/
cp ./app/code/community/Bold/CheckoutIntegration/etc/Bold_CheckoutIntegration.xml ./app/etc/modules/
cp -r ./app/code/community/Bold/Checkout/design/* ./app/design/
cp -r ./app/code/community/Bold/Checkout/locale/* ./app/locale/
cp -r ./app/code/community/Bold/CheckoutIntegration/design/* ./app/design/
Complete Bold Checkout onboarding
Complete the following steps in your store's Magento 1 Admin panel.
- Clear your Magento Admin cache.
- Navigate to System > Cache Management.
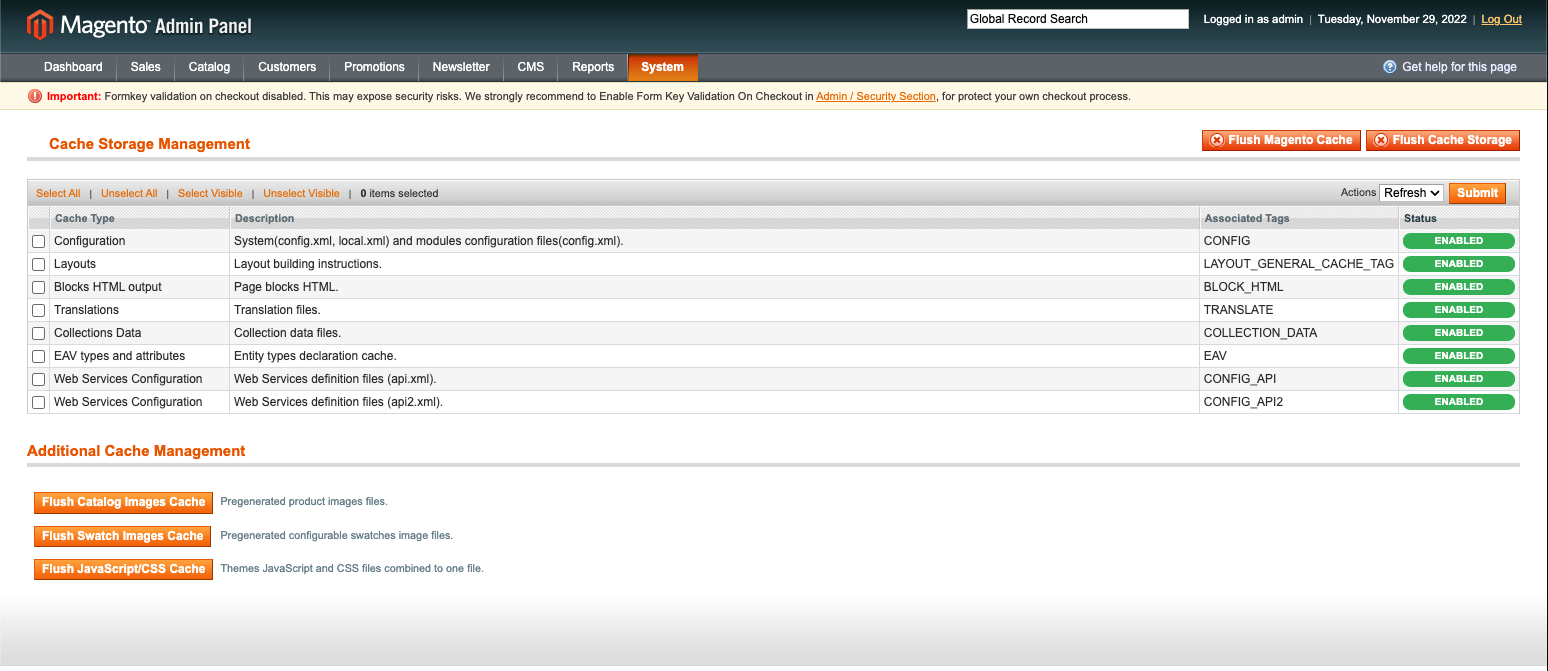
- Click the Flush Magento Cache button.
- Click the Flush Cache Storage button, then click OK on the confirmation pop-up message.
- Navigate to System > Cache Management.
- Navigate to System > Configuration.
- In the Sales section of the left-hand menu, click Checkout.
- In the Current Configuration Scope drop-down menu, select Main Website.
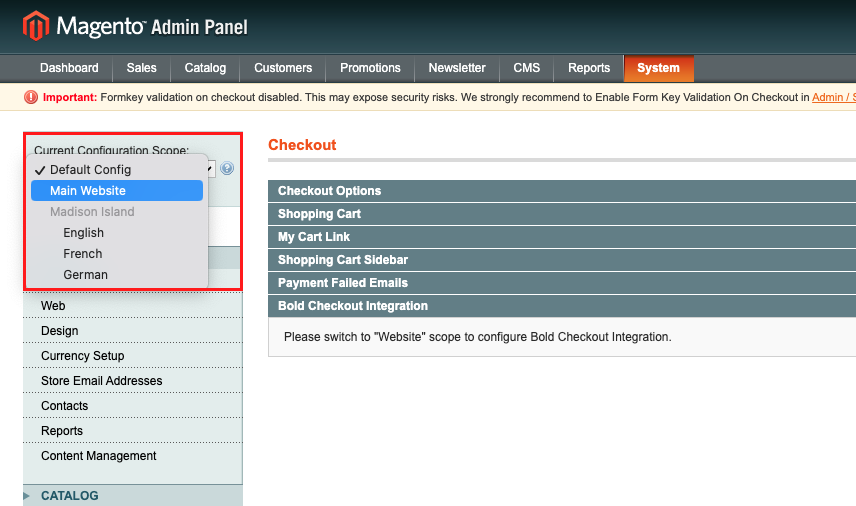
- A Bold Checkout onboarding banner appears on the page, prompting you to set up your store. Click the Connect with Bold button.
note
Ensure that your browser does not have any settings enabled that block cookies, such as "Incognito Mode" or similar "Do Not Track" (DNT) settings. These settings can cause an error when attempting to complete onboarding.
- A pop-up window appears. Follow the instructions in the window to complete the following steps:
- Create a Bold account and connect your store.
- Install Bold Checkout.
- Add and configure a payment gateway.
- If you want to only use PayPal payment buttons with no additional credit card options, uncheck the Use advanced credit and debit card fields box.
- Leave the Allow Bold Checkout to perform payments and refunds box checked.
- When prompted, click Allow to connect your store to your selected payment gateway.
- Click the button to return to your store and continue setup.
- Create an API access token.
caution
Ensure that you save the API access token in a safe place. You will need it for the next step.
Configure the Bold Checkout extension
Complete the following steps in your store's Magento 1 Admin panel.
- If you are not already there, navigate to the Checkout settings page under System > Configuration.
- In the Current Configuration Scope drop-down menu, ensure the scope is set to Main Website.
- Expand the Bold Checkout Extension section. Populate the API Token field using the API access token that you retrieved from the Bold Account Center.

- Click the Save Config button in the top right.
- Expand the Bold Checkout Extension Advanced Settings section and edit any settings in this section if necessary. Depending on whether you are using a standard or dual checkout configuration, your selections will vary.
- To entirely replace your store's checkout with Bold Checkout, select Standard from the Bold Checkout Type drop-down menu. 1. To use a dual checkout configuration and add an extra button to your cart page, select Dual from the Bold Checkout Type drop-down menu.
- Click the Save Config.
- Expand the Bold Checkout Platform Connector Integrations section. Click Authorize.

Place a test order
To ensure everything is set up correctly, you can place a test order using development mode and your associated gateway's test card. Once development mode is off, you can also test your store configuration using real payment data.
Follow the steps below to place a test order in development mode.
- From within Bold Checkout, navigate to Payment Options > Payment Gateways.
- Ensure that Development mode is toggled on.
- Navigate to your Magento 1 storefront, select an item, and proceed to checkout.
- Use your payment gateway's associated test credit card to complete the order.
- Once your order successfully completes, return to the Payment Gateways page in the Bold Checkout admin and turn Developer mode off.
Next steps
After setting up Bold, there are several steps you can take to customize your store's checkout experience:
- Customize the look and feel of the checkout experience by adding CSS rules. Refer to Style the Checkout with CSS for detailed instructions.
- Bold-hosted only: Tailor the frontend user experience by adding UI elements in strategic locations. Bold provides the Lightweight Frontend Experience (LiFE) elements for easy user interface customizations. Add LiFE elements using the Bold Checkout APIs or the Magento 1 admin.
- Bold-hosted only: Create a custom domain name for the Bold Checkout page.