Add Customized Elements to Checkout
The Checkout Lightweight Frontend Experience (LiFE) mechanism enables merchants to add customizable text fields, checkboxes, and other elements to a variety of locations on the checkout page.
Common uses for Checkout LiFE include:
- An HTML snippet including a link to more information.
- A checkbox to indicate whether the customer is tax exempt.
- A text input field for a VAT ID.
- A long text input field for a gift message.
You can add LiFE elements using the Checkout Admin API. This guide provides information about what LiFE elements are and how to add them to your checkout experience.
Prerequisites
Before you get started, complete the following steps:
- Follow the steps outlined in the Bold Checkout Getting Started guide.
- Ensure that your checkout uses either the one page or three page Bold-hosted checkout flows.
- Ensure that your checkout is in English, French, or Spanish.
LiFE element types
The following table shows the supported user interface elements and potential use cases for each:
| Element Type | Description | Use Cases |
|---|---|---|
text | A small text field, intended for a few words. |
|
textarea | A large text area, intended for longer text responses. |
|
checkbox | A checkbox |
|
html | An HTML snippet |
|
dropdown | A drop-down selector |
|
datepicker | A calendar date picking widget |
|
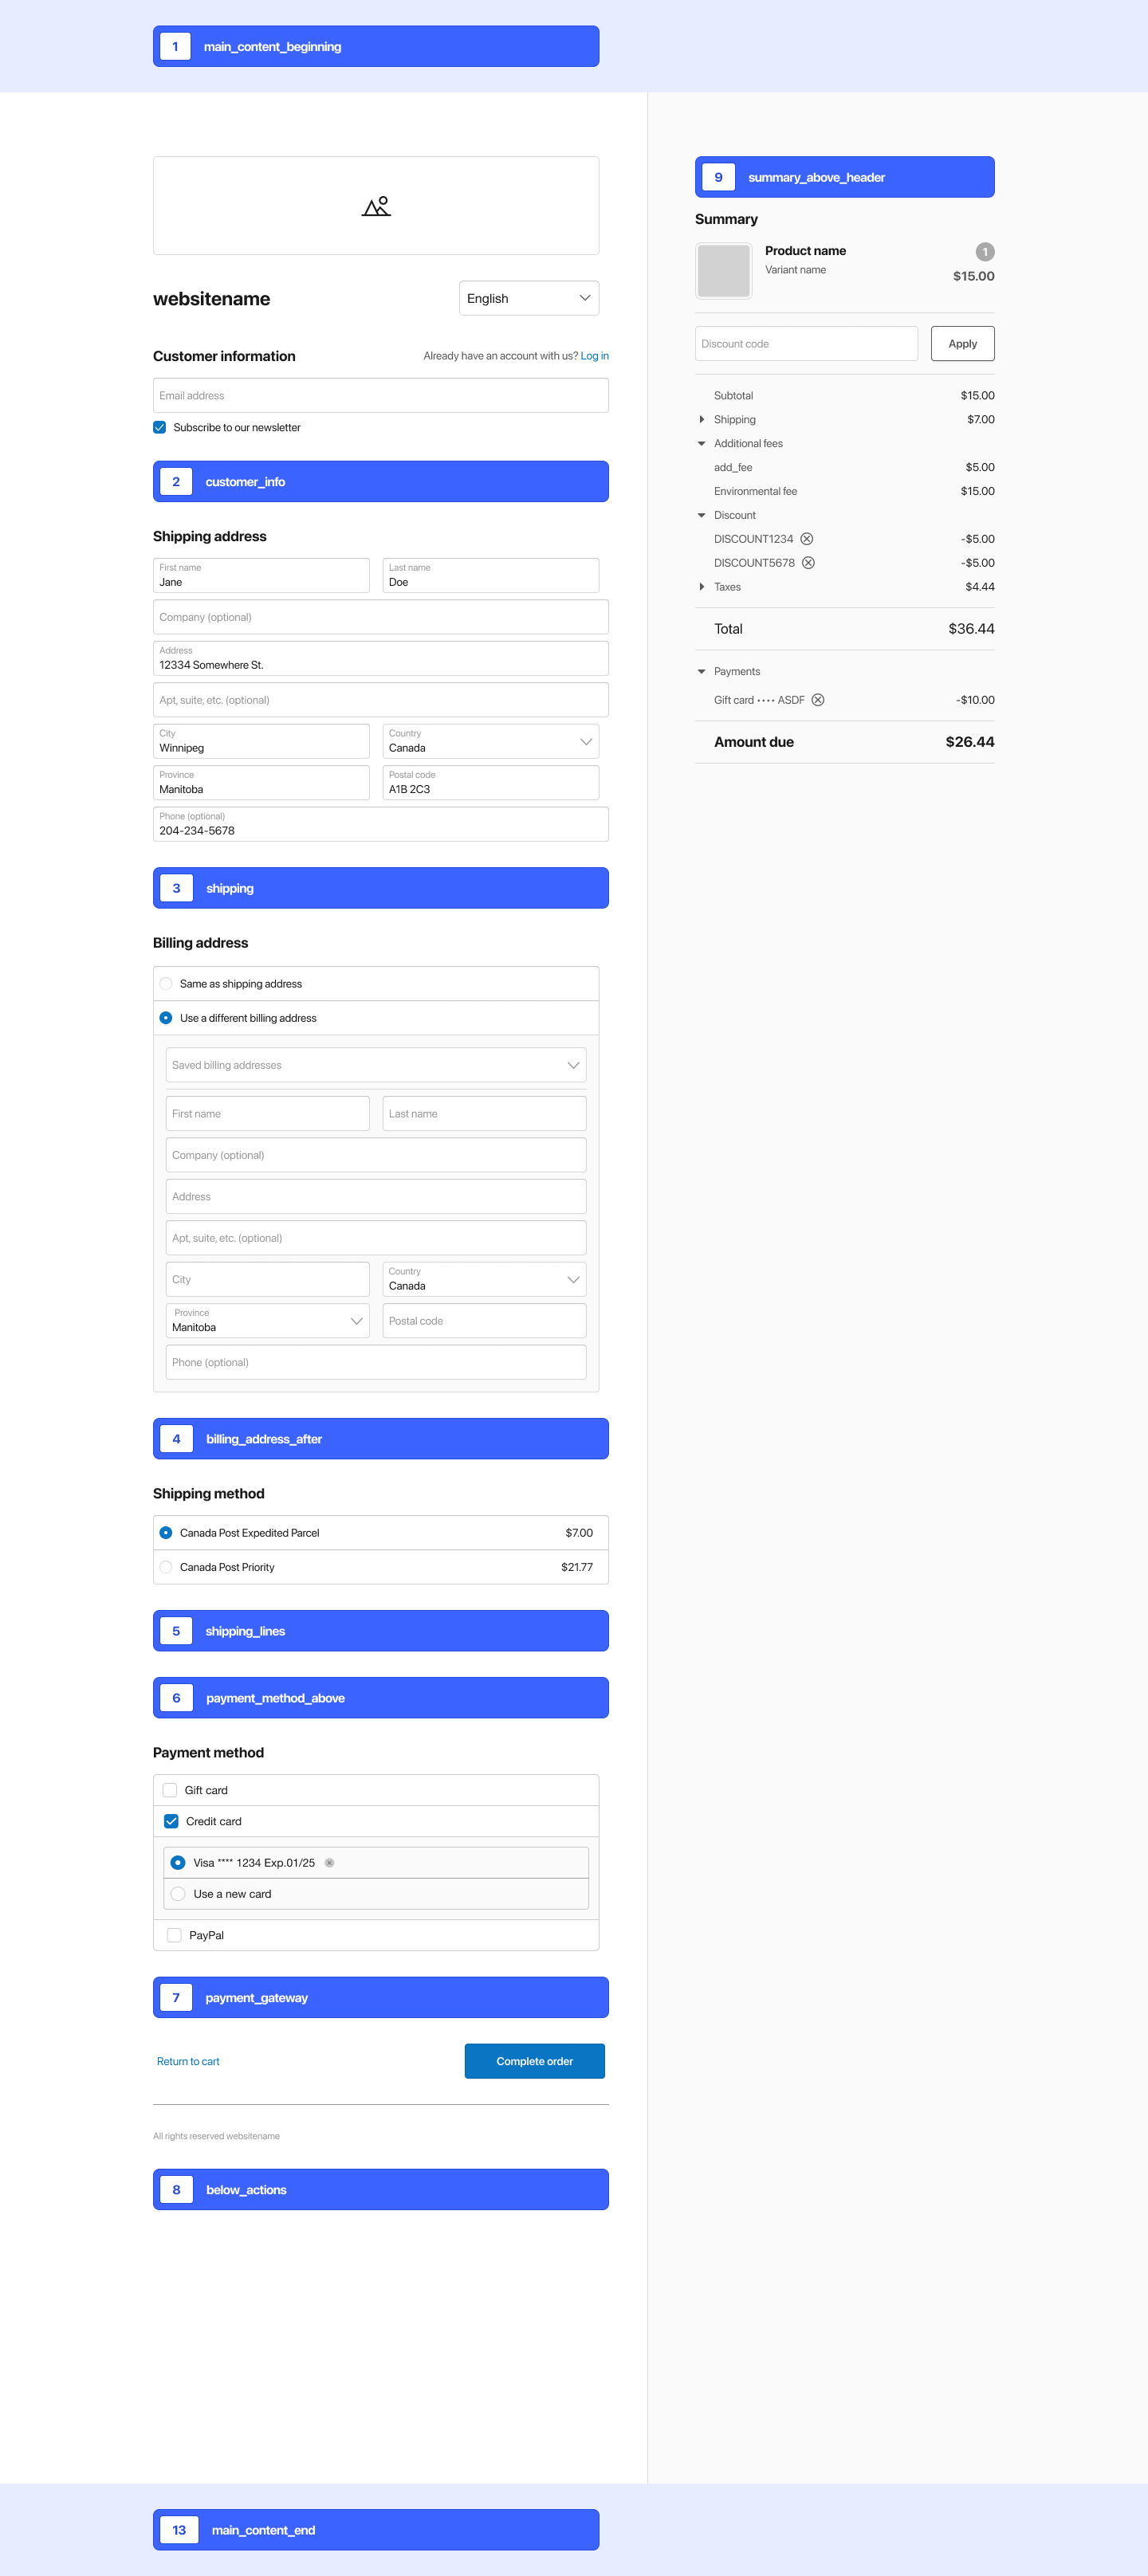
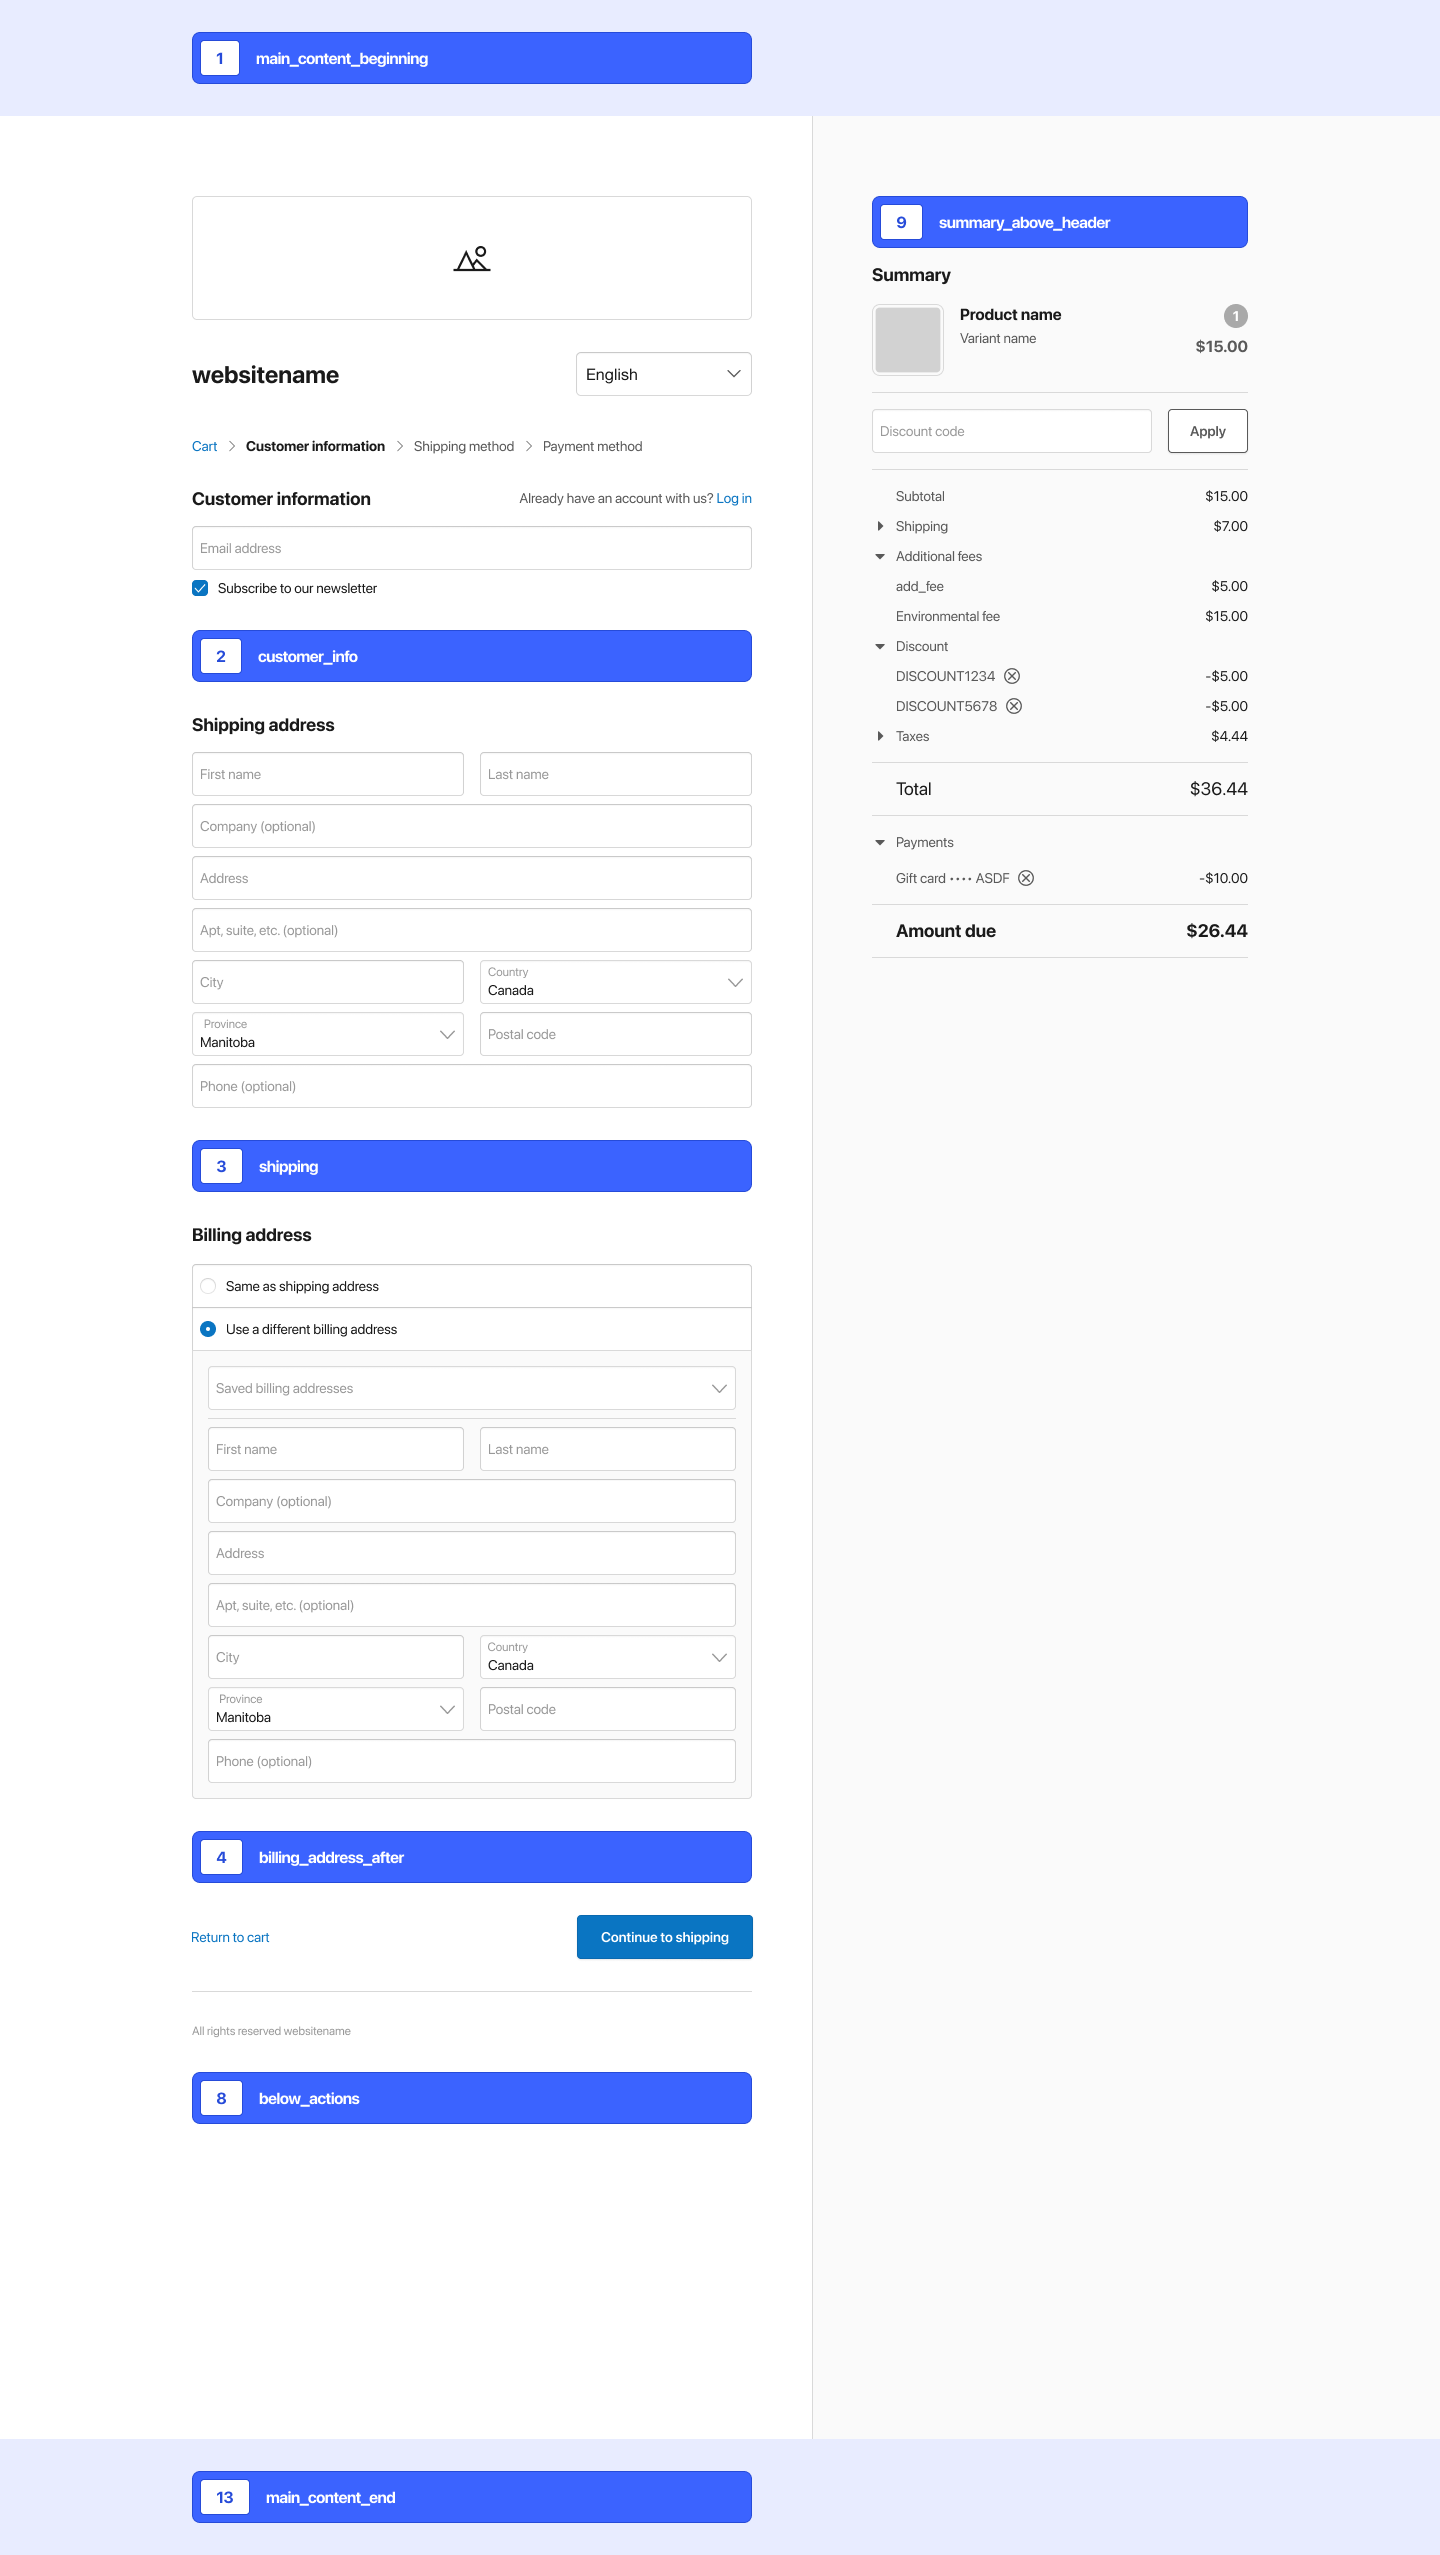
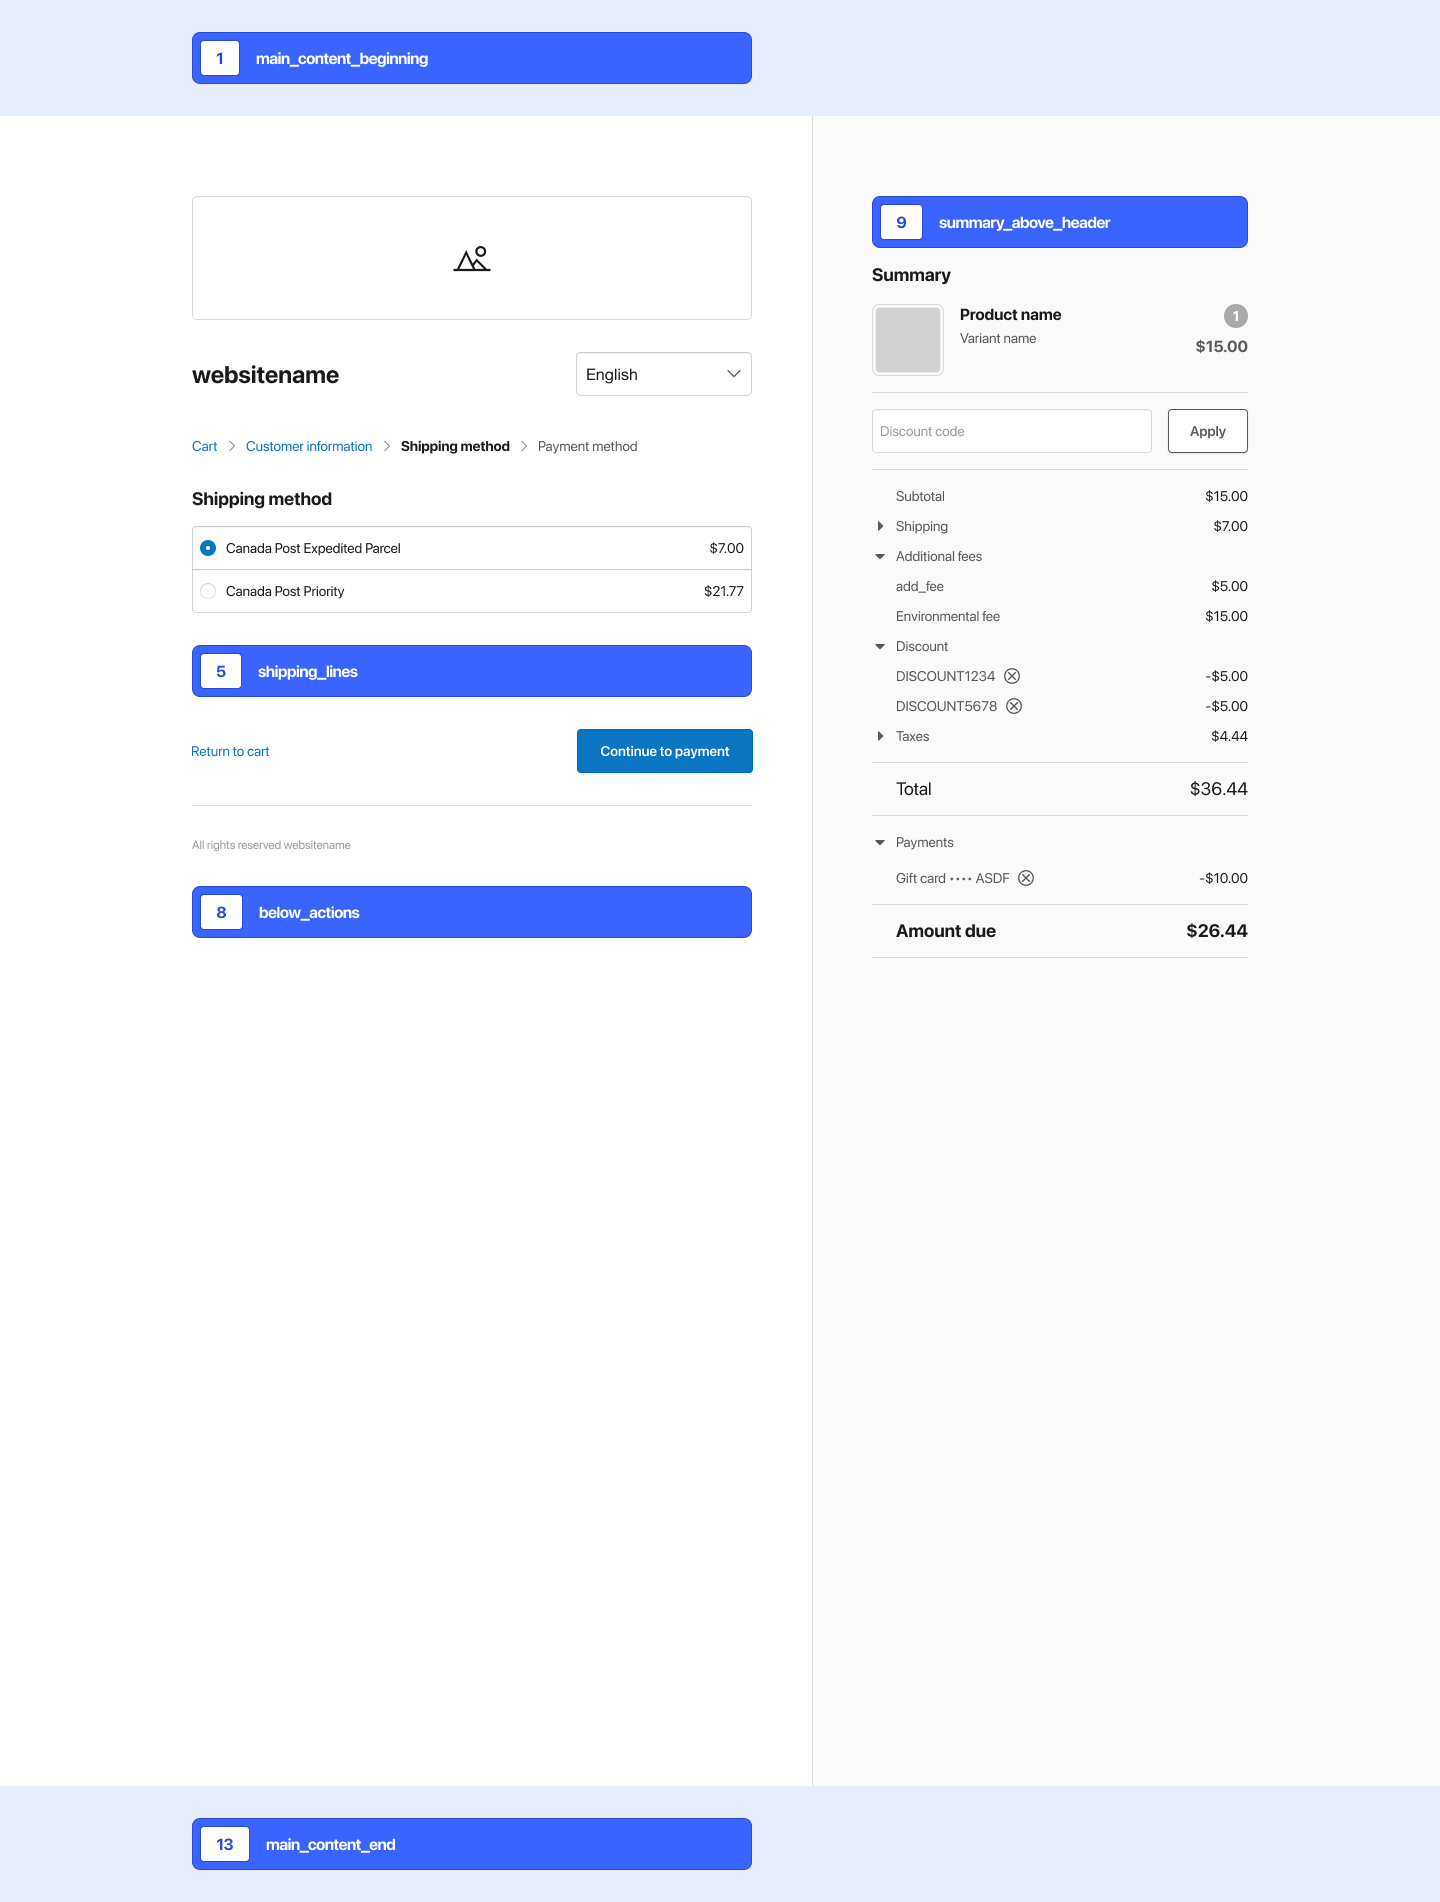
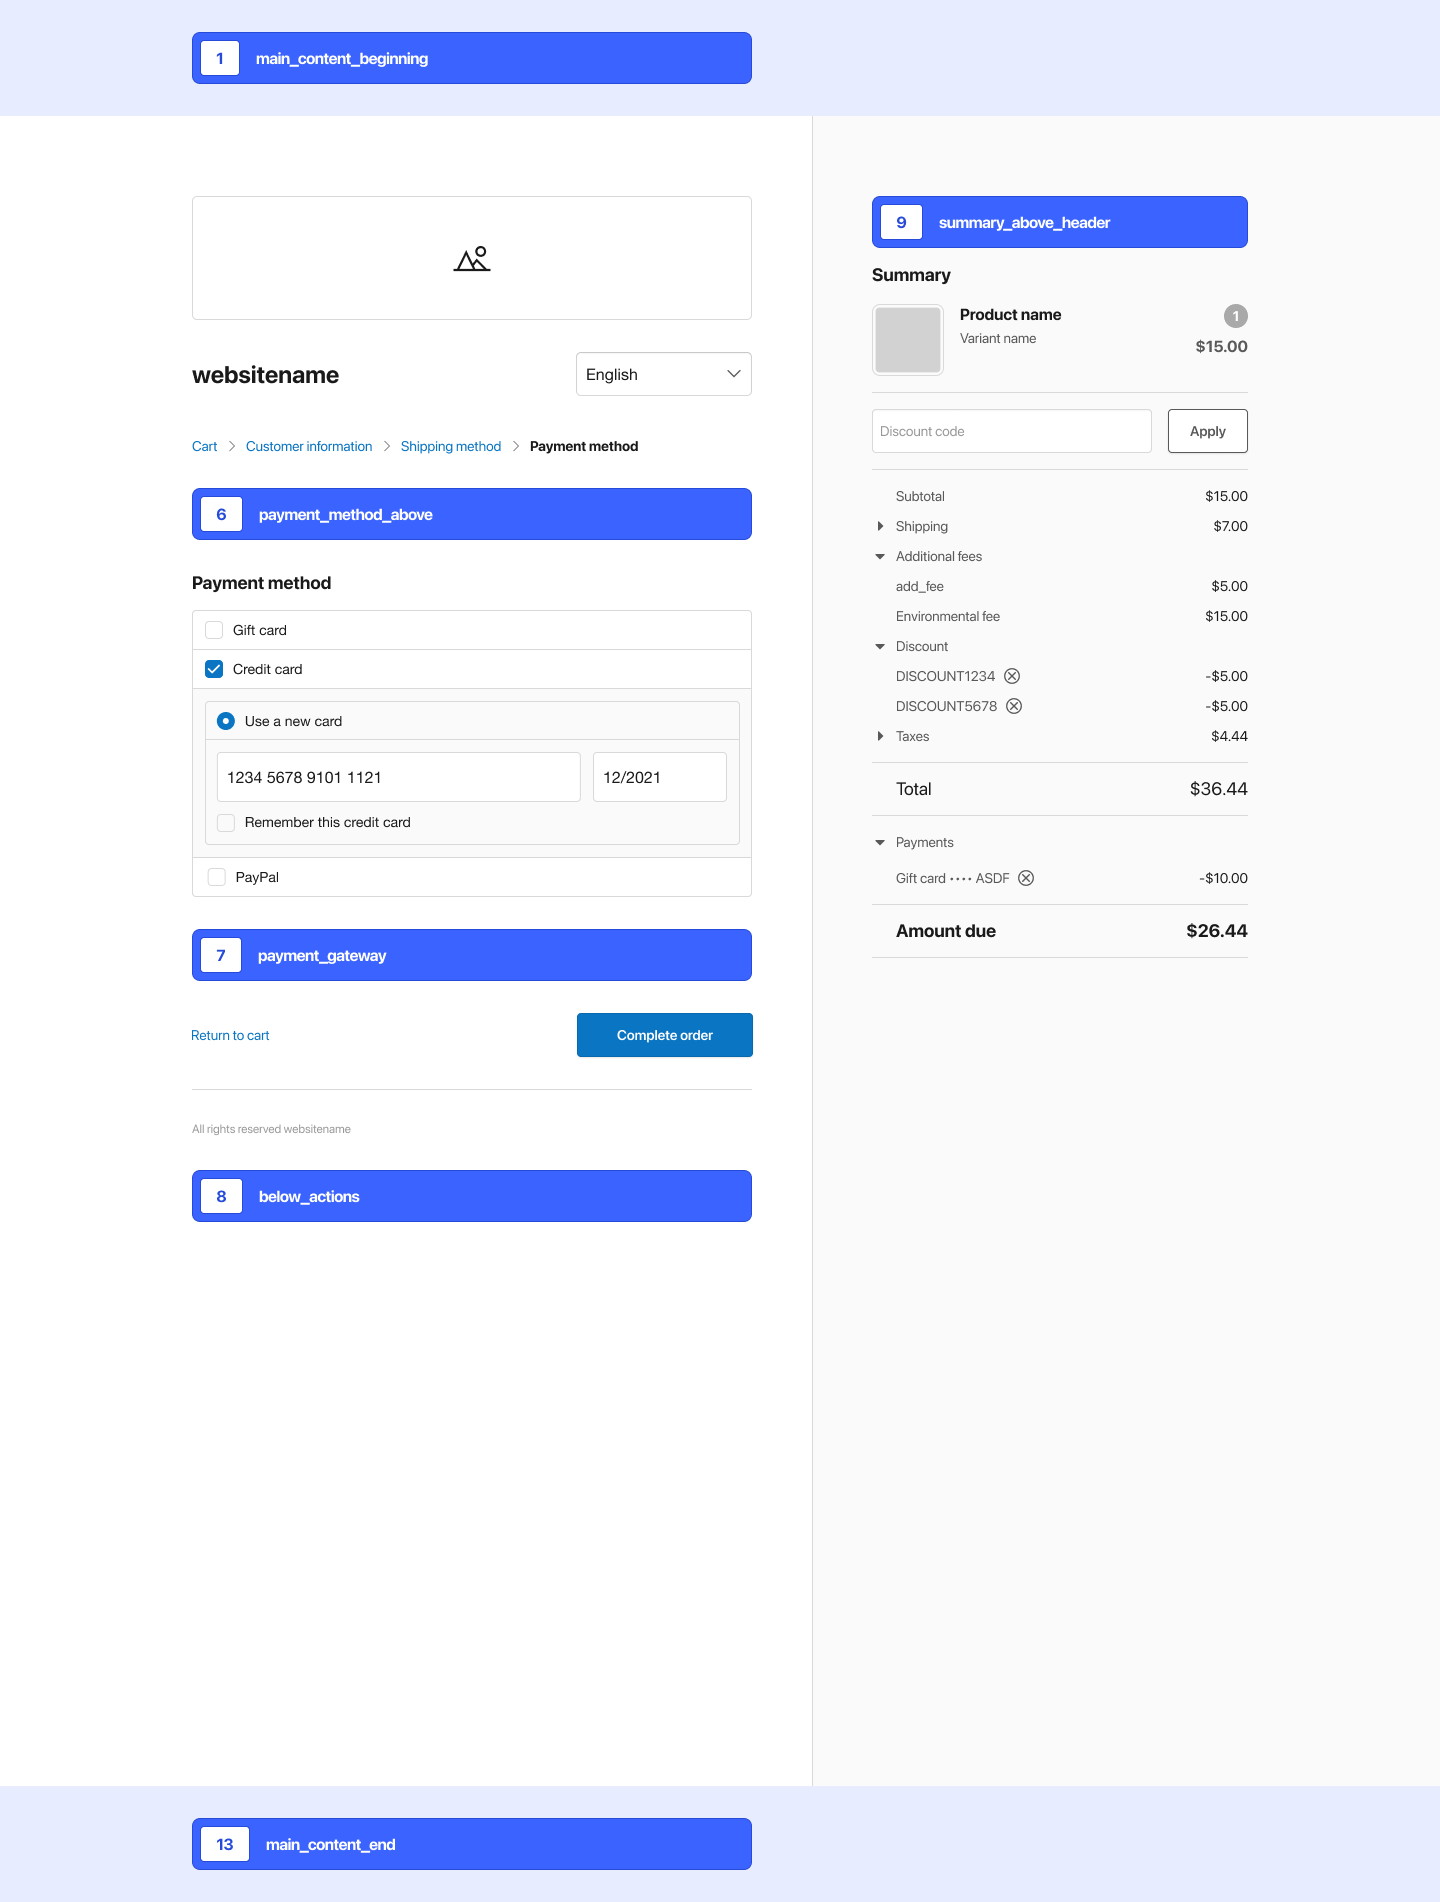
Anchor locations
You can place an extension at one of the following anchor points in the checkout experience:
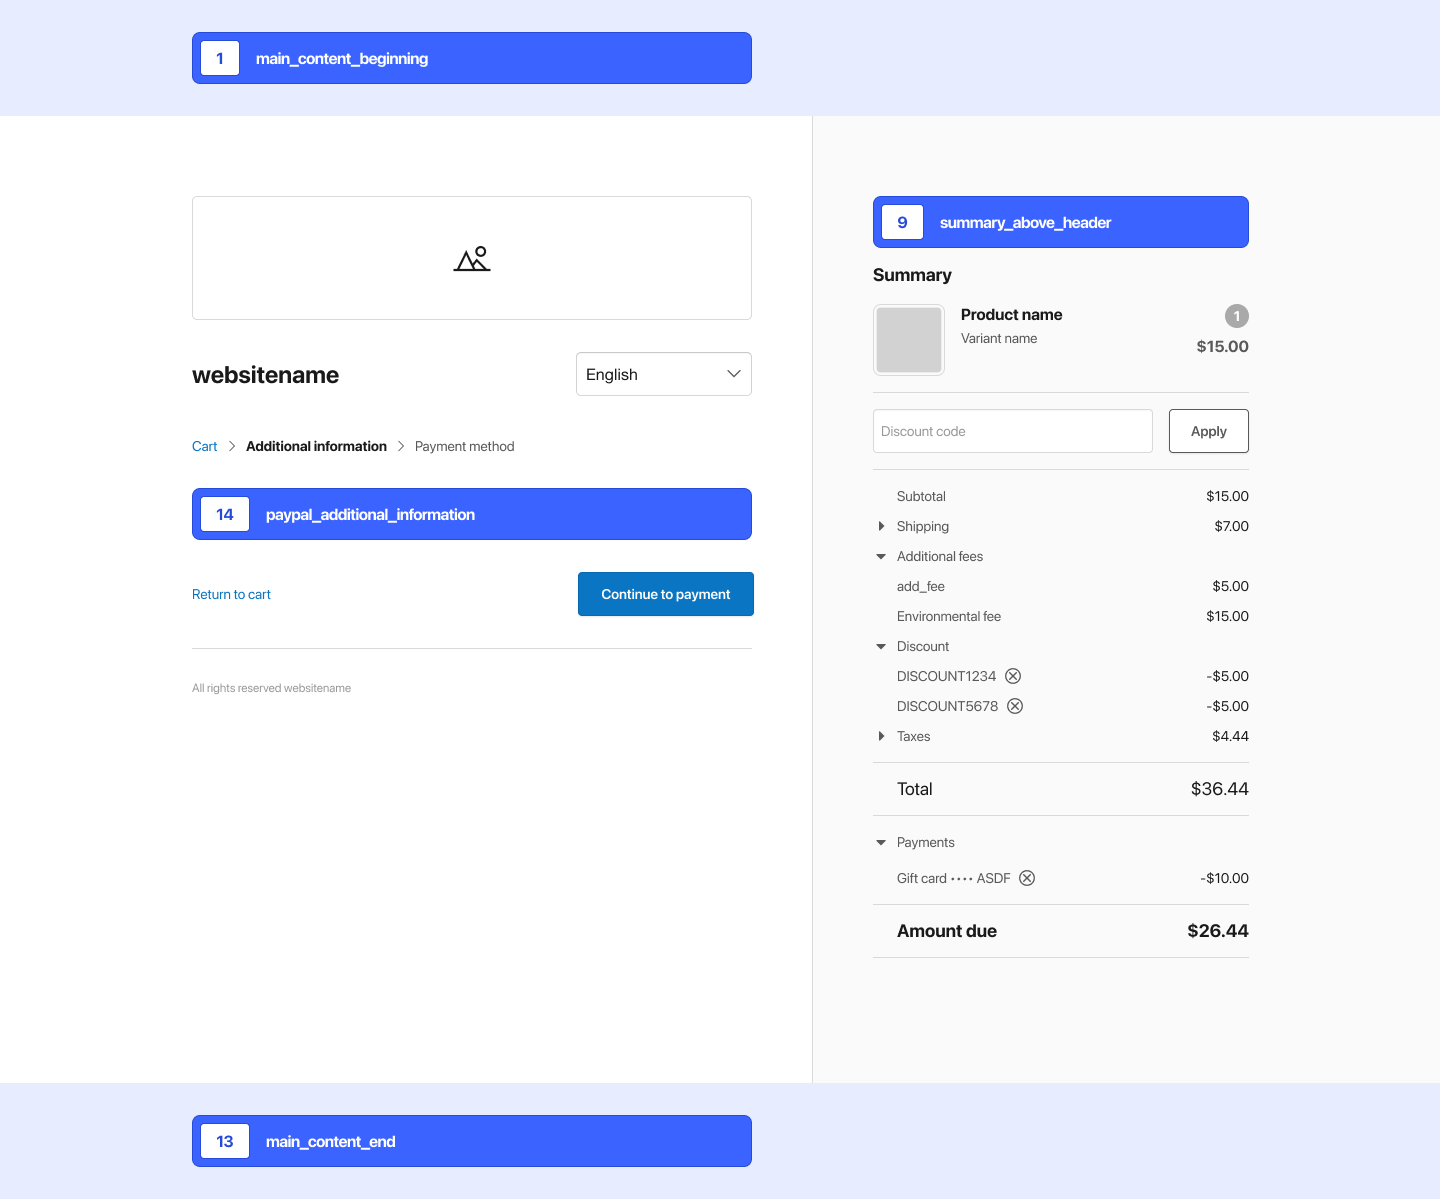
- At the top of the page —
main_content_beginning - Above the customer info section —
customer_info - Below the shipping address section —
shipping - Below the billing address section —
billing_address_after - Below the shipping method section —
shipping_lines - Above the payment method section —
payment_method_above - Below the payment method section —
payment_gateway - At the bottom of the main page, below the button to continue checkout —
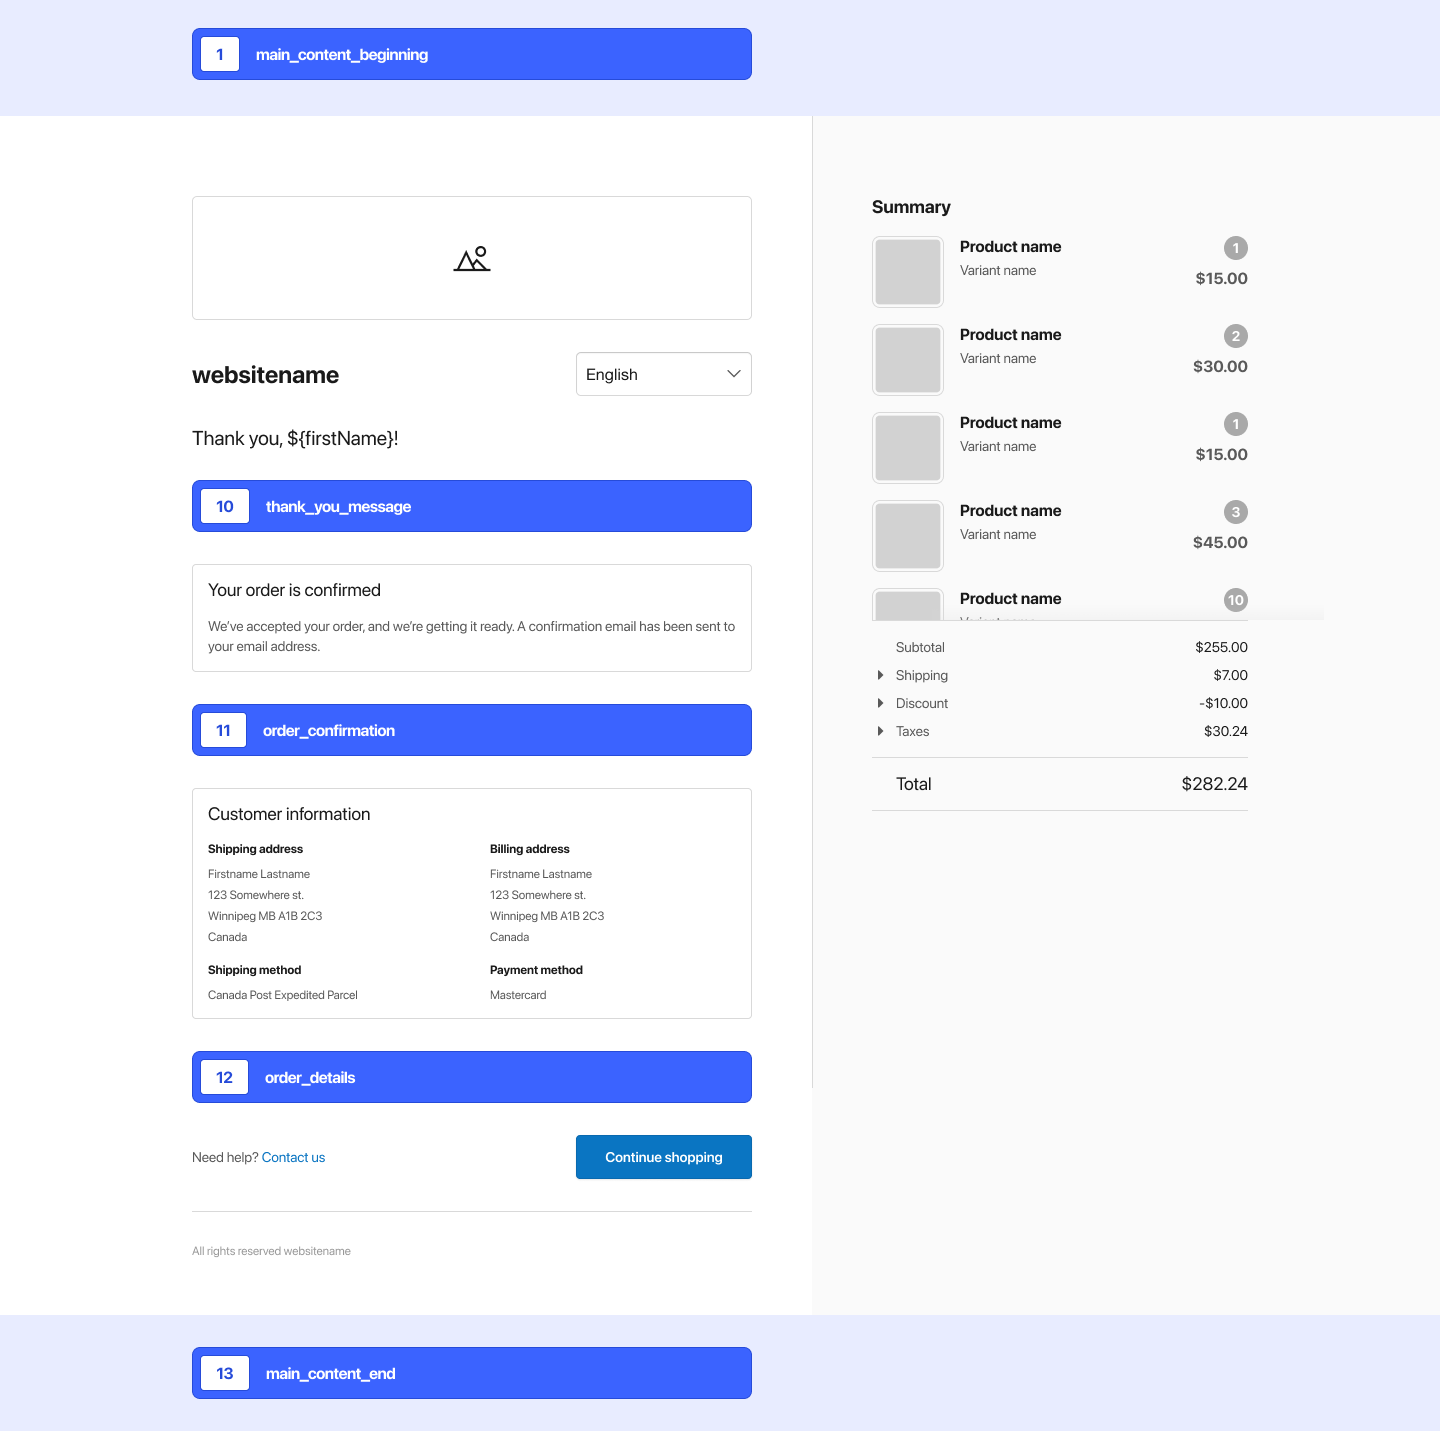
below_actions - At the top of the summary sidebar —
summary_above_header - On the thank you page, below the thank you message —
thank_you_message - On the thank you page, below the order confirmation message —
order_confirmation - On the thank you page, below the order details —
order_details - At the bottom of the page —
main_content_end - (PayPal Checkout Flow only) On the additional information page —
paypal_additional_information
One page checkout
Expand the following section to find a screenshot that shows these anchor locations on the one page checkout experience:
One page checkout
Three page checkout
Expand the following section to find screenshots that show these anchor locations on the three page checkout experience:
Thank you page
Both the one page checkout and the three page checkout have the same anchor locations on the thank you page. Expand the following section to find a screenshot that shows these anchor locations:
Thank you page
(PayPal Checkout Flow only) Additional information page
If you are using the PayPal Checkout Flow, you can use the paypal_additional_information anchor location. Adding an element in this location creates an Additional information page, between the Cart and Payment method pages, that contains your desired element.
If the paypal_additional_information anchor location is not used, then the Additional information page does not appear to the shopper.
Expand the following section to find a screenshot that shows this anchor location:
Additional information page
Add a LiFE element
Use the Create Element endpoint to add an element to the checkout experience on your store. This section includes several examples of how to do so.
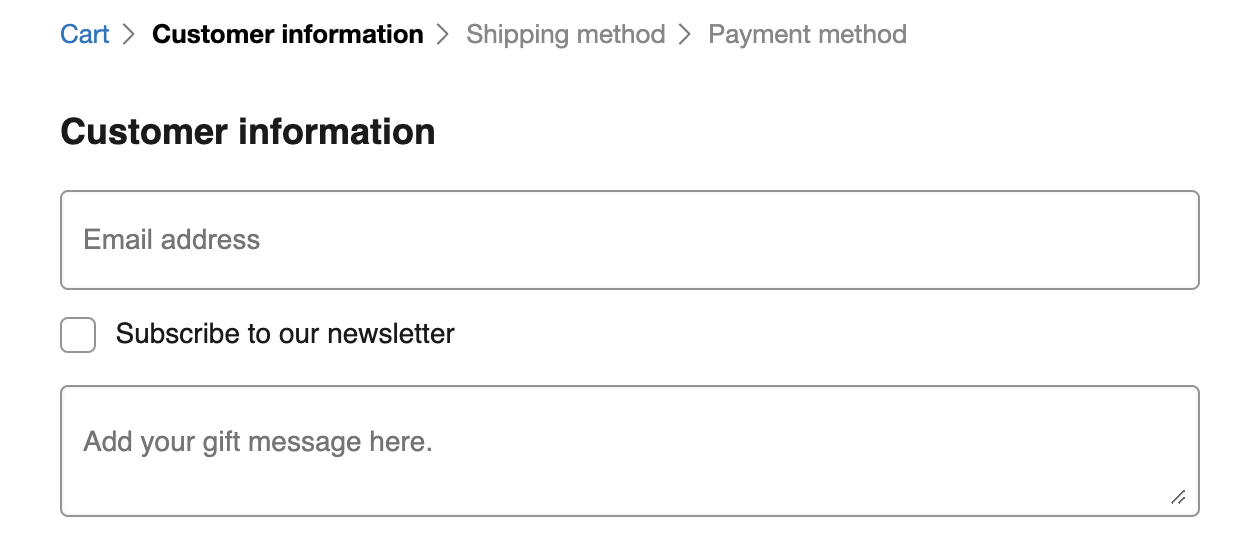
Text area example
The following cURL snippet shows an example of how to add a text area that enables the shopper to add a gift message to their order:
curl --request POST 'https://api.boldcommerce.com/checkout/shop/{shop_identifier}/life_elements' \
     --header 'Authorization: Bearer {API Access Token}' \
     --header 'Bold-API-Version-Date: 2022-05-01' \
     --header 'Content-Type: application/json' \
     --data '{
         "location": "customer_info",
         "input_type": "textarea",
         "input_label": "Gift message",
         "input_placeholder": "Add your gift message here.",
         "input_required": true,
         "meta_data_field": "gift_message",
         "order_asc": 1
     }'
The following screenshot shows the resulting change to the user interface:
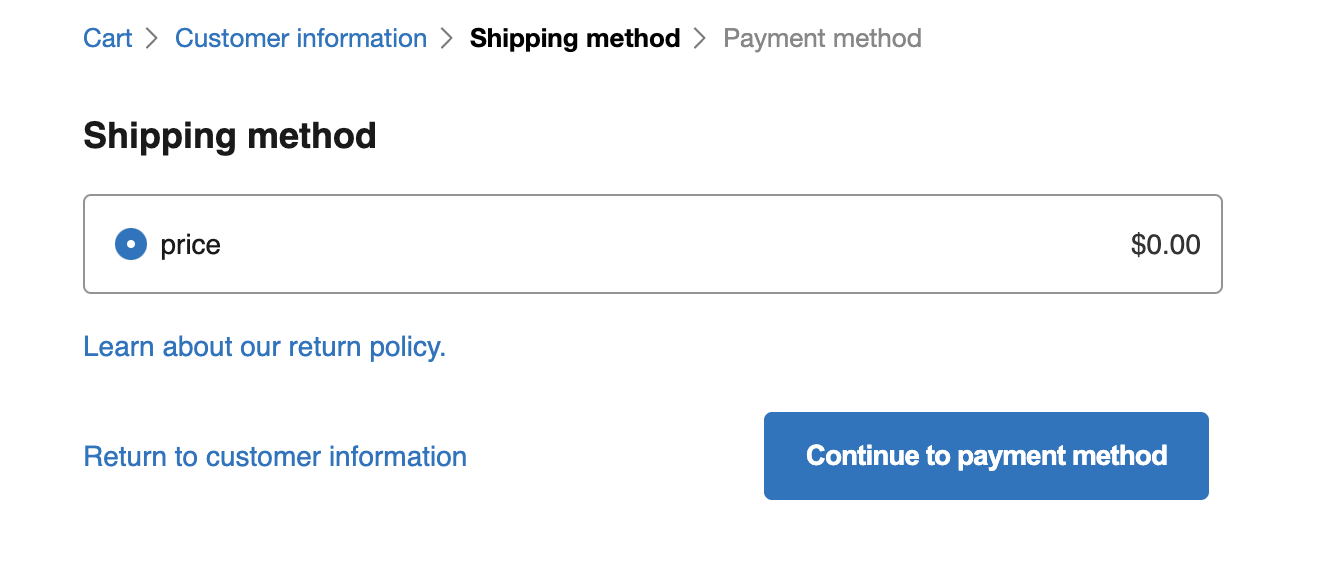
HTML example
The following cURL snippet shows an example of how to add a link to the store's return policy using the HTML element:
curl --request POST 'https://api.boldcommerce.com/checkout/shop/{shop_identifier}/life_elements' \
     --header 'Authorization: Bearer {API Access Token}' \
     --header 'Bold-API-Version-Date: 2022-05-01' \
     --header 'Content-Type: application/json' \
     --data '{
         "location": "shipping_lines",
         "input_type": "HTML",
         "input_default": "<a href='https://example.com/return-policy'>Learn about our return policy.</a>",
         "input_required": false,
         "meta_data_field": "return_policy",
         "order_asc": 1
     }'
The following screenshot shows the resulting change to the user interface:
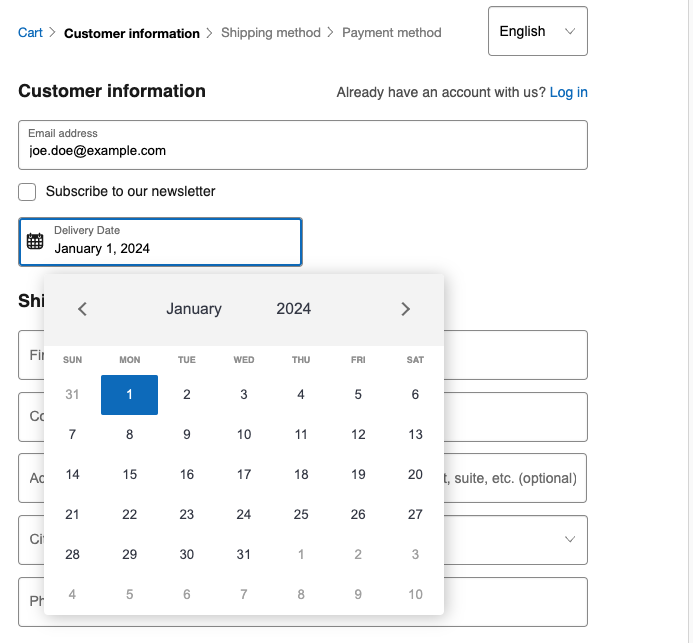
Date picker example
The following cURL snippet shows an example of how to add a date picker element:
curl --request POST 'https://api.boldcommerce.com/checkout/shop/{shop_identifier}/life_elements' \
     --header 'Authorization: Bearer {API Access Token}' \
     --header 'Bold-API-Version-Date: 2022-05-01' \
     --header 'Content-Type: application/json' \
     --data '{
         "location": "customer_info",
         "input_type": "datepicker",
         "input_label": "Delivery Date",
         "input_default": "2024/01/01",
         "input_required": true,
         "meta_data_field": "delivery_date",
         "order_asc": 1
     }'
The following screenshot shows the resulting change to the user interface:
Bold adds metadata to order
When the page with the LiFE element loads, a new metadata field is added to the order. The field is named with the meta_data_field value provided in the Create Element request. On page load, the field key is the input_default, and the field value is updated with the input value after shopper interaction.
Metadata is not added to the order for HTML LiFE elements, because it does not necessarily require user interaction.
Consider the text area example used earlier in this document. In this example, when the page loads, Bold Checkout updates the order_meta_data in the application_state. Since this example has no input_default, the value is left empty, and the order_meta_data object looks like the following:
"order_meta_data": {
  "cart_parameters": {},
  "note_attributes": {
    "gift_message": ""
  },
  "notes": "",
  "tags": []
}
After the shopper interacts with the text area, the order_meta_data is updated to include the shopper input:
"order_meta_data": {
  "cart_parameters": {},
  "note_attributes": {
    "gift_message": "Happy birthday! Hope you enjoy the gift."
  },
  "notes": "",
  "tags": []
}
You can retrieve the order metadata at any point using the List Order Metadata endpoint.
(Optional) Perform regular expression (regex) validation
For text and textarea element types, you can also configure the LiFE elements to perform regular expression (regex) validation. When calling Create Element, provide your validation rules in the input_regex field.
When configured, Bold Checkout evaluates the shopper input at the following points:
- Upon shopper interaction
- Upon button click (to advance to the next page)
If the shopper input fails the regex validation, the frontend displays a warning message and prevents the user from proceeding. The error message reads {input_label} is invalid.
For example, assume the following:
- The
input_labelis set to"Shipping note". - The
input_regexis set to"^[a-z]{4,100}$", meaning that the input must contain between four and 100 lower case letters. - The customer attempts to proceed without filling in the field.
Then the customer would see the following error:

LiFE and Checkout API overrides
Combined with API overrides, you can use LiFE elements to make changes to the order state.
For example, if you want to support tax-exempt customers, use the following steps:
-
Create a
checkboxLiFE element that appears at the end of the checkout.- The command might look something like this:
curl --request POST 'https://api.boldcommerce.com/checkout/shop/{shop_identifier}/life_elements' \
     --header 'Authorization: Bearer {API Access Token}' \
     --header 'Bold-API-Version-Date: 2022-05-01' \
     --header 'Content-Type: application/json' \
     --data '{
         "location": "payment_gateway",
         "input_type": "checkbox",
         "input_label": "Tax Exemption",
         "input_default": "false",
         "input_placeholder": "Check this box if you are a tax-exempt customer.",
         "input_required": false,
         "meta_data_field": "tax_exempt",
         "order_asc": 1
     }'
- The command might look something like this:
-
When a shopper clicks the checkbox, their order metadata is updated to include the following:
"order_meta_data": {
  "cart_parameters": {},
  "note_attributes": {
    "tax_exempt": true
  },
  "notes": "",
  "tags": []
} -
Each time taxes are calculated, Bold triggers a tax override request.
-
The merchant can then check for the presence of the
"tax_exempt": truemetadata and choose to update the tax calculation. The merchant then returns the new tax values in the tax override response.
This functionality is not supported on Magento 1 or Adobe Commerce stores.