Initialize, Populate, and Process a Checkout Order
When a customer is ready to check out, you can kick off the checkout process by initializing an order. The request body of this endpoint is flexible — you can leave it blank and populate it later, or use dynamic data from the platform to provide information about the cart and customer.
This page leads you through the process of initializing, populating, and processing an order through the following API calls:
- Initialize the order
- Add items
- Add a guest or authenticated customer
- Set the shipping address
- Set the shipping line
- Set the billing address
- Apply a discount, if applicable
- Generate taxes
- Get the iframe
- Process the order
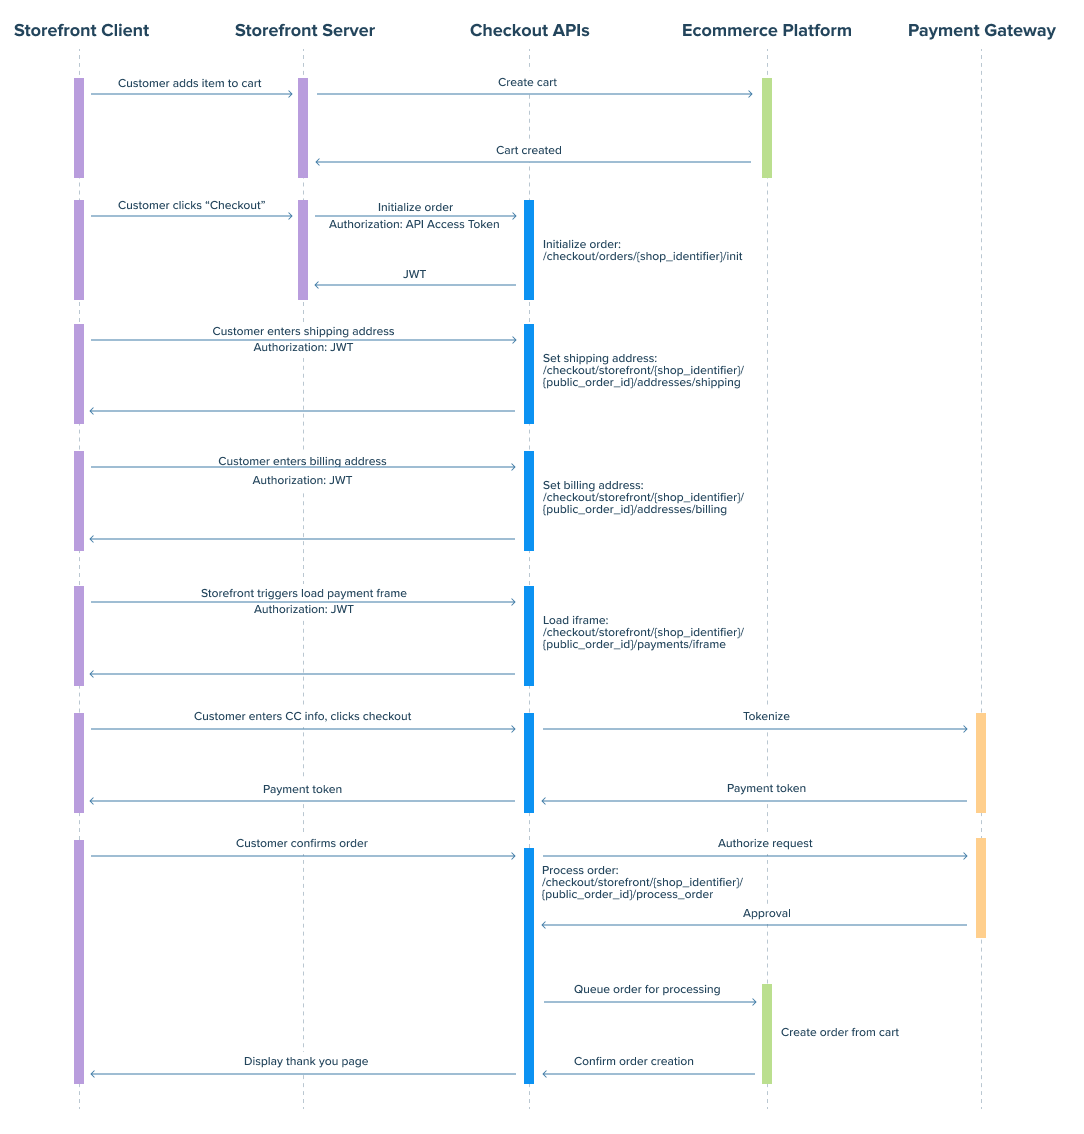
- There are various ways to call the Checkout Frontend API based on your business logic and checkout requirements. The instructions presented on this page are simply one recommendation.
The following diagram shows a simplified example of how these calls might pass between the storefront and Bold Checkout:
Prerequisites
Before you get started, complete the steps outlined in the Checkout Getting Started guide.
Initialize the order
When a customer clicks “Buy now”, “Checkout”, or any action that triggers the creation of a checkout page, the following steps are executed within the backend application:
- (Optional) Receive cart information from the ecommerce platform.
- (Optional) Authenticate the user.
- Use the Bold Checkout Backend API to initialize an order.
- Return the cart state to the frontend application in order to render the checkout.
These steps must be completed in your backend application because the Initialize Order endpoint returns information that is not safe to share with the frontend, so it is important to make these calls from a controlled environment.
The following sections contain instructions for completing each of these actions.
(Optional) Load dynamic cart data
The Initialize Order endpoint allows you to provide cart data through the cart_items object. This object can be left empty, explicitly defined, or populated with dynamic data.
The methods for retrieving dynamic data to populate the request vary between platforms. You can retrieve a cart object or cart ID from your platform, which both allow you to populate the request body with the current customer's cart contents.
You can also add items to the cart later in the order lifecycle.
(Optional) Authenticate users
If your store allows customers to log in to previously-created accounts, your backend application must verify the customer's identity while checking out.
The Initialize Order endpoint can accept a customer object in the request body. If the customer is logged in, use your platform's functionality to identify the customer checking out and verify this user is registered within your app. You can then use information from your platform, such as the platform_id of the customer, to construct a customer object and pass it to the Initialize Order endpoint.
For example, BigCommerce provides a Get Current Customer endpoint, which returns a JWT signed with your API access token. You can pass the JWT to your backend application and verify it matches your platform JWT, and determine the customer ID.
If you determine that the customer is not logged in, you can treat the checkout as a guest checkout and omit the customer object from the Initialize Order request body.
You can also add an authenticated customer later in the order lifecycle.
Call the Initialize Order endpoint
Call the Initialize Order endpoint of the Checkout Backend API to begin the checkout process.
The JSON response to this call contains important information about the new order, including:
-
initial_data— a set of data about the store the order was created on. -
application_state— all of the information that Bold Checkout has about the order. If no initial data was provided, all values will be empty. -
jwt_token— a JSON Web Token (JWT) that authenticates the user’s checkout session.noteThe
jwt_tokenmust be used in theAuthentication: Bearerheader for all calls to the Checkout Frontend API. This token is valid for 60 minutes, after which it must be refreshed using the Resume Order endpoint. -
public_order_id— a string used to keep track of the order and refresh the JWT if necessary.
Render the checkout
After you call the Initialize Order endpoint, you can display the checkout page to the customer. Because the Bold Checkout APIs are headless, you can do this via whatever frontend interface you would like.
Add items
If you chose not to dynamically load cart data when you initialize an order, you can manually add line items to the order via the Add Line Item endpoint.
- This endpoint requires either the
skuorplatform_id(also known asplatform_variant_id) of the product to be added. These values can be found by calling any endpoint that deals with products or their variants, such as the List Product Variants endpoint. - The
line_item_keyis a user-defined unique identifier for each line item in the order. After you add the product to the order, you can later manipulate the line item using endpoints such as Update Line Item.
The following cURL command demonstrates how to add an item to the order with this endpoint:
curl --request POST 'https://api.boldcommerce.com/checkout/storefront/{shop_identifier}/{public_order_id}/items' \
     --header 'Authorization: Bearer {JWT}' \
     --header 'Bold-API-Version-Date: 2022-05-01' \
     --header 'Content-Type: application/json' \
     --data '{
         "platform_id": "71",
         "sku": "CLC",
         "quantity": 1,
         "line_item_key": "key1"
     }'
Add customer
If a customer is logged in when they enter the checkout flow, you can authenticate their identity using your platform and include their information in the Initialize Order request body.
However, if the customer does not have an account with your store or logs in later in the process, you can add a customer to an existing order. The following sections show you how to add a guest or authenticated customer after the order has already been created.
Add a guest customer
The following cURL command demonstrates a call to the Add Guest Customer endpoint:
curl --request POST 'https://api.boldcommerce.com/checkout/storefront/{shop_identifier}/{public_order_id}/customer/guest' \
     --header 'Authorization: Bearer {JWT}' \
     --header 'Bold-API-Version-Date: 2022-05-01' \
     --header 'Content-Type: application/json' \
     --data '{
         "first_name": "John",
         "last_name": "Doe",
         "email_address": "[email protected]",
         "accepts_marketing": true
     }'
Add an authenticated customer
The following cURL command demonstrates a call to the Add Authenticated Customer endpoint. You can retrieve the customer's information from the platform or alternate user management system your store uses.
curl --request POST 'https://api.boldcommerce.com/checkout/orders/{shop_identifier}/{public_order_id}/customer/authenticated' \
     --header 'Authorization: Bearer {JWT}' \
     --header 'Bold-API-Version-Date: 2022-05-01' \
     --header 'Content-Type: application/json' \
     --data '{
         "first_name": "Jane",
         "last_name": "Doe",
         "email_address": "[email protected]",
         "platform_id": "string",
         "public_id": "string",
         "accepts_marketing": true,
         "saved_addresses": [
             {
                 "first_name": "Jane",
                 "last_name": "Doe",
                 "address_line_1": "50 Fultz Blvd",
                 "address_line_2": "",
                 "province": "Manitoba",
                 "city": "Winnipeg",
                 "country_code": "CA",
                 "country": "Canada",
                 "province_code": "MB",
                 "postal_code": "R3Y0L6",
                 "business_name": "",
                 "phone_number": "800-555-0100"
             }
         ]
     }'
If the customer is authenticated and has a saved address, you can populate their saved address in the UI and ask them to confirm the accuracy of the address. If they confirm it, you can then add the saved address as a shipping or billing address.
Set the shipping address
Next, call the Set Shipping Address endpoint. Complete this step before adding a shipping line and calculating taxes.
The following cURL command demonstrates how to make this call:
curl --request POST 'https://api.boldcommerce.com/checkout/storefront/{shop_identifier}/{public_order_id}/addresses/shipping' \
     --header 'Authorization: Bearer {JWT}' \
     --header 'Bold-API-Version-Date: 2022-05-01' \
     --header 'Content-Type: application/json' \
     --data '{
         "first_name": "John",
         "last_name": "Doe",
         "address_line_1": "50 Fultz Blvd",
         "address_line_2": "",
         "province": "Manitoba",
         "city": "Winnipeg",
         "country_code": "CA",
         "country": "Canada",
         "province_code": "MB",
         "postal_code": "R3Y0L6",
         "business_name": "",
         "phone_number": "800-555-0101"
     }'
Set the shipping line
Shipping lines represent shipping methods that are available to your customers. You can configure shipping lines in the Bold Checkout app by navigating to Shipping, then Shipping Zones.
Call the List Shipping Lines endpoint to determine the shipping lines that are available to your customer based on the shipping address they previously entered.
The following cURL command demonstrates a call to this endpoint:
curl --request GET 'https://api.boldcommerce.com/checkout/storefront/{shop_identifier}/{public_order_id}/shipping_lines' \
     --header 'Authorization: Bearer {JWT}' \
     --header 'Bold-API-Version-Date: 2022-05-01'
Calling this endpoint populates the available_shipping_lines object in the order's application_state object.
If there is only one available shipping line, the selected_shipping object automatically populates with the shipping line details and you can skip the remainder of this section.
When the customer selects how they would like their item to be shipped, use the index of the chosen shipping line to call the Set Shipping Line endpoint.
The following cURL command demonstrates how to select the shipping line at an index of 0:
curl --request POST 'https://api.boldcommerce.com/checkout/storefront/{shop_identifier}/{public_order_id}/shipping_lines' \
     --header 'Authorization: Bearer {JWT}' \
     --header 'Bold-API-Version-Date: 2022-05-01' \
     --header 'Content-Type: application/json' \
     --data '{
         "index": "0"
     }'
Set the billing address
Next, call the Set Billing Address endpoint.
You might choose to include a checkbox that a customer can mark to indicate that their shipping and billing addresses are the same. If the customer marks the box, trigger the Set Billing Address endpoint using the address you previously collected.
The following cURL command demonstrates an example of making this call:
curl --request POST 'https://api.boldcommerce.com/checkout/storefront/{shop_identifier}/{public_order_id}/addresses/billing' \
     --header 'Authorization: Bearer {JWT}' \
     --header 'Bold-API-Version-Date: 2022-05-01' \
     --header 'Content-Type: application/json' \
     --data '{
         "id": "12",
         "first_name": "John",
         "last_name": "Doe",
         "address_line_1": "50 Fultz Blvd",
         "address_line_2": "",
         "province": "Manitoba",
         "city": "Winnipeg",
         "country_code": "CA",
         "country": "Canada",
         "province_code": "MB",
         "postal_code": "R3Y0L6",
         "business_name": "",
         "phone_number": "800-555-0102"
     }'
Add a discount code
The Checkout Frontend API enables you to validate, apply, or delete a discount code that was configured in the Bold Checkout admin. Skip this step if your store does not have any discount codes or does not support them.
(Optional) Check validity
While you are not required to check the validity of a discount code before you apply it, this step is useful if you want to implement custom error handling in a complicated discount code scenario. The Validate Discount Code endpoint performs this validation.
This endpoint does not apply the discount code, only checks that it is valid.
If the code is valid, the API returns an empty data array. If the discount code is not valid, the API returns the following error:
{
  "errors": [
    {
      "code": "02",
      "type": "discount_code.discount_validation",
      "message": "Could not find Discount: BFCM30"
    }
  ]
}
Apply the discount code
Apply the code to the order using the Add Discount Code endpoint. The following cURL command demonstrates an example of this call:
curl --request POST 'https://api.boldcommerce.com/checkout/storefront/{shop_identifier}/{public_order_id}/discounts' \
     --header 'Authorization: Bearer {JWT}' \
     --header 'Bold-API-Version-Date: 2022-05-01' \
     --header 'Content-Type: application/json' \
     --data '{
         "code": "BFCM20"
     }'
Generate taxes
After you collect the customer's address and apply any price changes, calculate the applicable taxes. You cannot submit an order to be processed without first calling this endpoint and generating taxes.
Configure your tax settings in the Bold Checkout app by clicking Payment Options, then Tax Settings. For more information, refer to Set up Tax Settings in Bold Checkout.
When you are ready to calculate an order's taxes, call the Generate Taxes endpoint. The following cURL snippet shows an example of that call:
curl --request POST 'https://api.boldcommerce.com/checkout/storefront/{shop_identifier}/{public_order_id}/taxes' \
     --header 'Authorization: Bearer {JWT}' \
     --header 'Bold-API-Version-Date: 2022-05-01'
Taxes are not recalculated automatically. If you make any changes to the shipping address (through Update Shipping Address or Delete Shipping Address) after you initially generate taxes, you must call the Generate Taxes endpoint again to recalculate the taxes. Failing to do so could result in charging customers for taxes inaccurately.
Initialize SPI and add payment
Bold uses a Secure Payments Interface (SPI) to isolate customer payment information from the rest of the site. This information is displayed in an <iframe> on a customer-facing page.
You must generate a new instance of the SPI for each order using a shop_identifier, public_order_id, and jwt.
After the customer enters their payment information and confirms it, you must capture the payment information using the PIGI_ADD_PAYMENT action.
For example, the following JavaScript snippet shows how you might take the information captured in the <iframe> and add a payment to the order:
const iframeElement = document.querySelector("iframe#SPI");
const iframeWindow = iframeElement.contentWindow;
const action = { actionType: "PIGI_ADD_PAYMENT" };
iframeWindow.postMessage(action, "*");
A full list of SPI actions and responses can be found in the SPI API reference.
Process order
When the customer indicates that they are ready to complete the order, call the Process Order endpoint. This call triggers the backend processing of the order.
When this command is called, Bold Checkout checks to ensure all components of the order are valid, including the following:
- Taxes are calculated.
- Inventory is still available for the chosen products.
- Payment(s) are authorized.
- Discounts are finalized and officially applied.
If each of these checks passes, Bold Checkout sends the order to the platform to be processed there. If one of these checks does not pass, the endpoint returns an error with a message indicating which step failed.
The following cURL command demonstrates an example of a call to process an order:
curl --request POST 'https://api.boldcommerce.com/checkout/storefront/{shop_identifier}/{public_order_id}/process_order' \
     --header 'Authorization: Bearer {JWT}' \
     --header 'Bold-API-Version-Date: 2022-05-01'
This command adds a payments object to the application_state object. Note that value of the status key is paid, but that the transactions list is empty.
The following snippet shows an example of the payments object:
"payments": [
    {
        "value": 5400,
        "amount": 54,
        "lineText": "1111",
        "tag": "Credit",
        "driver": "stripe",
        "merchant_account": "Stripe",
        "gateway_id": 35212,
        "step": "preAuthed",
        "token": "cus_Kn0z9EBAiVxo2f",
        "currency": "CAD",
        "id": "ch_3K7QycC6rJ6JeBJ015WC5hb8",
        "transaction_token": "ch_3K7QycC6rJ6JeBJ015WC5hb8",
        "brand": "Visa",
        "is_customer": false,
        "public_payment_method_id": null,
        "key": "PaymentByCreditCard:PaymentService;Final:91000",
        "status": "paid",
        "transactions": [],
        "is_eligible_for_app_fee": true,
        "has_app_fee_been_collected": false,
        "application_fee_charged": 54,
        "application_fee_tier_id": 25,
        "order_to_bold_exchange_rate": 1.27864,
        "order_to_bold_currency_id": 1,
        "tier_id": 0,
        "order_payment_type_id": 1,
        "additional_information": "",
        "initial_recurring_charge": false,
        "recurring_charge": false,
        "bold_customer_id": 23317222,
        "sequence_number": 1,
        "successful_preauth": true,
        "message": "",
        "error_details": [],
        "created_at": "2021-12-16 20:54:03.305734",
        "single_use_token": "tok_1K7QxhC6rJ6JeBJ0EgFwRoBI",
        "is_3ds_enabled": false,
        "client_secret": "",
        "idempotent_key": "",
        "first_four_digits": "",
        "bin": "",
        "expiry": "",
        "gateway_transaction_no": "",
        "avs_result": "",
        "cvd_result": "",
        "transaction_time": "205459",
        "transaction_date": "20211216",
        "reference_num": "",
        "txn_time": "",
        "authorization_code": "ch_3K7QycC6rJ6JeBJ015WC5hb8",
        "extra_payment_data": {
            "cof": "none"
        }
    }
]
Call the Get Application State endpoint to see the transactions list populate with data, as you can see in the following example:
"transactions": [
    {
        "transaction_id": "2_0",
        "payment_transactions": [
            "2_0_0"
        ]
    }
]
Next steps
Once the you populate and process the order, you can proceed to fulfill it — for more information, refer to Fulfill an Order.