Integrate the Secure Payments Interface
The Secure Payments Interface (SPI) was previously named the Payment Isolation Gateway Interface (PIGI).
A Secure Payments Interface (SPI) is the UI a customer uses to input their payment information and add a payment to an order. The SPI was created to isolate customer payment information from everything else that could be happening during a checkout experience to increase security involving the customer’s payment information.
Your store creates and updates an order using the Checkout Backend API. After the order is created, display the SPI in an <iframe> tag to allow the customer to input their payment information. Use the Window.postMessage() method to send actions to the SPI, and the SPI responds in a similar manner.
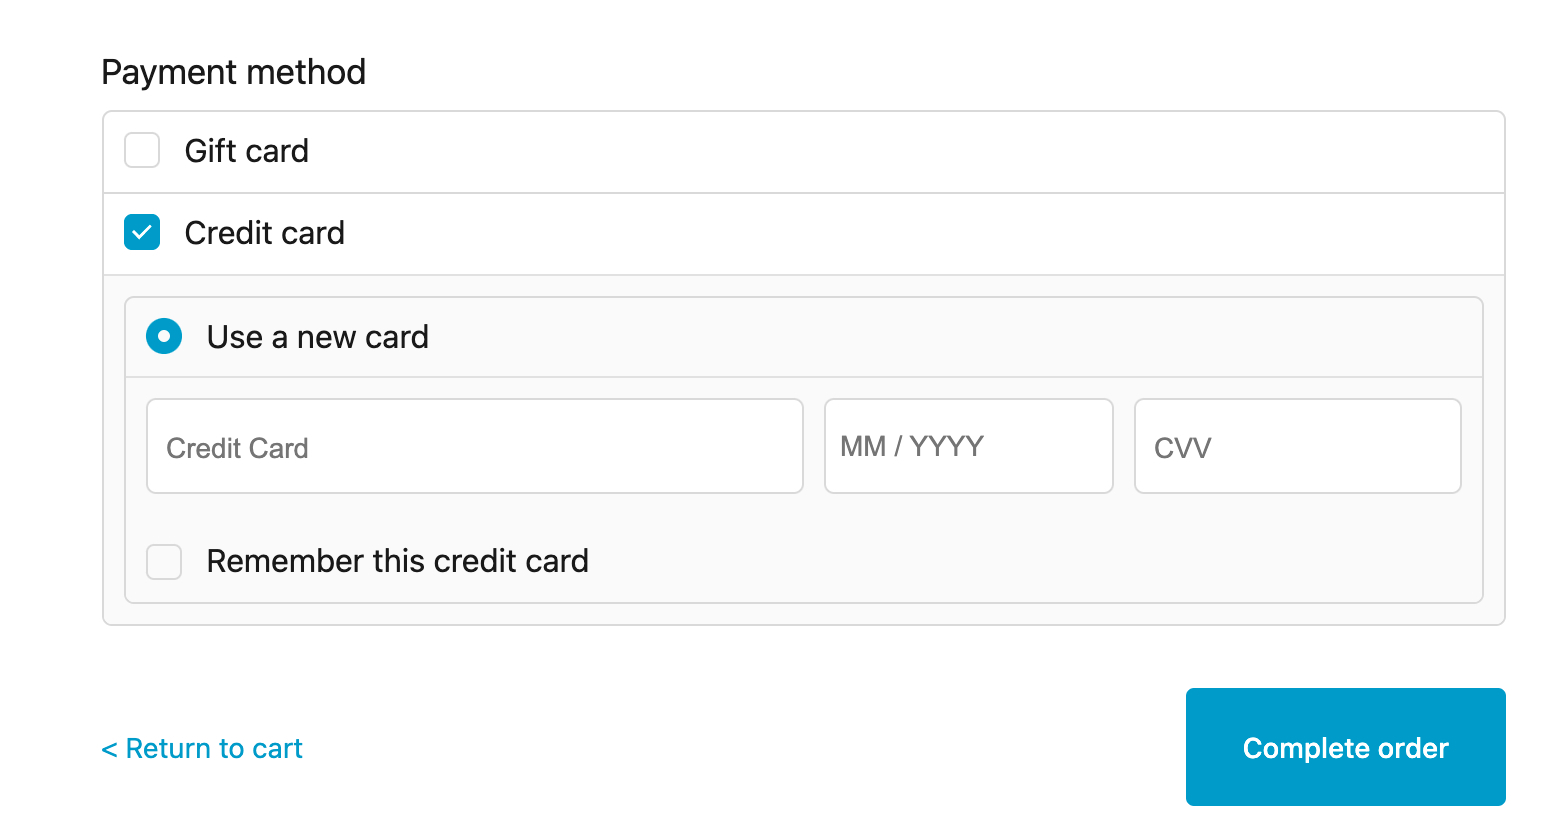
The following image shows an example of the SPI in a user interface:
Getting the URL for SPI
In order to embed the SPI in a page, create an <iframe> tag. Make a call to the Checkout Frontend API within the src attribute of this tag.
You need the following information in order to retrieve the SPI and load it into the <iframe>:
shop_identifier— Your store's shop identifier. Retrieved by calling the Get Shop Info endpoint.public_order_id— The ID of order. Retrieved by calling the Initialize Order endpoint.jwt— The JSON Web Token of the order. Retrieved by calling the Initialize Order endpoint or the Resume Order endpoint if the JWT expires.
The following snippet shows how to use these parameters in an <iframe> tag to load the SPI. Replace the variables (surrounded by brackets) with your own store and order information.
<iframe
  id="SPI"
  src="https://api.boldcommerce.com/checkout/storefront/{shop_identifier}/{public_order_id}/payments/iframe?token={jwt}"
/>
Sending Actions to SPI
The SPI uses Window.postMessage() to communicate between the <iframe> window and its parent.
The following snippet shows an example of sending an action to the SPI:
const iframeElement = document.querySelector("iframe#SPI");
const iframeWindow = iframeElement.contentWindow;
const action = { actionType: "PIGI_ADD_PAYMENT" };
iframeWindow.postMessage(action, "*");
For a list of actions that can be sent to the SPI, refer to the SPI API Reference.
Receiving Responses from SPI
The SPI responds to actions in a similar fashion to how actions are sent to the SPI. For example, in response to the actionType of PIGI_ADD_PAYMENT, SPI responds with a responseType of PIGI_ADD_PAYMENT along with a payload.
The following snippet shows an example of listening for a response from the SPI:
window.addEventListener("message", ({ data }) => {
  const type = data.responseType;

  if (type) {
    switch (type) {
      case "PIGI_INITIALIZED":
        initCallback(data.payload);
        break;
      case "PIGI_REFRESH_ORDER":
        refreshOrderCallback(data.payload);
        break;
      case "PIGI_ADD_PAYMENT":
        addPaymentCallback(data.payload);
        break;
    }
  }
});
For a list of responses that can be received from the SPI, refer to the SPI API Reference.
Handling Strong Customer Authentication (SCA)
If the merchant and customer are both located in Europe, you may be required to complete additional verification of the customer's identity to comply with Strong Customer Authentication (SCA). Bold completes this authentication using 3D Secure (3DS) technology, which is displayed within the SPI iframe.
The following steps outline the process of successfully handling SCA on an order:
- The frontend calls the Process Order endpoint and receives a
202error with a request body of{"handleSCA": true}. - The frontend uses the SPI API to send a
PIGI_HANDLE_SCAaction to the SPI. - The SPI uses 3D Secure (3DS) to prompt the customer to verify their identity.
- The SPI responds to the frontend with a
PIGI_HANDLE_SCAresponse and a request body that contains a"step"value of"DISPLAYED". The frontend resizes the SPI iframe to properly display the 3DS screen. - The customer authenticates their identity.
- The SPI responds to the frontend with a
PIGI_HANDLE_SCAresponse and a request body that contains a"step"value of"COMPLETED". - The frontend retries the Process Order endpoint.
Refer to the SPI API reference for more information and best practices on handling the responses from the SPI.